Yes, you need a bug bounty VPS. Why you may ask? Well here is a list of reasons why.
Bypassing Bans
The truth of the matter is that you’ll likely get banned from sites, or even whole IP blocks, for malicious scanning and/or excessive scanning (i.e. scanning too quickly). Sure, you can likely hack away just fine on a single site manually with Burp from the comfort of your personal computer. But if you’re firing up a scanner, you better think twice. Use a VPS.
Callbacks
Sure, there are a lot of tools out there for long term callbacks like interactsh or bxss, but short term, it may be just easier to use a current server you are SSHd into. You got a blind XSS and you want to load a payload from your server to show impact? Just tail your web server logs.
If you’re behind NAT on your home network, it’s gonna be hard to connect back to a listener if you somehow got an RCE on a network.
Or maybe you have a CORS bug or Postmesssage XSS and you need to host a POC somewhere. Sure you could forward ports from your router and fiddle around all day, but trust me, it’s way easier to just fire up a $5/month box on Linode and let it run 24/7.
Vertical and Horizontal Scaling Your Bug Bounty VPS Setup
Despite what a lot of people may tell you, essentially all of the leading bug bounty hunters do some sort of mass scanning. Now, with that said, they all do it to a different degree.
Automation is especially essential if you plan on making bug bounty hunting a source of passive, steady, and significant income. But you can’t do all of that without scaling. You need to scan more things faster which requires larger instances and greater numbers of them. Eventually your lowly desktop PC cannot handle all of this work.
For this you’d want to use axiom, or similar tooling.
Experience
This is underrated. No matter if you’re a IT professional with a ‘real’ job or a beginning bug bounty hunter, experience with cloud providers is invaluable. Deploying a server on AWS, Azure, or Linode (my choice for bug hunting) is valuable experience.
So?
Yes, you need a bug bounty VPS. Just use one. They’re cheap. You can even use this link and get a $100 credit at Linode, so it’s essentially free for a while too, haha.
As mentioned in a previous post, I was the July RotM for the DoD VDP program. I decided I’d try and win again in August, despite not usually focusing on VDPs. I ended up finding RAMADDA running on an in-scope subdomain, and it looked like it had decent amount of functionality, which is always good for hacking. (update – I did not win again, lol).
RAMADDA does all sorts of stuff. It’s kind of a file repository, wiki, CMS and more all under one roof. It’s a pretty fun app. But with all that functionality comes ample opportunity for vulnerabilities. So what do I usually do first when starting in on a web application?
In this case, I Googled around and looked for all the info I could on it, including the Github and official documentation and user guide. Even if you don’t have access to source code, official documentation, user guides, manuals, and so forth are a wealth of knowledge. ALWAYS READ THE DOCS. Sometimes you’ll find just what you need – just like I did in this app.
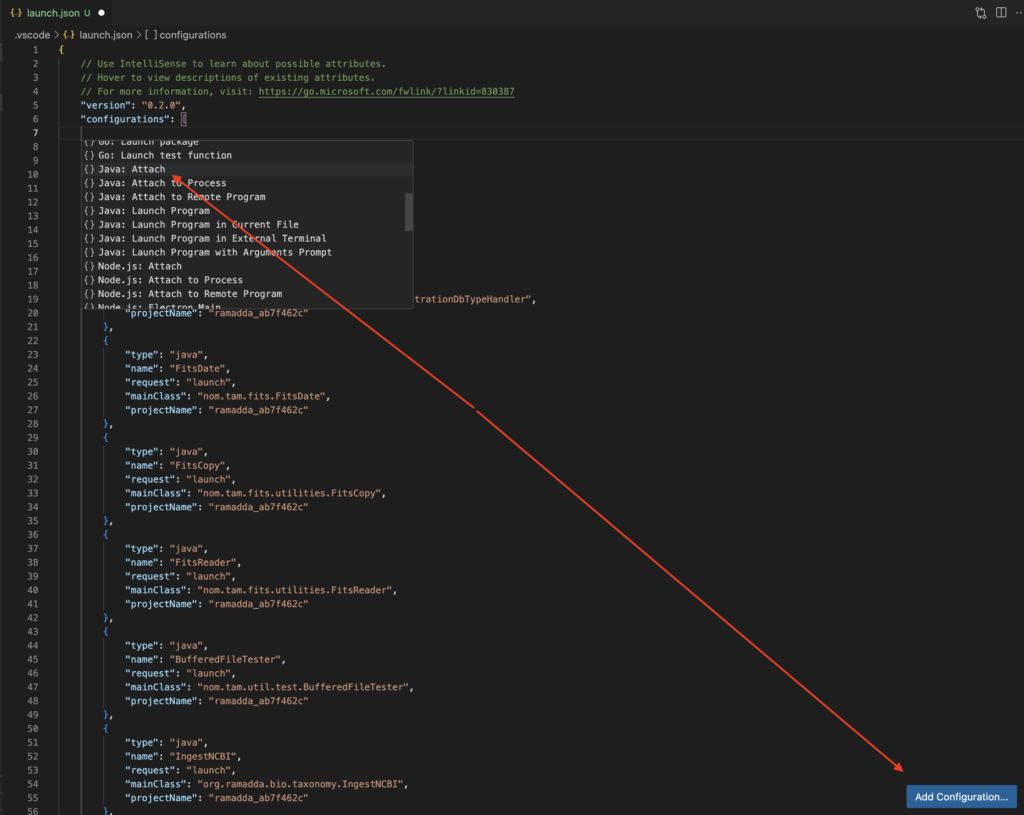
If you get so lucky as to find an open source app, or an app you can decompile properly, you need to do your best to get debugging working. Debugging will save you a tremendous amount of time throughout the hacking process, but it’ll be particularly handy when troubleshooting why your payloads aren’t working. In this case, RAMADDA is a Java app. Open the cloned ramadda directory in VSCode. Then the following command allowed RAMADDA to run in debug mode.
After running that command, the terminal window will just sit there until you attach to it. In VSCode you can click run with debugging, add a configuration, and then select Java attach.
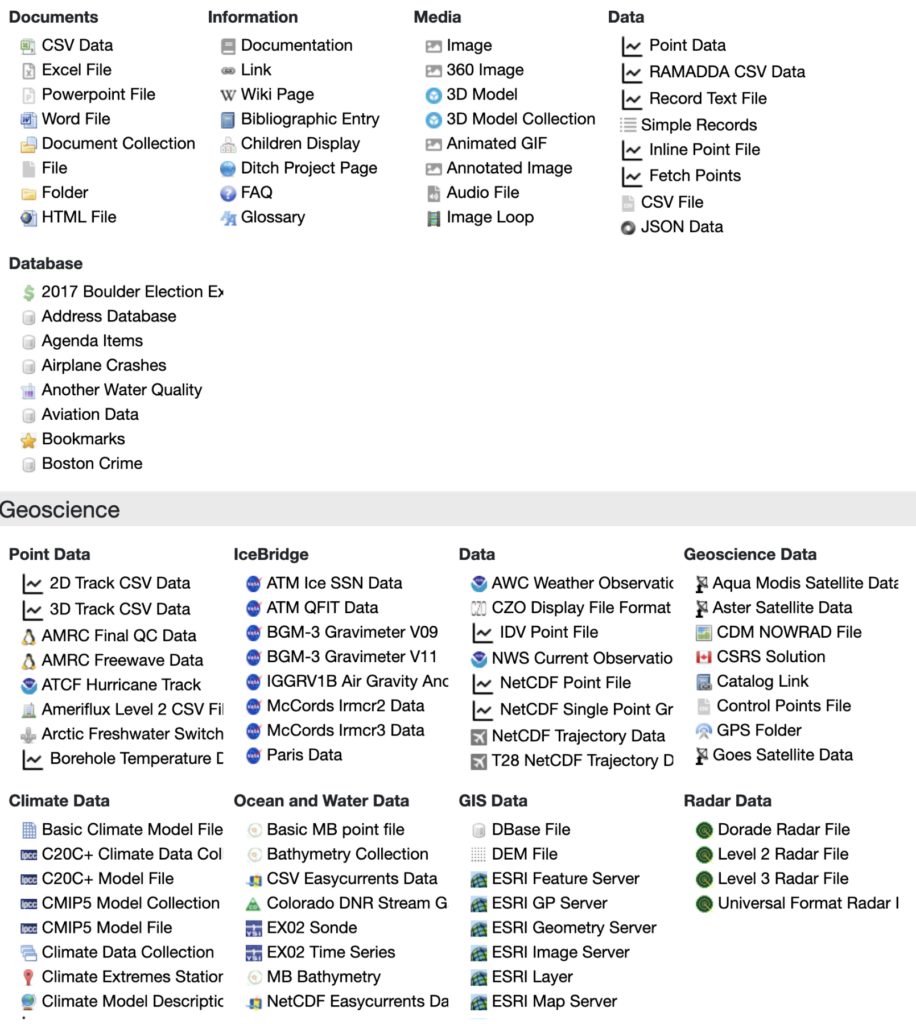
Now, if you click to the left of the line numbering, you can set a breakpoint, which will pause the program execution if it gets to that line of code. At one point during testing of this app I had probably forty breakpoints set, and I couldn’t hit any of them. It was somewhat difficult to figure out how the app operates, especially since you can upload all sorts of different types of files in this app. Here is a screenshot from the docs showing all the files you can upload, and this one looks old. There seems to be more options in the newer versions.
A lot of these files have different ways to process them – this is key in one of my exploits.
Anyway, once you’ve downloaded the code, it’s always a good idea to hit it with some sort of static analyzer. I use several, but semgrep would be a good place to start. Sometimes these apps will literally straight up find a legit bug that’ll get you some of that sweet bug bounty cash, but that’s not the norm. What they will do is point you in some interesting directions.
For example, in RAMADDA, one of the static analysis tools reported a bunch of uses of the ProcessBuilder class. ProcessBuilder is kind of the ‘better’ Runtime.exec that we’ve all seen in labs and beginner pentester courses. ProcessBuilder takes a list as input of which the first entry is the command you’re running and the rest of the list are arguments. So that’s where I started looking at the code – every ProcessBuilder in the app, but before we get to that.
Low Hanging Fruit
Generally when I first run an app, I’m proxying everything through Burp Suite and I try to hit as much functionality of the application that I can. I’m manually looking at the HTML/JS on the page. I’m also using Burp Intruder/Gobuster/FFUF to fuzz for dirs, even if I have the code of the app because I probably haven’t looked for every endpoint in the code at this point.
After a couple of hours, I manually found the following XSS.
I think I had noticed that he username was reflected onto the page when an incorrect user was entered, or something along those lines, and I ended up with the payload you see. Other payloads may work, too.
After I’ve mapped out as much of the functionality of the application that I can, I’ll run a Burp Active scan and just walk away from my computer and come back the next day. In this case, I found another XSS. Don’t sleep on active scans.
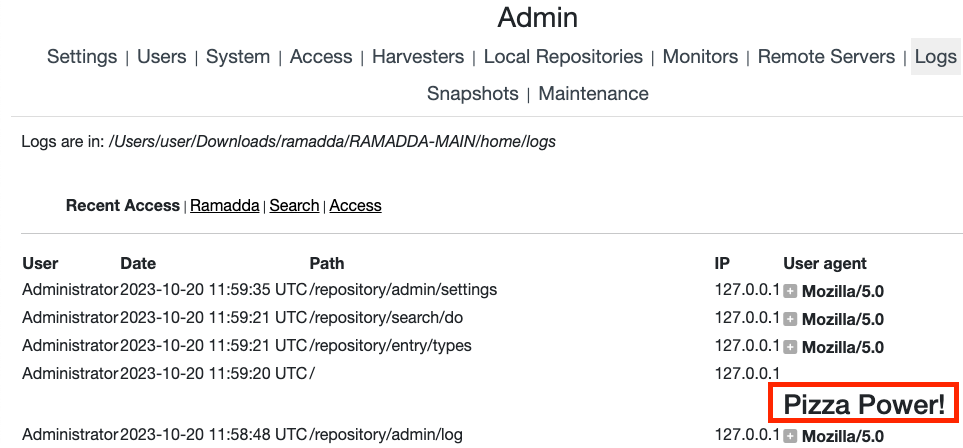
Additionally, during this first stage of testing I noticed that there was a view logs feature in the admin panel. In this panel, HTTP requests and the User-Agent are both logged. Both of those are attacker controlled. It turns out that the request URL is escaped properly, but the User-Agent wasn’t. An XSS payload in the User-Agent header would be stored in the logs which makes it an unauthenticated, stored, and blind XSS. I thought that was a good one.
Better Vulns
Nobody wants to only find XSS. What else was in this app?
Another one of the first places I look in an app is the password reset/change process. If the application doesn’t ask for the user’s password to change their password, then right there you have a great vuln that can often be chained with XSS/CSRF. It turns out this app has a CSRF-like authToken that doesn’t change and was easily obtainable.
In RAMADDA, I was able to hit an authenticated admin with one of the XSS previously mentioned, automate the changing of their password and takeover their account. In this case, a more opsec safe exploit would be to create a whole new admin account, which was also possible. Developers should always prompt for passwords when changing passwords or creating accounts in applications.
Betterer Vulns
What’s next? I want some code execution. But before that let’s talk about docs again. Part of docs are usually installation instructions. For RAMADDA, installation on an AWS Amazon Linux box is pushed hard. Something every bug bounty hunter keeps in mind when it comes to AWS EC2 instances is the forever haunting Metadata SSRF.
If you’re reading this blog post, you probably already know about this, so I’m not going to explain it, but here are somelinks. At the end of the day, it’s a SSRF that allows an attacker to steal AWS credentials, which is obviously a big issue.
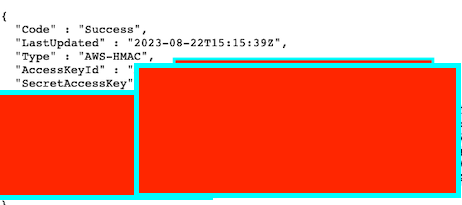
As previously mentioned, RAMADDA hosts data, so obviously a user can upload data, but one interesting thing that RAMADDA can do is download data for you. All the user has to do is put in a URL and RAMADDA will download it for you. This should set off your hacker alarms! Obviously I’m trying all sorts of things. But I’m blocked from requesting local files with different protocols etc. etc. I actually didn’t fully explore this in every spot, but I did find one particular spot in the app that allowed me to make the request and obtain the creds.
I’m a spectacular redactor.
Command Injection in a Downloadable Script
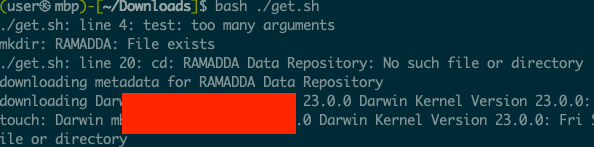
I found a fun feature that essential automatically creates a download script to download everything from the repository. I eventually figured out a way to upload a file with a specially crafted (a hacker’s favorite term) filename, that when jammed into this download script, will execute our commands. It’s just a basic command substitution payload.
$(malicious-command).txt
and here is the script to download normally, without a malicious filename>
export DOWNLOAD_COMMAND="wget  --no-check-certificate ";
export ROOT="http://localhost";
makedir() {
if ! test -e $1 ; then
	mkdir $1;
fi
}
download() {
echo "$1";
touch "$2.tmp"
${DOWNLOAD_COMMAND}  -q   -O  "$2.tmp" "$3"
if [[ $? != 0 ]] ; then
	echo "download failed url:$3"
	exit $?
fi
mv "$2.tmp" "$2"
}
makedir "RAMADDA Data Repository";
#--------------------------------------------------------------------
cd "RAMADDA Data Repository";
touch ".placeholder";
download "downloading metadata for RAMADDA Data Repository" ".this.ramadda.xml" "${ROOT}/repository/entry/show?entryid=a5d6711a-9b23-46e8-979f-1be0c7ce117b&output=xml.xmlentry";
if ! test -e "test.txt" ; then
download "downloading test.txt (0 bytes)" "test.txt" "${ROOT}/repository/entry/get/test.txt?entryid=d0ad8b0d-0a48-4d4c-b1bb-76a2d356bb13";
else
	echo "File test.txt already exists";
fi
download "downloading .test.txt.ramadda.xml" ".test.txt.ramadda.xml" "${ROOT}/repository/entry/show?entryid=d0ad8b0d-0a48-4d4c-b1bb-76a2d356bb13&output=xml.xmlentry";
makedir "Data";
#--------------------------------------------------------------------
cd "Data";
touch ".placeholder";
download "downloading metadata for Data" ".this.ramadda.xml" "${ROOT}/repository/entry/show?entryid=15c762c1-707c-4a3c-a788-06e389ef347b&output=xml.xmlentry";
cd ..;
makedir "Users";
#--------------------------------------------------------------------
cd "Users";
touch ".placeholder";
download "downloading metadata for Users" ".this.ramadda.xml" "${ROOT}/repository/entry/show?entryid=ebceaa33-341d-42e9-9562-7718c81a24b9&output=xml.xmlentry";
cd ..;
makedir "Projects";
#--------------------------------------------------------------------
cd "Projects";
touch ".placeholder";
download "downloading metadata for Projects" ".this.ramadda.xml" "${ROOT}/repository/entry/show?entryid=b29ffb57-99cf-4d82-9071-fd586e7c31ef&output=xml.xmlentry";
cd ..;
So, essentially everywhere you see test.txt would instead have $(malicious-command).txt. Here what happens when I upload $(uname -a).txt. You can see the output of the command there. So, a malicious user could upload files with malicious names, and if someone downloads and runs this script, they’ll execute whatever code the malicious user inserted.
RCE
It turns out that an admin in this application has the ability to add what is called properties. Properties can be all sorts of things, but especially interesting is that properties can be used to direct the application to an executable file.
In my case, I found that I was able to specify the location of a binary that would “slice” images up to make them zoomable. At first glance this seemed insecure, but in order to exploit it, I’d have to jump through some hoops.
The above is the line of code where we injected the path to our binary, specifically splicer is controlled by us.
In order to do this, I had to do the following activities
1 – An admin user gets hit with one of the XSS above that downloads a malicious payload which does the following, resulting in remote code execution.
2 – Uploads a malicious script.
3 – Navigates to admin -> system -> system disk and obtains the storage directory (where our file is actually on disk).
4 – Navigates to admin -> settings -> file system access and adds the storage directory (so our file will show up in the repository with its real name).
5 – navigates to admin -> harvesters and sets up a file system harvester for the storage directory – This is to leak the exact filename that we will need in the future. The filename is something like UUID_file_injection.sh. The filename gets changed on disk when we upload it, though in the GUI it’ll remain the same as we named it. A harvester essentially populates our repo based on the path we give it, so now our file with a changed name will show up.
6 – Return to the homepage and parse it to find the filepath. It will look like this /{storage-directory-from-earlier}/y2023/m8/d22/UUID_file_injection.sh or something along those lines. We need this exact filepath.
7 – Navigates to admin -> site and contact information -> properties and adds a property ramadda.image.slicer=/{storage-directory-from-earlier}/y2023/m8/d22/UUID_file_injection.sh
8 – Navigates to file upload and uploads a zoomable image.
9 – The zoomable image triggers RCE due to processBuilder call in ZoomifyTypeHandler.java on line 98/99 as seen in the screenshot above.
Here is the reflected XSS link that performs the RCE. It loads a payload from pizzapower.org.
In reality, it would probably be easier to create an admin account and do this manually, haha. I’d post the exploit code here, but it was about 400 lines of gibberish that I’m very sensitive as to the quality of.
As mentioned earlier, always read the documentation. I fiddled around for hours just trying to manually figure this all out. After I looked at the docs – bam RCE.
Anyway, I thought RAMADDA was cool app. The developer fixed everything in like four hours. Go check it out if you have need for an app like this!
And if we can take a few things away from this for bug bounty and white box testing there are:
Always read the docs.
Always get debugging going.
Always static and dynamically analyze.
Always analyze JS files (though I didn’t do much of that here).
Have fun!
Updates: Ended up reporting this to the DoD and Department of Commerce programs, neither of which are paid. I did get an ack on this page, though.
I sometimes like to spin up a virutal machine in the cloud, do some testing, and then tear it down. It doesn’t even have to be for bug bounty hunting, but since I’ve been hunting so sporadically lately, that’s what I’ve been using this project for.
Anyway, it becomes tedious to do this repeatedly, so I decided to automate a large majority of the infrastructure creation and configuration with Terraform and Ansible.
In the following article, I’ll deploy a node on Linode, my VPS provider of choice. Use this referral link for a $100, 60-day credit. That way, you can test this project out until you’re blue in the face. The node size I deploy in this post runs $10 a month.
While Terraform and Ansible can both accomplish the same things, they both have their wheel houses. Terraform should be used for deploying infrastructure and Ansible should be used to configure that infrastructure.
In order to follow along with this article, you’ll need to install Terraform and Ansible per your Operating System’s documentation. I’m using Ubuntu 20.10.
Let’s begin b creating a directory structure for your project.
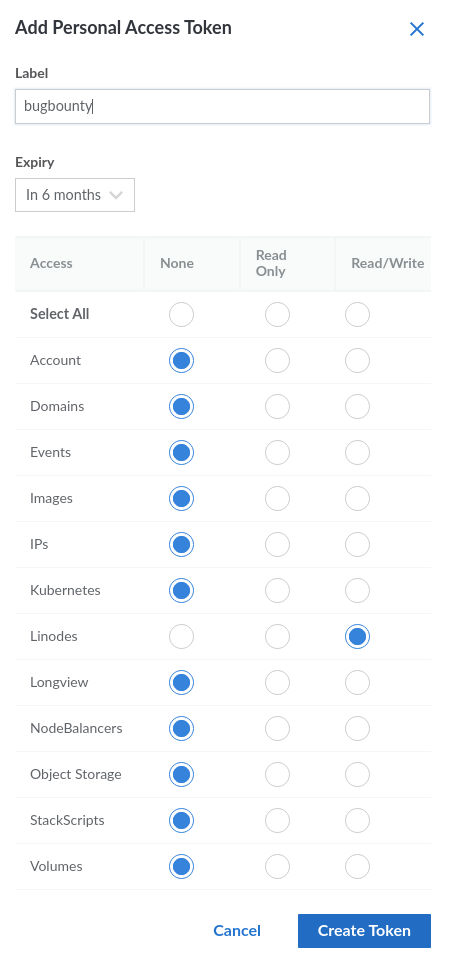
Next, you’ll need to obtain credentials from Linode. If you haven’t already, create an account, then click on your account name in the top, right-hand corner and select “API Tokens.”
Select create an access token and give it a name. Select Linodes and Read/Write, and then click “Create Token.”
Linode Read/Write Access Token
The token will be a long string of characters. Save this token for usage in a bit!
Terraform
cd into the Terraform directory you just created and create the following files:
The main.tf file is where the magic is done. This file will create the VM to our specifications. The variables.tf file declares variables that are used in main.tf. variables.tfvars will have the initializing values for these variables. You can also initialize the variables directly in variables.tf or even on the command line, if you’d prefer. We do it this way because it makes updating variables slightly easier and our project simpler, in a sense. output.tf defines what values will be printed to the console after we run the project.
Next, create some templates within the templates directory.
terraform {
  required_providers {
    linode = {
      source  = "linode/linode"
      version = "1.27.0"
    }
  }
}

# Configure the Linode Provider
provider "linode" {
  token = var.token
}

# Create a Linode
resource "linode_instance" "bugbountybox" {
  image     = var.image
  label     = var.label
  region    = var.region
  type      = var.type
  root_pass = var.root_pass
}

# Create an Ansible playbook from a template file
resource "local_file" "bugbountybox_setup" {
  content = templatefile("./templates/playbook.tmpl",
    {
      ip_address = linode_instance.bugbountybox.ip_address
    }
  )
  file_permission = "0640"
  filename        = "../ansible/playbook.yml"
}

# Create an Ansible config from a template file.
resource "local_file" "ansible_config" {
  content = templatefile("./templates/ansible.tmpl",
    {
      remote_user = "root"
    }
  )
  file_permission = "0640"
  filename        = "../ansible/ansible.cfg"
}

# Create an Ansible playbook from a template file
resource "local_file" "ansible_inventory" {
  content         = linode_instance.bugbountybox.ip_address
  file_permission = "0640"
  filename        = "../ansible/hosts"
}
variables.tf
Copy the following code into variables.tf:
variable "token" {
  type        = string
  description = "Linode APIv4 token."
  sensitive   = true
}

variable "image" {
  type        = string
  description = "Image to use for your VM."
  default     = "linode/ubuntu20.04"
}

variable "label" {
  type        = string
  description = "Label to give your VM."
}

variable "region" {
  type        = string
  description = "Region where the VM will be created."
}

variable "root_pass" {
  type        = string
  description = "Password for the root account on this VM."
  sensitive   = true
}

variable "type" {
  description = "Your Linode's plan type."
  # You can initialize variables here instead of the tfvars file.
  default = "g6-standard-1"
}
variables.tfvars
Copy the following code into variables.tfvars, and enter the values as needed:
token     = "" # put your API token here.
image     = "linode/ubuntu20.04"
label     = "bug-bounty-box"
region    = "us-east"
root_pass = "" # put your new VM's password here.
output.tf
Copy the following code into output.tf:
output "IP_Address" {
  value = linode_instance.bugbountybox.ip_address
}
Templates
The templates will be used by Terraform to create files that Ansible will use. We could manually create/edit these Ansible files, but why do things manually when we can automate it?
If you take a close look at these templates, you’ll see variables indicated with the following templating syntax:
${ variable_name }
These are “filled in” during the terraform apply process. We only have a single variable in each of these files, but you can use as many as you’d like depending on what you’re trying to accomplish. This is a very powerful feature. It allows you to dynamically create files to be used in other processes – in our case, Ansible.
It’s Alive!
We are ready to create our infrastructure by running the following commands within the terraform directory. Type “yes” when prompted after the apply command.
The terraform init command initializes the project directory. terraform fmt formats the files to the canonical style. terraform validate validates the project to ensure it will work properly. Finally, terraform apply creates your infrastructure using the tfvars file you specified.
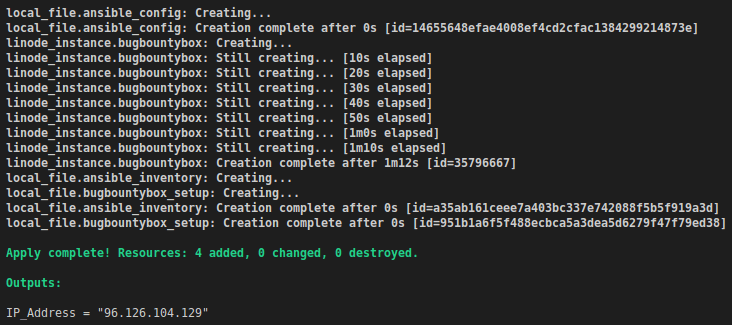
If everything goes as planned, you should see output similar to this.
terraform apply output
As you can see, the IP address of our VM was present in the output as we specified in outputs.tf.
Ansible
During the infrastructure creation process, several files should have been created in the ansible directory. Ansible will use these files update/upgrade and install packages on our VM. From the ansible directory we run the following command to configure our new VM. At the start, you will be prompted for the SSH password that you used in your tfvars file.
$ ansible-playbook -i hosts playbook.yml
We need to specify the hosts file that Terraform created so Ansible doesn’t use the hosts file located in /etc/ansible.
This process will take a few minutes to complete, but if all went as planned, you should see something similar to this on your terminal.
Tear it Down
When you are all done playing around with your new VM, you can destroy it with the following command. Please remember to destroy it or else you will incur costs. Type “yes” when prompted.
Now, play around with the above project. Can you set it up to deploy multiple VMs? Can you set it up to deploy multiple VMs, install some other packages, run some commands and send the output of those commands to a database somewhere? Can you set this up on multiple clouds?
The example here is pretty basic, and doesn’t necessarily follow best practices (especially with Ansible), but it gives you the idea of what can be done with automation. Some, if not all, of the leading bug bounty hunters are at least partially automating their work. You should automate too.
Feel free to download all this code from my github and don’t forget to use my link to sign up for a Linode account.
Links
Here are some links to more information and documentation that is pertinent to this article, including a link to this code on Github.
I recently was enrolled in the Offensive Security Advanced Web Attacks and Exploits course. This is the newer version of the course, and it leads to the Offensive Security Web Expert Certification. Well, you’ll get the cert after you pass a 48 hour hands-on exam and write a report of your findings. Fun.
First off, I have bug bounty hunting/web app testing experience, so some of the material in the course is not new to me. With that said, the material is presented well, and I enjoyed being able to see somebody else’s methodology of going from initial exploit to full-blown remote code execution. And I definitely still learned a lot along the way.
I’m a mostly self-taught hacker, as are a lot of people in the field. Unfortunately, I find that when I learn on my own, I miss some things along the way. Usually it’s just little time-saving tricks or different ways of doing things, but sometimes I miss things that may cost me money in the bug hunting world. So, I like to supplement the self-learning with some courses occasionally.
If you’re reading this, you probably know how the labs are set up. You get access to 12 boxes running vulnerable software. You exploit them from initial exploit to RCE. The course manual and videos walk you through it, and then they give you “extra miles” to complete, if you’re inclined. The course manual and videos are well put together and explain all the exploits thoroughly.
Should you purchase this course? That depends. I think if you’re already established in the field and making some money bug hunting, you can probably pass it over. If you’re looking to make a transition into web-app pentesting from dev work, it would be a good choice for you. If you’re looking to challenge yourself, go for it. If you’re looking to bolster the resume, go for it.
What do you need to know to complete the course? Well, my skills in C# and Java are a little lacking, so those parts were the most challenging for me, but they were also the parts where I learned the most. I’ve seen some people recommend having an OSCP cert before starting the AWAE, but I don’t think that’s necessary. They are different beasts, and while there is some overlap, it isn’t much. I’d say having a thorough understand of Python (requests package and sessions), and Linux is much more helpful than having an OSCP. The course touches PHP, Node, regular Javascript, Python, C#, and Java (am I forgetting anything?), so if you are lacking experience in any of those, I’d recommend familiarizing yourself with them before you start the course.
Bug hunting seems to be all the rage these days. I can understand that, hacking is fun. So if you can hack (legally) and get paid, why not? Let me just tell you what you’re getting yourself into.
For one, you probably aren’t going to make much money, and even if you do make some money, you’d have probably made more with a part time job, or doing whatever needs to get done at your day job to move up in the organization and make more money.
Here are a few questions to ask yourself before you bug hunt.
Can you afford $20-$40 a month for a VPS? You’ll be doing A LOT of recon and you don’t want to do it from your home IP address. You’ll get IP bans, and it will really make your household angry if they can’t get on Netflix because you spent all night hammering Akamai or whatever the case may be.
Can you afford a $400 Burp Pro subscription? Yeah, you may be able to get away without it, but IMO it isn’t worth the effort – double so if you do/are planning to work in the security industry.
> Programs:
Now, you see all those programs listed for hacking on HackerOne and and BugCrowd? Well they are all public programs that have had thousands of people picking over their programs for YEARS at this point. That’s not to say some bugs aren’t still there, they are, but they are way, way less in numbers. Not to mention, many of them have had paid pentesters hacking on them. A lot of these programs were private before they went public too, so when you see the “launched” time, it actually isn’t true – the program didn’t just launch this month.
And don’t get me started on the unpaid bounty programs. They basically are getting all this work done without having to pay anybody. But hey, you’ll get points for hacking them!!!!! Oh wow, great. Unpaid programs should not exist. It lessens the value of our work.
Let me tell you a story of me and an unpaid program. About a year ago, I got invited to this program, and I immediately realized the scope was very large – which is awesome. Within a few days, I had found a bunch of bugs. All of these bugs were medium or higher, and one was EXTREMELY critical. So naturally, I’m happy, and I’m thinking I’m going to make some good money. Wrong. That’s when I found out that this program was unpaid.
I know, I know – it is my fault for not checking first. At the time, I was under the assumption that you had to be a paid program to be a private program. I don’t know where I got that from. My point remains valid. Basically, there is a good chance I saved this company millions of dollars, and without going into details, it could have been worse that just a monetary loss for them. You know what I got in return? Points. Great. Wow.
This actually happened to me again recently. Yes, I’m stupid. But I digress, haha.
> Coding:
I see a lot of posts asking if you need to know how to code to bug hunt. It sounds like a lot of these people are trying to get away without learning how to code. Let me help you.
YOU NEED TO KNOW HOW TO CODE.
You don’t have to be a pro, but you need to be decently fluent in python and bash, and at the very least, be able to read PHP and Javascript. The more experienced you are the better.
You see those people making a lot of money bug hunting? They are probably good coders. They’ve probably automated all their recon with Python or Bash scripts. They can decompile mobile and web apps. They’re pretty good coders, generally.
> Certs:
Let’s talk about the OSCP. Is it a cool cert? Yes. Does it teach you much about bug hunting? Yes and no. You’ll need to add a lot more techniques and tools to your arsenal to be successful. The offsec AWAE does have some topics that are useful to bug hunting – web apps in particular.
Let’s talk about these techniques and tools.
You’ll need to install a lot of tools you’ve never heard of. And listen, everybody has a massive amount of bug hunting scripted. They are constantly scanning ALL the hosts in EVERY program for low hanging fruit. Again, that doesn’t mean you won’t find anything, but it greatly reduces your chances.
You still wanna bug hunt? Go for it. But don’t get discouraged when you’re in the hole $600 bucks and you’ve found two self XSS vulns after a year. Lol
> TLDR:
Don’t bug hunt, and if you do, avoid unpaid programs. Better yet, spend your time advancing your career or getting a part time job. Also, use my Linode link for your VPS 😉
For one, it’ll keep your IP address from being banned by certain providers. How would it feel to wake up one day and not being able to access certain sites because your IP has been blacklisted? If you use a VPS, this isn’t much of an issue. You can just change out the IP from the VPS provider. It may be a littler harder to change your home IP address.
For two, it makes tool installation easier and faster. On Linode, I have a lengthy script that I run when I’m starting up a new box. The script sets up everything I need for bug bounty hunting. It makes tearing down a box and bringing it up a new one simple and quick.
Another reason you may want a cloud-based box running is for server capabilities. For example if you’re testing out some sort of XSS/XXE/etc. and you need a server to host a payload, your bug bounty box can serve double duty. Additionally, some hunters maintain giant databases of scraped webpages, nmap scans, targets and their subdomains, and on and on and on. But perhaps my favorite usage of a dedicated bug-bounty box is hosting your own semi-permanent Burp Collaborator server as described here.
I use this in my day-to-day exploitation because I don’t want to host this stuff at home, which exposes my personal IP address and whatever ports I have open to the general public, which I try to avoid.
Here is a small example of a script that I run. My script is significantly larger, but this is a decent start.
#!/bin/bash
# for use with Ubuntu 20.04
# some security tools to get started
# use this to setup new bug bounty box
# use at your own risk

# check if running as root
if [ "$EUID" -ne 0 ]
	then echo "Run as root, please!"
	exit
fi

mkdir sectools
cd sectools

apt update -y && apt upgrade -y

# install some packages and tools that are used regularly
apt install \
apt-transport-https \
ca-certificates \
curl \
gnupg-agent \
software-properties-common \
net-tools \
nmap \
john \
hashcat \
python3-pip \
wfuzz \
nikto \
gobuster \
masscan \
ruby-full \
ruby-railties \
wireguard \
nfs-common \
hydra \
cewl \
mlocate

# evil winrm
gem install evil-winrm

# powershell
snap install powershell --classic

# amass
curl -s https://api.github.com/repos/OWASP/Amass/releases/latest | grep "browser_download_url.*linux_amd64.zip" | cut -d : -f 2,3 | tr -d \" | wget -i -
unzip amass*
chmod +x ./amass_linux_amd64/amass
mv ./amass_linux_amd64/amass /usr/bin/


# nuclei
curl -s https://api.github.com/repos/projectdiscovery/nuclei/releases/latest | grep "browser_download_url.*linux_amd64.tar.gz" | cut -d : -f 2,3 | tr -d \" | wget -i -
tar xzf nuclei* nuclei
chmod +x nuclei
mv nuclei /usr/bin/

# httpx
curl -s https://api.github.com/repos/projectdiscovery/httpx/releases/latest | grep "browser_download_url.*linux_amd64.tar.gz" | cut -d : -f 2,3 | tr -d \" | wget -i -
tar xzf httpx* httpx
chmod +x httpx
mv httpx /usr/bin/

# subfinder
curl -s https://api.github.com/repos/projectdiscovery/subfinder/releases/latest | grep "browser_download_url.*linux_amd64.tar.gz" | cut -d : -f 2,3 | tr -d \" | wget -i -
tar xzf subfinder* subfinder
chmod +x subfinder
mv subfinder /usr/bin/

#aquatone setup
curl -s https://api.github.com/repos/michenriksen/aquatone/releases/latest | grep "browser_download_url.*linux_amd64-*" | cut -d : -f 2,3 | tr -d \" | wget -i -
unzip aquatone* aquatone
chmod +x aquatone && cp aquatone /usr/bin

# FFUF
curl -s https://api.github.com/repos/ffuf/ffuf/releases/latest | grep "browser_download_url.*linux_amd64.tar.gz" | cut -d : -f 2,3 | tr -d \" | wget -i -
tar xzf ffuf* ffuf
chmod +x ffuf
mv ffuf /usr/bin/

# getallurls (gau)
curl -s https://api.github.com/repos/lc/gau/releases/latest | grep "browser_download_url.*linux_amd64.tar.gz" | cut -d : -f 2,3 | tr -d \" | wget -i -
tar xzf gau* gau
chmod +x gau
mv gau /usr/bin

cd ..
echo "Don't forget to install metasploit, setoolkit, hexeditor, burp suite, wireshark, etc"
echo "all finished!"
You can add whatever you want to this script, and then spin up your bug bounty box with one script. I have my script set my hostname, bashrc, environment variables, download repos from git, install docker, install go, etc.
So who should you use for your VPS? I’ve used AWS, Azure, Digital Ocean, and Linode, and I find Linode to be the best. Just try them all out, and I think you’ll agree with me. AWS and Azure are both massive in size. Azure seems to take way to long to do certain tasks, so that is frustrating. The site just seems slow in general. AWS is better than Azure.
Linode is where it is at. It is quick. The interface is simpler and easier to use than all of the above, and it is cheaper than all of the above. Check it out using my referral link, if you’re interested. That link will give you a $100/60 day credit, so you don’t want to sign up without one. You can just try it out for free and see what you think.