If you’re a pentester or bug bounty hunter that is trying to do some iOS mobile application testing, half the battle is getting a phone properly jailbroken so you can proxy HTTP requests. Nowadays, many apps are requiring the use of more modern iOS versions, so this jailbreak should help.
Note that this isn’t really going to cover the whole attack surface of an application, but it’s a good start. And, since the resources are slim out there, I figured I’d write up my process on Linux to jailbreak iOS 16.7.8 on iPhone X.
To do this, we are going to use palera1n. If you go to the official site, you can get an install command to pipe straight to sudo and bash! Perfect, lol. https://palera.in/download/?tab=linux
First off, you need to erase all content and settings on your iPhone. This jailbreak will not work properly if you’ve ever had a passcode set on your device, so erasing all content and settings and then setting up your phone puts it in a clean state. Do not set a passcode or face ID during the install.
Once setup is complete, on Ubuntu, you then need to run these commands to see some USB connection information and to help us debug issues.
sudo systemctl stop usbmuxd
sudo usbmuxd -f -p
Plug your phone in, and after that, run
sudo palera1n -l
Now, follow the directions on the screen. You may need to try this a couple of times, or unplug your device and plug it back it during the process. It has been kind of hit or miss for me. I’ve also found, as noted on the internet, you need to use a USB-A cable connection for this.
Once everything is complete, we need to install some things. In the palera1n app, install Sileo. You can do that by opening palera1n and clicking Sileo and install. Very simple. You may have to set a password during this process. I usually just use alpine for every password on devices, because it is the ‘default’ password for many jailbroken devices and linux images, et.c
Frida
Open up Sileo, click the + button on the top right, and enter this URL, and click add source.
https://build.frida.re/
Frida should appear in the list of Repositories. Click on it, then all categories, then Frida and install Frida.
This tutorial assumes you’ve already installed frida on your pc/mac. If you haven’t go ahead and install it per easily Googleable directions.
SSH Access
At this point you should be able to get your IP address from your settings and you should be able to SSH into your phone as the user mobile and password alpine.
SSH access is needed for all sorts of things during a mobile application penetration test or bug bounty hunting, but we won’t go into the methodology here.
Moving On
From here you can install the Burp Suite certificate on your device, use frida to bypass SSL pinning, etc. We won’t go into those, but they are all easily googleable.
Caveats
There are some Caveats to this jailbreak, as listed below.
if you reboot, you need to re-jailbreak
you can’t use anything that requires a passcode e.g. Apple Pay etc
Edit: The weather station issues were given CVE-2022-35122.
I contacted the manufacturer in regards to these issues. They responded quickly. I wasn’t expecting anything to be done about the issues that I brought up, but they did do something…
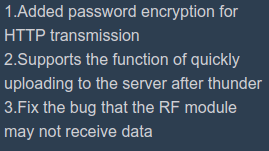
I logged into my weather station yesterday, an lo and behold, there is an update. Most notably the following, “added password encryption for HTTP transmission.”
Screenshot from the app itself showing the update notes.
Encryption for the password during HTTP transmission? What does this even mean? HTTPS? Why wouldn’t they just say HTTPS? Just encrypting the password client side and sending it to the station for decryption? That seems odd. I was hoping for HTTPS, but I would soon be let down.
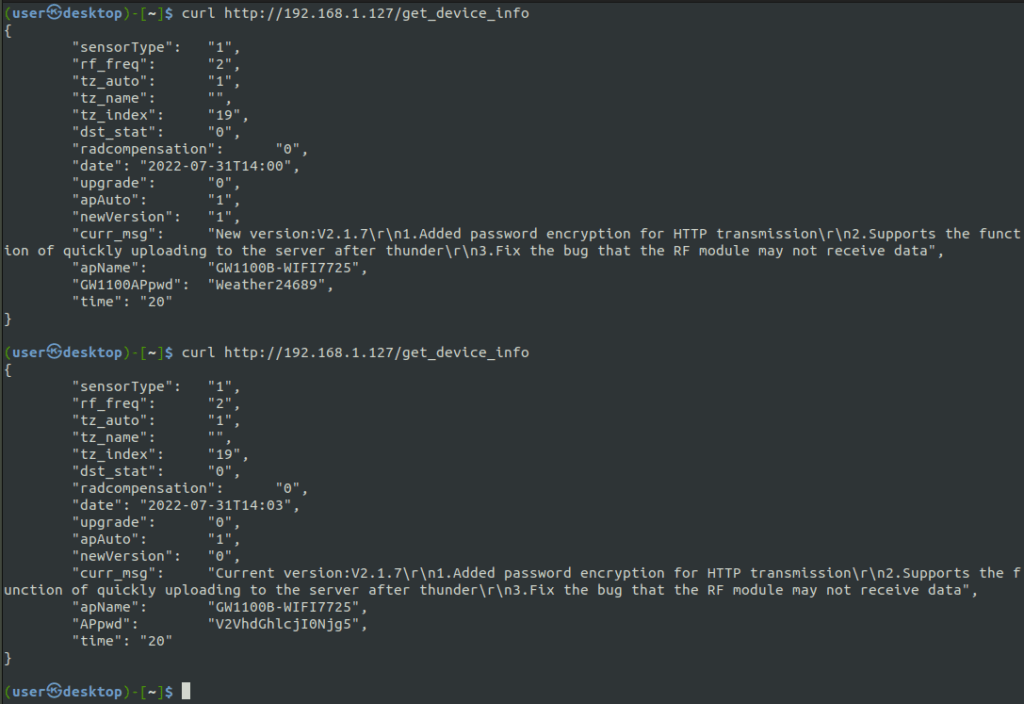
curl request from before and after the ‘upgrade’
Before updating, I decided to try and make the curl request as I had done before to the get_device_info endpoint. As before, the password to the system was returned.
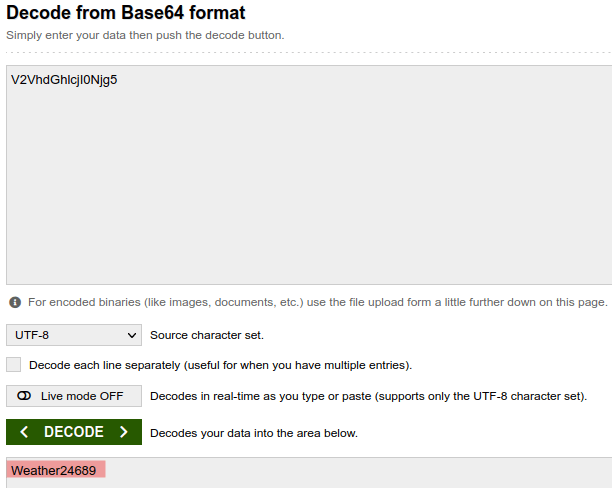
Next, I upgraded the device and then made the same request. Would you look at that, the APpwd now does look ‘encrypted.’ But, as you may have guessed, it is actually just base 64 encoded.
I sometimes like to spin up a virutal machine in the cloud, do some testing, and then tear it down. It doesn’t even have to be for bug bounty hunting, but since I’ve been hunting so sporadically lately, that’s what I’ve been using this project for.
Anyway, it becomes tedious to do this repeatedly, so I decided to automate a large majority of the infrastructure creation and configuration with Terraform and Ansible.
In the following article, I’ll deploy a node on Linode, my VPS provider of choice. Use this referral link for a $100, 60-day credit. That way, you can test this project out until you’re blue in the face. The node size I deploy in this post runs $10 a month.
While Terraform and Ansible can both accomplish the same things, they both have their wheel houses. Terraform should be used for deploying infrastructure and Ansible should be used to configure that infrastructure.
In order to follow along with this article, you’ll need to install Terraform and Ansible per your Operating System’s documentation. I’m using Ubuntu 20.10.
Let’s begin b creating a directory structure for your project.
Next, you’ll need to obtain credentials from Linode. If you haven’t already, create an account, then click on your account name in the top, right-hand corner and select “API Tokens.”
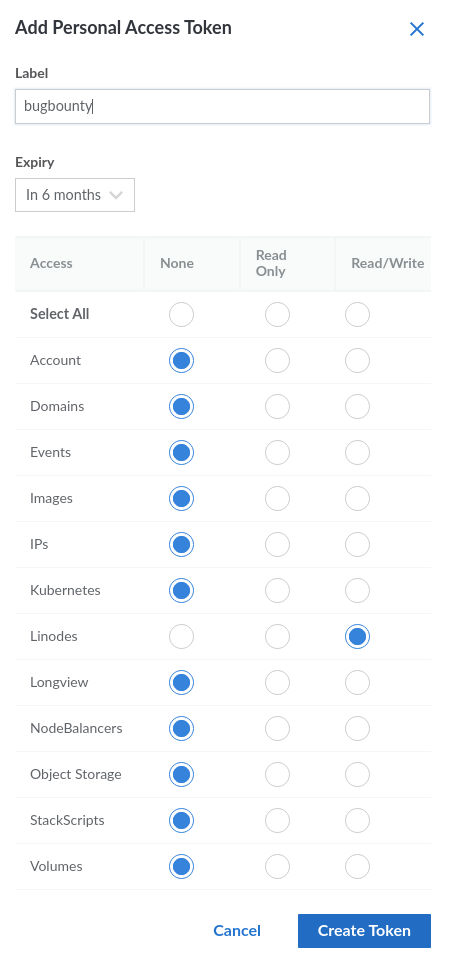
Select create an access token and give it a name. Select Linodes and Read/Write, and then click “Create Token.”
Linode Read/Write Access Token
The token will be a long string of characters. Save this token for usage in a bit!
Terraform
cd into the Terraform directory you just created and create the following files:
The main.tf file is where the magic is done. This file will create the VM to our specifications. The variables.tf file declares variables that are used in main.tf. variables.tfvars will have the initializing values for these variables. You can also initialize the variables directly in variables.tf or even on the command line, if you’d prefer. We do it this way because it makes updating variables slightly easier and our project simpler, in a sense. output.tf defines what values will be printed to the console after we run the project.
Next, create some templates within the templates directory.
terraform {
  required_providers {
    linode = {
      source  = "linode/linode"
      version = "1.27.0"
    }
  }
}

# Configure the Linode Provider
provider "linode" {
  token = var.token
}

# Create a Linode
resource "linode_instance" "bugbountybox" {
  image     = var.image
  label     = var.label
  region    = var.region
  type      = var.type
  root_pass = var.root_pass
}

# Create an Ansible playbook from a template file
resource "local_file" "bugbountybox_setup" {
  content = templatefile("./templates/playbook.tmpl",
    {
      ip_address = linode_instance.bugbountybox.ip_address
    }
  )
  file_permission = "0640"
  filename        = "../ansible/playbook.yml"
}

# Create an Ansible config from a template file.
resource "local_file" "ansible_config" {
  content = templatefile("./templates/ansible.tmpl",
    {
      remote_user = "root"
    }
  )
  file_permission = "0640"
  filename        = "../ansible/ansible.cfg"
}

# Create an Ansible playbook from a template file
resource "local_file" "ansible_inventory" {
  content         = linode_instance.bugbountybox.ip_address
  file_permission = "0640"
  filename        = "../ansible/hosts"
}
variables.tf
Copy the following code into variables.tf:
variable "token" {
  type        = string
  description = "Linode APIv4 token."
  sensitive   = true
}

variable "image" {
  type        = string
  description = "Image to use for your VM."
  default     = "linode/ubuntu20.04"
}

variable "label" {
  type        = string
  description = "Label to give your VM."
}

variable "region" {
  type        = string
  description = "Region where the VM will be created."
}

variable "root_pass" {
  type        = string
  description = "Password for the root account on this VM."
  sensitive   = true
}

variable "type" {
  description = "Your Linode's plan type."
  # You can initialize variables here instead of the tfvars file.
  default = "g6-standard-1"
}
variables.tfvars
Copy the following code into variables.tfvars, and enter the values as needed:
token     = "" # put your API token here.
image     = "linode/ubuntu20.04"
label     = "bug-bounty-box"
region    = "us-east"
root_pass = "" # put your new VM's password here.
output.tf
Copy the following code into output.tf:
output "IP_Address" {
  value = linode_instance.bugbountybox.ip_address
}
Templates
The templates will be used by Terraform to create files that Ansible will use. We could manually create/edit these Ansible files, but why do things manually when we can automate it?
If you take a close look at these templates, you’ll see variables indicated with the following templating syntax:
${ variable_name }
These are “filled in” during the terraform apply process. We only have a single variable in each of these files, but you can use as many as you’d like depending on what you’re trying to accomplish. This is a very powerful feature. It allows you to dynamically create files to be used in other processes – in our case, Ansible.
It’s Alive!
We are ready to create our infrastructure by running the following commands within the terraform directory. Type “yes” when prompted after the apply command.
The terraform init command initializes the project directory. terraform fmt formats the files to the canonical style. terraform validate validates the project to ensure it will work properly. Finally, terraform apply creates your infrastructure using the tfvars file you specified.
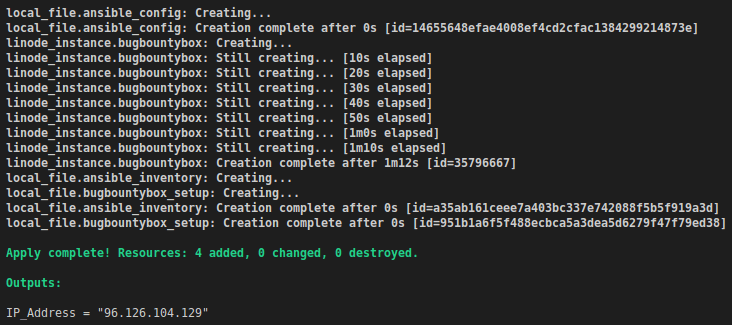
If everything goes as planned, you should see output similar to this.
terraform apply output
As you can see, the IP address of our VM was present in the output as we specified in outputs.tf.
Ansible
During the infrastructure creation process, several files should have been created in the ansible directory. Ansible will use these files update/upgrade and install packages on our VM. From the ansible directory we run the following command to configure our new VM. At the start, you will be prompted for the SSH password that you used in your tfvars file.
$ ansible-playbook -i hosts playbook.yml
We need to specify the hosts file that Terraform created so Ansible doesn’t use the hosts file located in /etc/ansible.
This process will take a few minutes to complete, but if all went as planned, you should see something similar to this on your terminal.
Tear it Down
When you are all done playing around with your new VM, you can destroy it with the following command. Please remember to destroy it or else you will incur costs. Type “yes” when prompted.
Now, play around with the above project. Can you set it up to deploy multiple VMs? Can you set it up to deploy multiple VMs, install some other packages, run some commands and send the output of those commands to a database somewhere? Can you set this up on multiple clouds?
The example here is pretty basic, and doesn’t necessarily follow best practices (especially with Ansible), but it gives you the idea of what can be done with automation. Some, if not all, of the leading bug bounty hunters are at least partially automating their work. You should automate too.
Feel free to download all this code from my github and don’t forget to use my link to sign up for a Linode account.
Links
Here are some links to more information and documentation that is pertinent to this article, including a link to this code on Github.
Newer versions of Linux may not come with any sort of Python 2 installed. I recently wanted to run Sharpshooter, which is a “payload creation framework for the retrieval and execution of arbitrary CSharp source code.”
Problem is, Python 2 isn’t installed by default on Ubuntu 21.xx and neither is pip2. You also need to install an older (I think) version of jsmin – at least that’s what worked for me.
Use this script to install everything and get it up and running.
if [ "$EUID" -ne 0 ]
    then echo "Run as root!"
    exit
fi

# clone sharpshooter from github
git clone https://github.com/mdsecactivebreach/SharpShooter.git

add-apt-repository universe && apt update

apt install git curl

# install python2.7 and pip2
apt install python2.7 -y
curl https://bootstrap.pypa.io/pip/2.7/get-pip.py --output get-pip.py
chmod +x ./get-pip.py
sudo python2.7 ./get-pip.py

# install correct jsmin
wget https://files.pythonhosted.org/packages/17/73/615d1267a82ed26cd7c124108c3c61169d8e40c36d393883eaee3a561852/jsmin-2.2.2.tar.gz
tar xzf jsmin-2.2.2.tar.gz
python2.7 ./jsmin-2.2.2/setup.py install
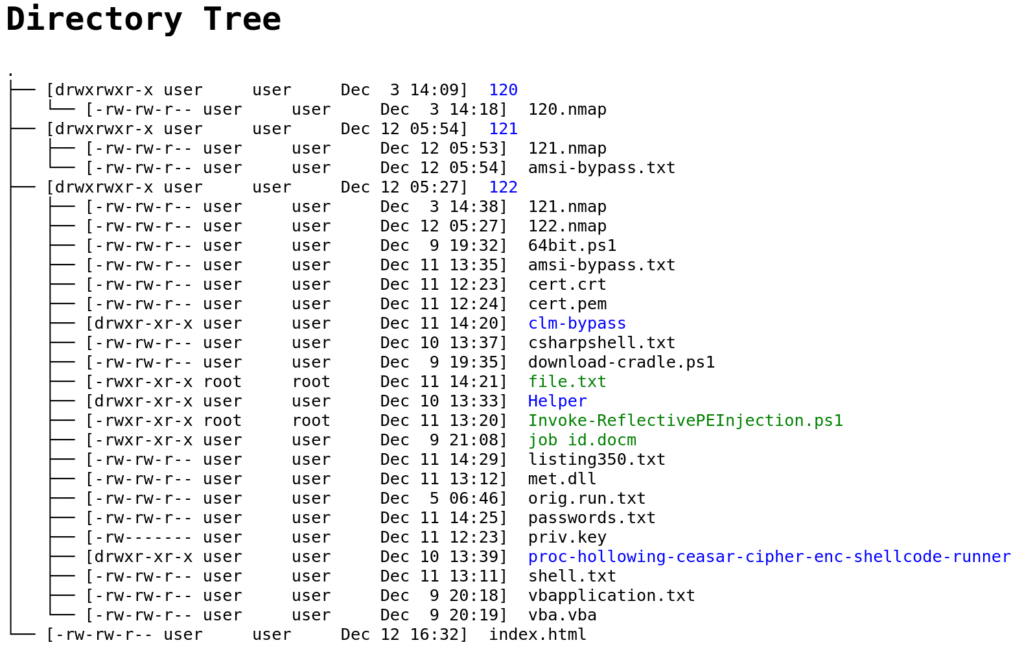
If you aren’t familiar with the Tree command in Linux, you should be. You can read about it here. Tree has been around for what seems like forever, and I’ve been using it for as long as I’ve been using Linux. With that said, I didn’t really know all that much about it until recently. The extent of my usage has always been something like this: $ tree -L 3 and that’s it.
Like most other Linux tools, there is much more to Tree than what I know. Take a look at the following command:
$ tree -LpDugC 2 -H . > index.html
This will create an index.html file that has a listing of everything in the dir in HTML form.
Anyway, you can install tree on Linux, Mac, and even Windows. There really wasn’t a huge point to this post — it’s just a reminder that your tools can do a lot more than what you’re probably already using them for. It pays to read the documentation.
I had Tesla solar panels and Powerwalls installed several weeks ago. I currently don’t have permission to operate (PTO) from my electricity provider, which means I can’t ship any of my surplus power back to the grid. So, after my batteries fill up for the day, I usually have power production that is going to waste. What can I do with that power?
Mine crypto, that’s what I can do! Those of you that know me IRL, know that I’ve been involved in crypto for a decade. Mining isn’t new to me, but I mostly gave up on it in 2012/2013 when I was only mining a few of Bitcoin a month and it wasn’t worth it to me anymore. Talk about a wrong decision…
I digress. I’m sitting here now producing extra power. Mining crypto with a graphics card that I already have will make me around $50-100/month and give me a chance to whip up a script in Python, which is what I truly enjoy in life. I haven’t done the actual math on it, but I think mining crypto is more profitable that selling my power back to my utility provider. It is also more fun to mine, lol.
My workstation that I’ll be mining on has a sole Gigabyte 1080 TI. It’s a little old, but they’re still going for $700 on eBay these days. I’m running Ubuntu 20.04, and I’ve decided to mine with a docker container and pointing my card at an ethash endpoint from NiceHash. I need to do some research to see if there are better options – which I assume exist.
My overall strategy for this operation will be pretty simple to start off. I’m just going to mine when my batteries are charged above a certain threshold. I set this threshold in the variable BATTERY_CHARGE_TO_START_MINING in the code. Yeah, I like long variable names.
Fortunately, Tesla provides an API to gather information from the Powerwall and there is a Python package to query it. To install this package use the following command:
pip3 install tesla_powerwall
And since I use this docker image to run the Trex Miner app, we also need to install the docker python package.
pip3 install docker
This script is pretty straightforward. I start a docker client to get the running images. I create a new Miner class with my wallet address and URL. This class has methods to start and stop the miner, as well as check if it is running.
Then, in a while loop I check my battery level and start and stop the miner as appropriate. I repeat this every HOW_OFTEN_TO_CHECK seconds.
Here is the code:
#!/usr/bin/env python3

import os
from tesla_powerwall import Powerwall
import docker
import time

POWERWALL_URL = ""  # PowerWall Gateway address goes here
EMAIL = ""  # email address that you use to login into the gateway
PASSWD = ""  # password that you use to log into the gateway
WALLET_ADDRESS = "35kwhvhyfnVnGdoWdyLqrtaHeY7RYByPfW"  # mining wallet address
MINING_URL = (
    "stratum+tcp://daggerhashimoto.usa-east.nicehash.com:3353"  # Mining url
)
# lowest battery charge where mining will start
BATTERY_CHARGE_TO_START_MINING = 50
# how often to check is battery level allows mining or not in seconds
HOW_OFTEN_TO_CHECK = 1800


def init():
    # initialize powerwall object and api
    powerwall = Powerwall(
        endpoint=POWERWALL_URL,
        timeout=10,
        http_session=None,
        verify_ssl=False,
        disable_insecure_warning=True,
        pin_version=None,
    )
    powerwall.login(PASSWD, EMAIL)

    api = powerwall.get_api()

    return powerwall, api


class Miner:
    def __init__(self, client, wallet_address, mining_url):

        self.wallet_address = wallet_address
        self.mining_url = mining_url
        self.client = client
        return

    def start_miner(self, client):
        env_vars = {
            "WALLET": WALLET_ADDRESS,
            "SERVER": MINING_URL,
            "WORKER": "Rig",
            "ALGO": "ethash",
        }
        try:
            client.containers.run(
                "ptrfrll/nv-docker-trex:cuda11",
                detach=True,
                runtime="nvidia",
                name="trex-miner",
                ports={4067: 4067},
                environment=env_vars,
            )
        except os.error as e:
            client.containers.get("trex-miner").restart()
        return

    def stop_miner(self, client):
        trex = client.containers.get("trex-miner")
        trex.stop()
        return

    def is_running(self):
        try:
            client.containers.get("trex-miner")
            return True
        except os.error:
            return False


if __name__ == "__main__":
    powerwall, api = init()

    client = docker.from_env()

    miner = Miner(client, WALLET_ADDRESS, MINING_URL)

    miner.start_miner(client)

    while True:
        # powerwall charge is satisfactory, start mining
        if not miner.is_running() and (
            api.get_system_status_soe()["percentage"]
            > BATTERY_CHARGE_TO_START_MINING
        ):
            miner.start_miner(client)
            print("miner is running or will be started")
        # powerwall charge is too low, shut off mining
        elif miner.is_running() and (
            api.get_system_status_soe()["percentage"]
            < BATTERY_CHARGE_TO_START_MINING
        ):
            print("stopping miner")
            miner.stop_miner(client)
        # try again
        time.sleep(HOW_OFTEN_TO_CHECK)
You can also find future updates of the code here.
TODO: add more options to start/stop mining e.g. if my panels/batteries are connected to the grid or not, start/stop mining based on the weather, etc.
IDK where I have been, but I never heard of this language until today. So, what’s the first thing you do when you learn about a language? You write a directory enumeration script with it.
Please disregard my horrible code, inability to follow Nim standards and philosophies, and the general hackiness of this code.
import httpclient
import parseopt
import strutils
import system

var p = initOptParser()
var wordlist: string
var url: string

while true:
  p.next()
  case p.kind
  of cmdEnd: break
  of cmdShortOption, cmdLongOption:
    if p.key == "u":
      url = p.val
    if p.key == "w":
      wordlist = p.val
  of cmdArgument:
    echo ""

let contents = readFile(wordlist)
let words = contents.splitLines()

var final_url: string
var client = newHttpClient(timeout = 100)

for i in 0 ..< words.len:
    final_url = url & "/" & words[i]
    try:
        let response = client.request(final_url, httpMethod = HttpGet)
        let status_code = response.status.split(' ')[0]
        if status_code == "200":
            echo final_url
    except:
        echo ""
All this code does is take a url parameter and a wordlist parameter and makes http get requests to the url + wordlist entry – standard directory enumeration stuff. If the response code is 200, that url gets sent to stdout.
As time permits I’ll update this app. It’d be cool to have it much more feature complete like gobuster, wfuzz, et. al. For now, see the github respository for more information.
This docker-compose-yml file will run all of these services. This post assumes that you have a little technical knowledge already and that you have Docker and Docker Compose installed. This will run all the downloading with qBittorrent and encrypted over PIA VPN.
Here is the directory structure that this compose file needs.
/home └── user ├── data │ ├── movies │ ├── music │ └── television └── data2 ├── config ├── data ├── jackett ├── lidarr ├── radarr └── sonarr └── prowlarr /var └── docker └── plex ├── config └── transcode
You’ll need to update the docker-compose file with your username. My username is user, so that is what you see in the structure above.
You can make these directories and set permissions with the following commands on Linux.
In the docker-compose file, you’ll need to enter your PIA username and password. The Plex service is set up for Plex Pass usage, so you’ll need to enter your plex claim. Once everything is rolling, you’ll need to update path mappings in Sonarr, Radarr, and Lidarr. You do this in settings > download clients in each application.
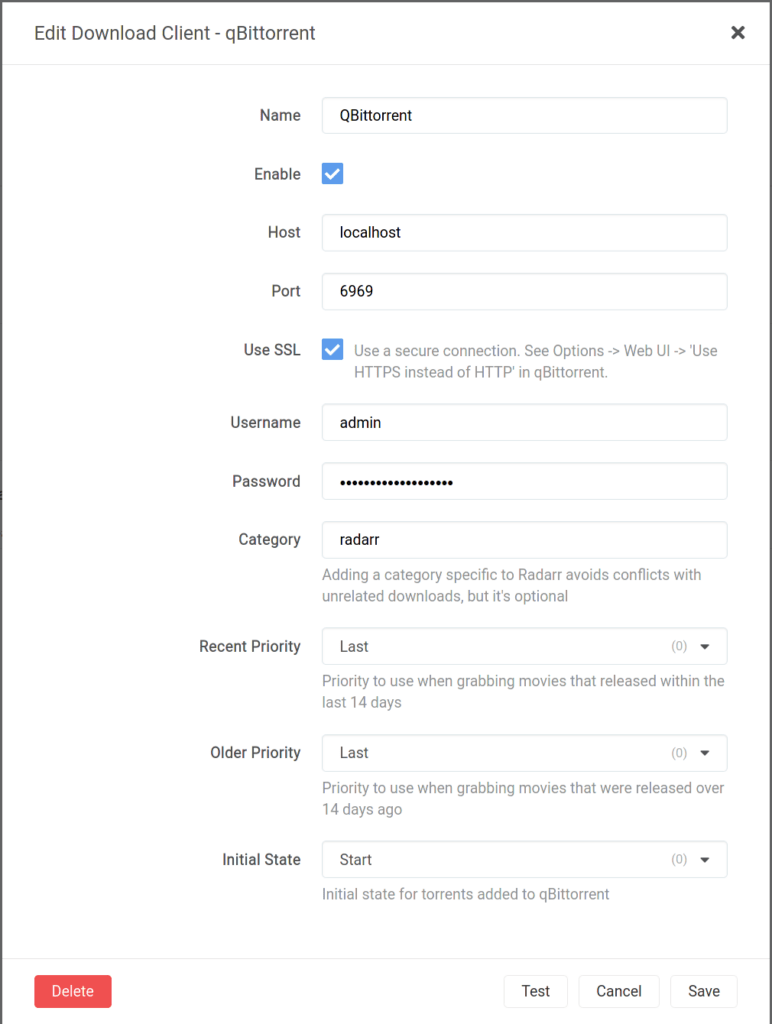
You also need to setup the downloaders in Sonarr, Radarr, and Lidarr. You can do this through settings > download clients and then click the big plus button to add a client. If you’re not using SSL for your qBittorrent instance, you won’t need to check that box. The same goes for the password protection. If you’re looking to use SSL, you can check out this post of mine.
Now you need to set up Jackett with your indexers. This will be different for everybody, so follow the instructions that are widely available.
As promised, here is the docker-compose.yml file. You may need to change your UID/GID to what is applicable to your installation/user. Please read it thoroughly – especially the comments. There are things you will need to change.
Now you should be able to cd into the directory that contains this docker compose file, and then run
sudo docker compose up

# or the following, so output isn't printed to screen

sudo docker compose up -d
This post should point you in the right direction, at least. I’m not responsible for any errors. Things may have been updated since I wrote this post. Special thanks to linuxserver.io and binhex for the images.
For people unfamiliar with this course and exam, here is a link to the Offensive security website. I’ve also written about it before, so you can check my post history. Basically the course is a giant pdf and a bunch of videos that go over web application attacks. You then get access to a lab consisting of 13 machines that are running a wide variety of vulnerable web-apps. In regards to languages/DBs/tech, this course covers VSCode, Visual Studio, JDGui, Javascript, PHP, Node, Python, Java, C#, mysql, and postgres – so it’s pretty thorough.
The exam is a 48 hour long exam where they give you access to two machines running vulnerable web-apps. You have to bypass auth on them to get administrator access and then escalate your attack to full-blown remote code execution. You’ll get two debugging machines that are running the same apps as the exam machines. You get full access to the app source code – this is a white-box course after all. You have to review the code base, and then use these debugging machines to develop ‘one-shot’ exploit script that bypasses auth and trigger RCE. I used python, as do most people, I think.
Oh yeah, and they watch you on camera the whole time.
After the exam time is up, assuming you have enough points to pass, you have another 24 hours to write an exam report documenting what you found and how you exploited it.
> How did it go?
First things first: I had to take this one twice. My power went out twice, briefly, and my father had to go to the hospital (he’s fine) during my first attempt. Even though he lives hours away, and there wasn’t much I could do, I was a little distracted. And it wasn’t like I was in front of the computer for the full 48 hours. I took a break about every 1.5 hours or so and slept 5-6 hours both nights.
Nevertheless, I still managed RCE on one of the boxes, and if I had another hour or so, I would have had an auth bypass on the second box – which would likely have let me pass. I look back and I just kind of laugh at how I failed it. I missed something simple that would have given me enough points to pass. I even knew what I needed – I just overlooked it.
I actually noticed the vulns on both boxes within an hour of looking at them. I then went down some rabbit holes for a bit and got sidetracked – especially on the box that I considered the harder one.
The second time around I crushed the exam in about 8 hours – RCE on both boxes. I had my report turned in at the 20 hour mark or so – and I was lollygagging.
If you don’t know me, my background is this: I’m not a professional developer. I don’t work in IT. I have never worked in IT. I just like computers. If I can pass this exam, so can you.
> Advice and Review
My advice for people that are preparing to take this exam is to just take their time and read the code. You need to know how to get the VSCode debugging going. It is a lifesaver. It is probably hard to pass if you don’t get it working. If you follow the code flow in a debugger, things should pop out at you. With that said, they do throw in a couple curve balls, which I bet throws some people for a loop. Now these curve balls aren’t hard to hit, per se, but someone that hasn’t been in the infosec/CTF/bug bounty world may miss these things.
Another question that I’ve been asked is, “Do you need an OSCP to do this couse?” I’ve changed my mind on this several times, and while I think an OSCP will give you a leg up, you don’t really need to have one – especially if you’re already involved the hacking/bug bounty/CTF world. If you’re coming at it straight from being a developer, it may not hurt to expose yourself to this stuff beforehand.
All in all, I’d say the exam was fair and maybe a little on the easy side. I say that as someone that failed it once, too, haha. But not only that, the exam is also a lot of fun. I love the Offensive Security exams. Some people will probably hate me for saying that, but they are a lot of fun.