Prerequisites and Getting Started
I sometimes like to spin up a virutal machine in the cloud, do some testing, and then tear it down. It doesn’t even have to be for bug bounty hunting, but since I’ve been hunting so sporadically lately, that’s what I’ve been using this project for.
Anyway, it becomes tedious to do this repeatedly, so I decided to automate a large majority of the infrastructure creation and configuration with Terraform and Ansible.
In the following article, I’ll deploy a node on Linode, my VPS provider of choice. Use this referral link for a $100, 60-day credit. That way, you can test this project out until you’re blue in the face. The node size I deploy in this post runs $10 a month.
While Terraform and Ansible can both accomplish the same things, they both have their wheel houses. Terraform should be used for deploying infrastructure and Ansible should be used to configure that infrastructure.
In order to follow along with this article, you’ll need to install Terraform and Ansible per your Operating System’s documentation. I’m using Ubuntu 20.10.
Let’s begin b creating a directory structure for your project.
mkdir -p ./bugbounty/{/terraform/templates,ansible}Next, you’ll need to obtain credentials from Linode. If you haven’t already, create an account, then click on your account name in the top, right-hand corner and select “API Tokens.”
Select create an access token and give it a name. Select Linodes and Read/Write, and then click “Create Token.”
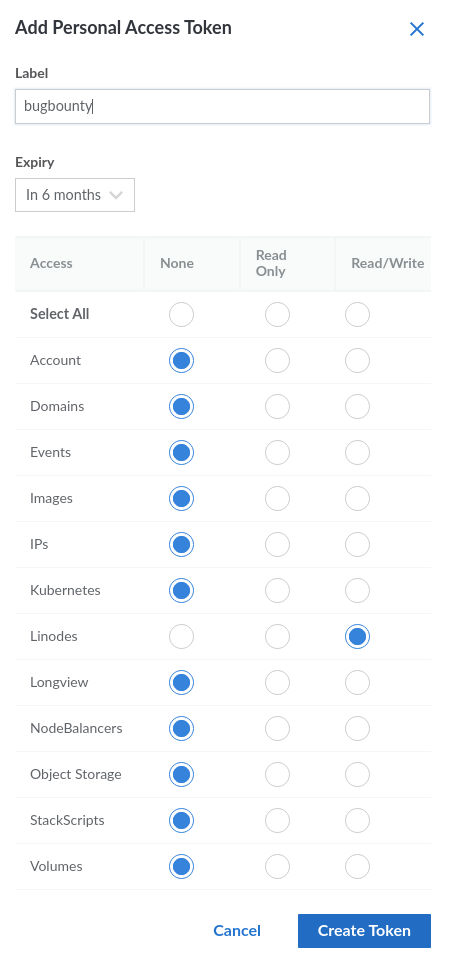
The token will be a long string of characters. Save this token for usage in a bit!
Terraform
cd into the Terraform directory you just created and create the following files:
$ touch {main.tf,output.tf,variables.tf,variables.tfvars}The main.tf file is where the magic is done. This file will create the VM to our specifications. The variables.tf file declares variables that are used in main.tf. variables.tfvars will have the initializing values for these variables. You can also initialize the variables directly in variables.tf or even on the command line, if you’d prefer. We do it this way because it makes updating variables slightly easier and our project simpler, in a sense. output.tf defines what values will be printed to the console after we run the project.
Next, create some templates within the templates directory.
touch {./templates/ansible.tmpl,./templates/playbook.tmpl,./templates/hosts}main.tf
Copy the following code into main.tf:
terraform {
  required_providers {
    linode = {
      source  = "linode/linode"
      version = "1.27.0"
    }
  }
}

# Configure the Linode Provider
provider "linode" {
  token = var.token
}

# Create a Linode
resource "linode_instance" "bugbountybox" {
  image     = var.image
  label     = var.label
  region    = var.region
  type      = var.type
  root_pass = var.root_pass
}

# Create an Ansible playbook from a template file
resource "local_file" "bugbountybox_setup" {
  content = templatefile("./templates/playbook.tmpl",
    {
      ip_address = linode_instance.bugbountybox.ip_address
    }
  )
  file_permission = "0640"
  filename        = "../ansible/playbook.yml"
}

# Create an Ansible config from a template file.
resource "local_file" "ansible_config" {
  content = templatefile("./templates/ansible.tmpl",
    {
      remote_user = "root"
    }
  )
  file_permission = "0640"
  filename        = "../ansible/ansible.cfg"
}

# Create an Ansible playbook from a template file
resource "local_file" "ansible_inventory" {
  content         = linode_instance.bugbountybox.ip_address
  file_permission = "0640"
  filename        = "../ansible/hosts"
}
variables.tf
Copy the following code into variables.tf:
variable "token" {
  type        = string
  description = "Linode APIv4 token."
  sensitive   = true
}

variable "image" {
  type        = string
  description = "Image to use for your VM."
  default     = "linode/ubuntu20.04"
}

variable "label" {
  type        = string
  description = "Label to give your VM."
}

variable "region" {
  type        = string
  description = "Region where the VM will be created."
}

variable "root_pass" {
  type        = string
  description = "Password for the root account on this VM."
  sensitive   = true
}

variable "type" {
  description = "Your Linode's plan type."
  # You can initialize variables here instead of the tfvars file.
  default = "g6-standard-1"
}
variables.tfvars
Copy the following code into variables.tfvars, and enter the values as needed:
token     = "" # put your API token here.
image     = "linode/ubuntu20.04"
label     = "bug-bounty-box"
region    = "us-east"
root_pass = "" # put your new VM's password here.
output.tf
Copy the following code into output.tf:
output "IP_Address" {
  value = linode_instance.bugbountybox.ip_address
}
Templates
The templates will be used by Terraform to create files that Ansible will use. We could manually create/edit these Ansible files, but why do things manually when we can automate it?
Copy the following code into ansible.tmpl:
[defaults]
host_key_checking = False
remote_user = ${ remote_user }
ask_pass      = True
Copy the following code into playbook.tmpl:
---
- name: Update/upgrade and install packages on remote server.
  hosts: ${ ip_address }
  become: true
  tasks:
    - name: Update
      apt: update_cache=yes force_apt_get=yes cache_valid_time=3600

    - name: Upgrade all packages on servers
      apt: upgrade=dist force_apt_get=yes

    - name: Install packages
      apt:
        pkg:
          - ca-certificates
          - curl
          - apt-transport-https
          - lsb-release
          - gnupg
          - software-properties-common
          - python3-pip
          - unzip
          - tar
          - tmux
          - gobuster
          - wireguard
          - wireguard-tools
          - john
          - hashcat
          - nikto
          - ruby-full
          - ruby-railties
          - hydra
          - cewl
          - whois
          - squid
          - nmap
          - git
          - python3-impacket

        update_cache: true

    - name: Install Golang
      shell: |
        wget https://go.dev/dl/go1.18.linux-amd64.tar.gz
        tar -xvf go1.18.linux-amd64.tar.gz
        chown -R root:root ./go
        mv go /usr/local
        echo "export GOPATH=$HOME/go" >> $HOME/.bashrc
        echo "export PATH=$PATH:/usr/local/go/bin:$GOPATH/bin" >> $HOME/.bashrc
      args:
        executable: /bin/bash

    - name: Install Amass
      shell: |
        curl -s https://api.github.com/repos/OWASP/Amass/releases/latest | grep "browser_download_url.*linux_amd64.zip" | cut -d : -f 2,3 | tr -d \" | wget -i -
        unzip amass*
        chmod +x ./amass_linux_amd64/amass
        mv ./amass_linux_amd64/amass /usr/bin/
      args:
        executable: /bin/bash

    - name: Install Nuclei
      shell: |
        curl -s https://api.github.com/repos/projectdiscovery/nuclei/releases/latest | grep "browser_download_url.*linux_amd64.zip" | cut -d : -f 2,3 | tr -d \" | wget -i -
        unzip nuclei* nuclei
        chmod +x nuclei
        mv nuclei /usr/bin/
      args:
        executable: /bin/bash

    - name: Install FFUF
      shell: |
        curl -s https://api.github.com/repos/ffuf/ffuf/releases/latest | grep "browser_download_url.*linux_amd64.tar.gz" | cut -d : -f 2,3 | tr -d \" | wget -i -
        tar xzf ffuf* ffuf
        chmod +x ffuf
        mv ffuf /usr/bin/
      args:
        executable: /bin/bash

    - name: Install Subfinder
      shell: |
        curl -s https://api.github.com/repos/projectdiscovery/subfinder/releases/latest | grep "browser_download_url.*linux_amd64.zip" | cut -d : -f 2,3 | tr -d \" | wget -i -
        unzip subfinder* subfinder
        chmod +x subfinder
        mv subfinder /usr/bin/
      args:
        executable: /bin/bash

    - name: Install Aquatone
      shell: |
        curl -s https://api.github.com/repos/michenriksen/aquatone/releases/latest | grep "browser_download_url.*linux_amd64-*" | cut -d : -f 2,3 | tr -d \" | wget -i -
        unzip aquatone* aquatone
        chmod +x aquatone
        mv aquatone /usr/bin
      args:
        executable: /bin/bash

    - name: Install getallurls (gau)
      shell: |
        curl -s https://api.github.com/repos/lc/gau/releases/latest | grep "browser_download_url.*linux_amd64.tar.gz" | cut -d : -f 2,3 | tr -d \" | wget -i -
        tar xzf gau* gau
        chmod +x gau
        mv gau /usr/bin
      args:
        executable: /bin/bash

    - name: Install CrackMapExec
      shell: |
        wget https://github.com/byt3bl33d3r/CrackMapExec/releases/download/v5.2.2/cme-ubuntu-latest.zip
        unzip cme-ubuntu-latest.zip -d "$HOME/tools/*"
        pip3 install cffi==1.14.5
      args:
        executable: /bin/bash

    - name: Reboot the box
      reboot:
        msg: "Reboot initiated by Ansible for updates"
        connect_timeout: 5
        reboot_timeout: 300
        pre_reboot_delay: 0
        post_reboot_delay: 30
        test_command: uptime
If you take a close look at these templates, you’ll see variables indicated with the following templating syntax:
${ variable_name }These are “filled in” during the terraform apply process. We only have a single variable in each of these files, but you can use as many as you’d like depending on what you’re trying to accomplish. This is a very powerful feature. It allows you to dynamically create files to be used in other processes – in our case, Ansible.
It’s Alive!
We are ready to create our infrastructure by running the following commands within the terraform directory. Type “yes” when prompted after the apply command.
$ terraform init

$ terraform fmt

$ terraform validate

$ terraform apply -var-file="./variables.tfvars"
The terraform init command initializes the project directory. terraform fmt formats the files to the canonical style. terraform validate validates the project to ensure it will work properly. Finally, terraform apply creates your infrastructure using the tfvars file you specified.
If everything goes as planned, you should see output similar to this.
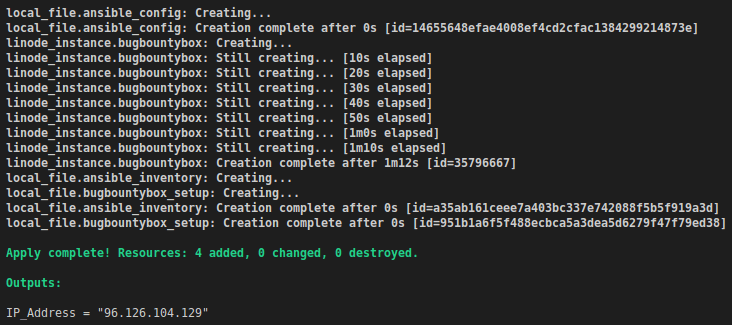
As you can see, the IP address of our VM was present in the output as we specified in outputs.tf.
Ansible
During the infrastructure creation process, several files should have been created in the ansible directory. Ansible will use these files update/upgrade and install packages on our VM. From the ansible directory we run the following command to configure our new VM. At the start, you will be prompted for the SSH password that you used in your tfvars file.
$ ansible-playbook -i hosts playbook.ymlWe need to specify the hosts file that Terraform created so Ansible doesn’t use the hosts file located in /etc/ansible.
This process will take a few minutes to complete, but if all went as planned, you should see something similar to this on your terminal.

Tear it Down
When you are all done playing around with your new VM, you can destroy it with the following command. Please remember to destroy it or else you will incur costs. Type “yes” when prompted.
$ terraform destroy -var-file="./variables.tfvars"What’s Next?
Now, play around with the above project. Can you set it up to deploy multiple VMs? Can you set it up to deploy multiple VMs, install some other packages, run some commands and send the output of those commands to a database somewhere? Can you set this up on multiple clouds?
The example here is pretty basic, and doesn’t necessarily follow best practices (especially with Ansible), but it gives you the idea of what can be done with automation. Some, if not all, of the leading bug bounty hunters are at least partially automating their work. You should automate too.
Feel free to download all this code from my github and don’t forget to use my link to sign up for a Linode account.
Links
Here are some links to more information and documentation that is pertinent to this article, including a link to this code on Github.
https://www.github.com/pizza-power/bugbountyboxautomation
https://www.linode.com/docs/guides/how-to-build-your-infrastructure-using-terraform-and-linode/
https://registry.terraform.io/providers/linode/linode/latest/docs