I updated this post to add in prowlarr support. But here is the updated docker-compose.yml.
version: '3.8'
services:
pms-docker:
container_name: plex
network_mode: host
hostname: plex
runtime: nvidia
environment:
- TZ=America/New_York
- PLEX_UID=1000
- PLEX_GID=1000
- PLEX_CLAIM=<your claim here>
- ADVERTISE_IP= #ip:port here e.g. http://127.0.0.1:32400
- NVIDIA_VISIBLE_DEVICES=GPU-04aeacae-0ae1-25b6-1504-a4bec4ed2da9 #change as needed
- NVIDIA_DRIVER_CAPABILITIES=compute,video,utility
volumes:
- /var/docker/plex/config:/config
- /var/docker/plex/transcode:/transcode
- /home/user/data/television:/data/tvshows
- /home/user/data/movies:/data/movies
- /home/user/data/music:/data/music
restart: unless-stopped
devices:
- /dev/dri/card0:/dev/dri/card0 #your devices go here
- /dev/dri/renderD128:/dev/dri/renderD128 #may be different
image: plexinc/pms-docker:plexpass
arch-qbittorrentvpn:
container_name: qbittorrentvpn
hostname: qbittorrentvpn
cap_add:
- NET_ADMIN
ports:
- '6881:6881'
- '6881:6881/udp'
- '6969:6969'
- '8118:8118'
container_name: qbittorrentvpn
restart: unless-stopped
volumes:
- '/home/user/data2/data:/data'
- '/home/user/data2/config:/config'
- '/etc/localtime:/etc/localtime:ro'
environment:
- VPN_ENABLED=yes
- VPN_USER= #put your PIA username here
- VPN_PASS= #put your PIA password here
- VPN_PROV=pia
- VPN_CLIENT=openvpn
- STRICT_PORT_FORWARD=yes
- ENABLE_PRIVOXY=yes
- LAN_NETWORK=192.168.1.0/24 #possibly different
- 'NAME_SERVERS=209.222.18.222,84.200.69.80,37.235.1.174,1.1.1.1,209.222.18.218,37.235.1.177,84.200.70.40,1.0.0.1'
- VPN_INPUT_PORTS=1234
- VPN_OUTPUT_PORTS=5678
- DEBUG=false
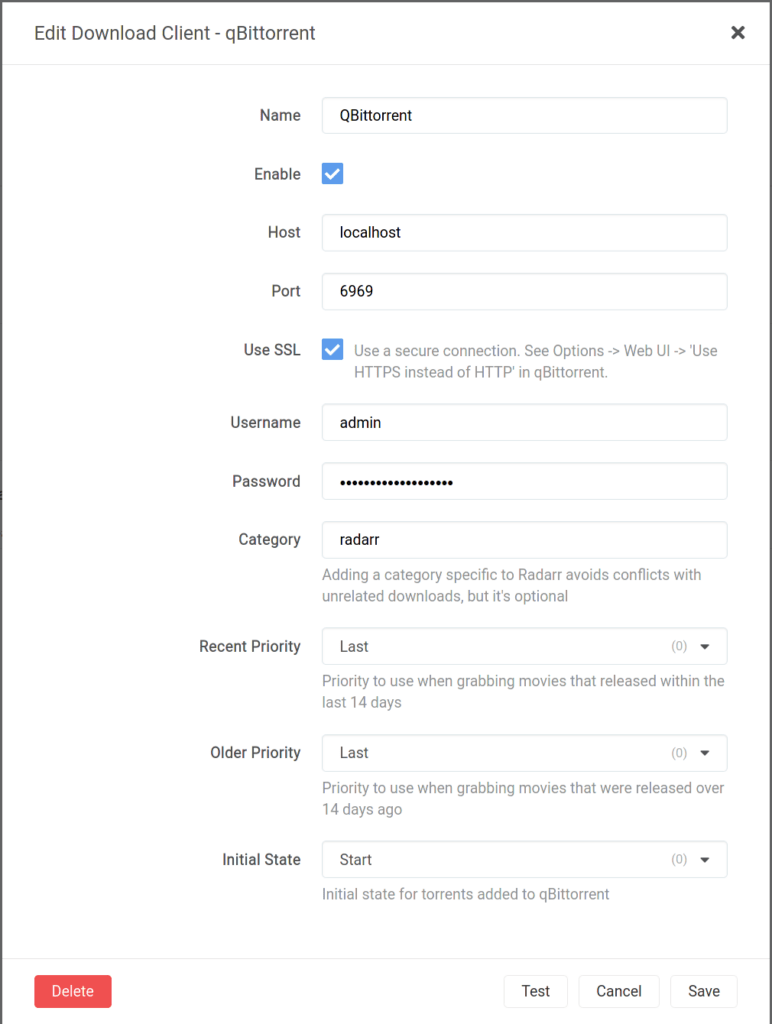
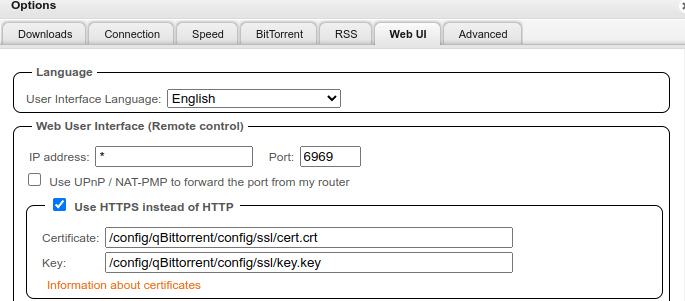
- WEBUI_PORT=6969 #not the default change in webui
- UMASK=000
- PUID=1000
- PGID=1000
sysctls:
- net.ipv6.conf.all.disable_ipv6=1
image: binhex/arch-qbittorrentvpn
jackett:
image: ghcr.io/linuxserver/jackett
container_name: jackett
environment:
- PUID=1000
- PGID=1000
- TZ=America/New_York
- AUTO_UPDATE=true
- RUN_OPTS=<run options here>
volumes:
- /home/user/data2/jackett/config:/config
- /home/user/data2/data:/downloads
network_mode: host #9117
restart: unless-stopped
radarr:
image: ghcr.io/linuxserver/radarr
container_name: radarr
environment:
- PUID=1000
- PGID=1000
- TZ=America/New_York
volumes:
- /home/user/data2/radarr:/config
- /home/user/data/movies:/movies
- /home/user/data2/data:/downloads
network_mode: host #7878
restart: unless-stopped
sonarr:
image: ghcr.io/linuxserver/sonarr
container_name: sonarr
environment:
- PUID=1000
- PGID=1000
- TZ=America/New_York
volumes:
- /home/user/data2/sonarr:/config
- /home/user/data/television:/tv
- /home/user/data2/data:/downloads
network_mode: host #8989
restart: unless-stopped
lidarr:
image: ghcr.io/linuxserver/lidarr
container_name: lidarr
environment:
- PUID=1000
- PGID=1000
- TZ=America/New_York
volumes:
- /home/user/data2/lidarr:/config
- /home/user/data/music:/music
- /home/user/data2/data:/downloads
network_mode: host #8686:8686
restart: unless-stopped
prowlarr:
image: lscr.io/linuxserver/prowlarr:develop
container_name: prowlarr
environment:
- PUID=1000
- PGID=1000
- TZ=America/New_York
# put your directories here
volumes:
- /home/user/data2/prowlarr:/config
network_mode: host #9696
restart: unless-stopped